BlueOS Documentation
Usage Integrations- Flight Controller Board
- Onboard (Companion) Computer
- Control Station (Topside) Computer
- Joystick / Gamepad
- Camera
- Electronic Speed Controllers (ESCs)
- Thrusters
- Power Sensor / Battery Monitor
- Power Supply / Battery
- Tether
- Leak Sensors
- Sonars
- Positioning Sensors (GPS / DVL)
- Other Sensors (Temperature, Salinity, Thickness, etc)
- Servos
- Ethernet (Network) Switch
- Electrical Switch
- Electronic Switches (Relays and MOSFETs)
- Grippers and Manipulators
- Indicator Lights
- Acoustic Modems
Advanced Usage
#General Information
This documentation page is for detailed information about the services and pages in the BlueOS web interface. For a higher level list and direct comparison of features see the Overview instead.
#Pirate Mode
The default BlueOS interface is simplified, and shows only the major tools that most people are likely to find useful. Full functionality is available via "Pirate Mode", which can be enabled from the header bar. Note that Pirate Mode is advanced/development mode, and should be used with care.
This documentation by default shows the full functionality interface, to provide an overview of all functionality instead of a limited subset, but if you're only interested in the basic functionality you can click the button below:
For clarity of this documentation, any pages that are extended by (or only available in) Pirate Mode are shown in dark mode, and described with grey text.
#Interface Overview
Based On: blueos-frontend | Port:80
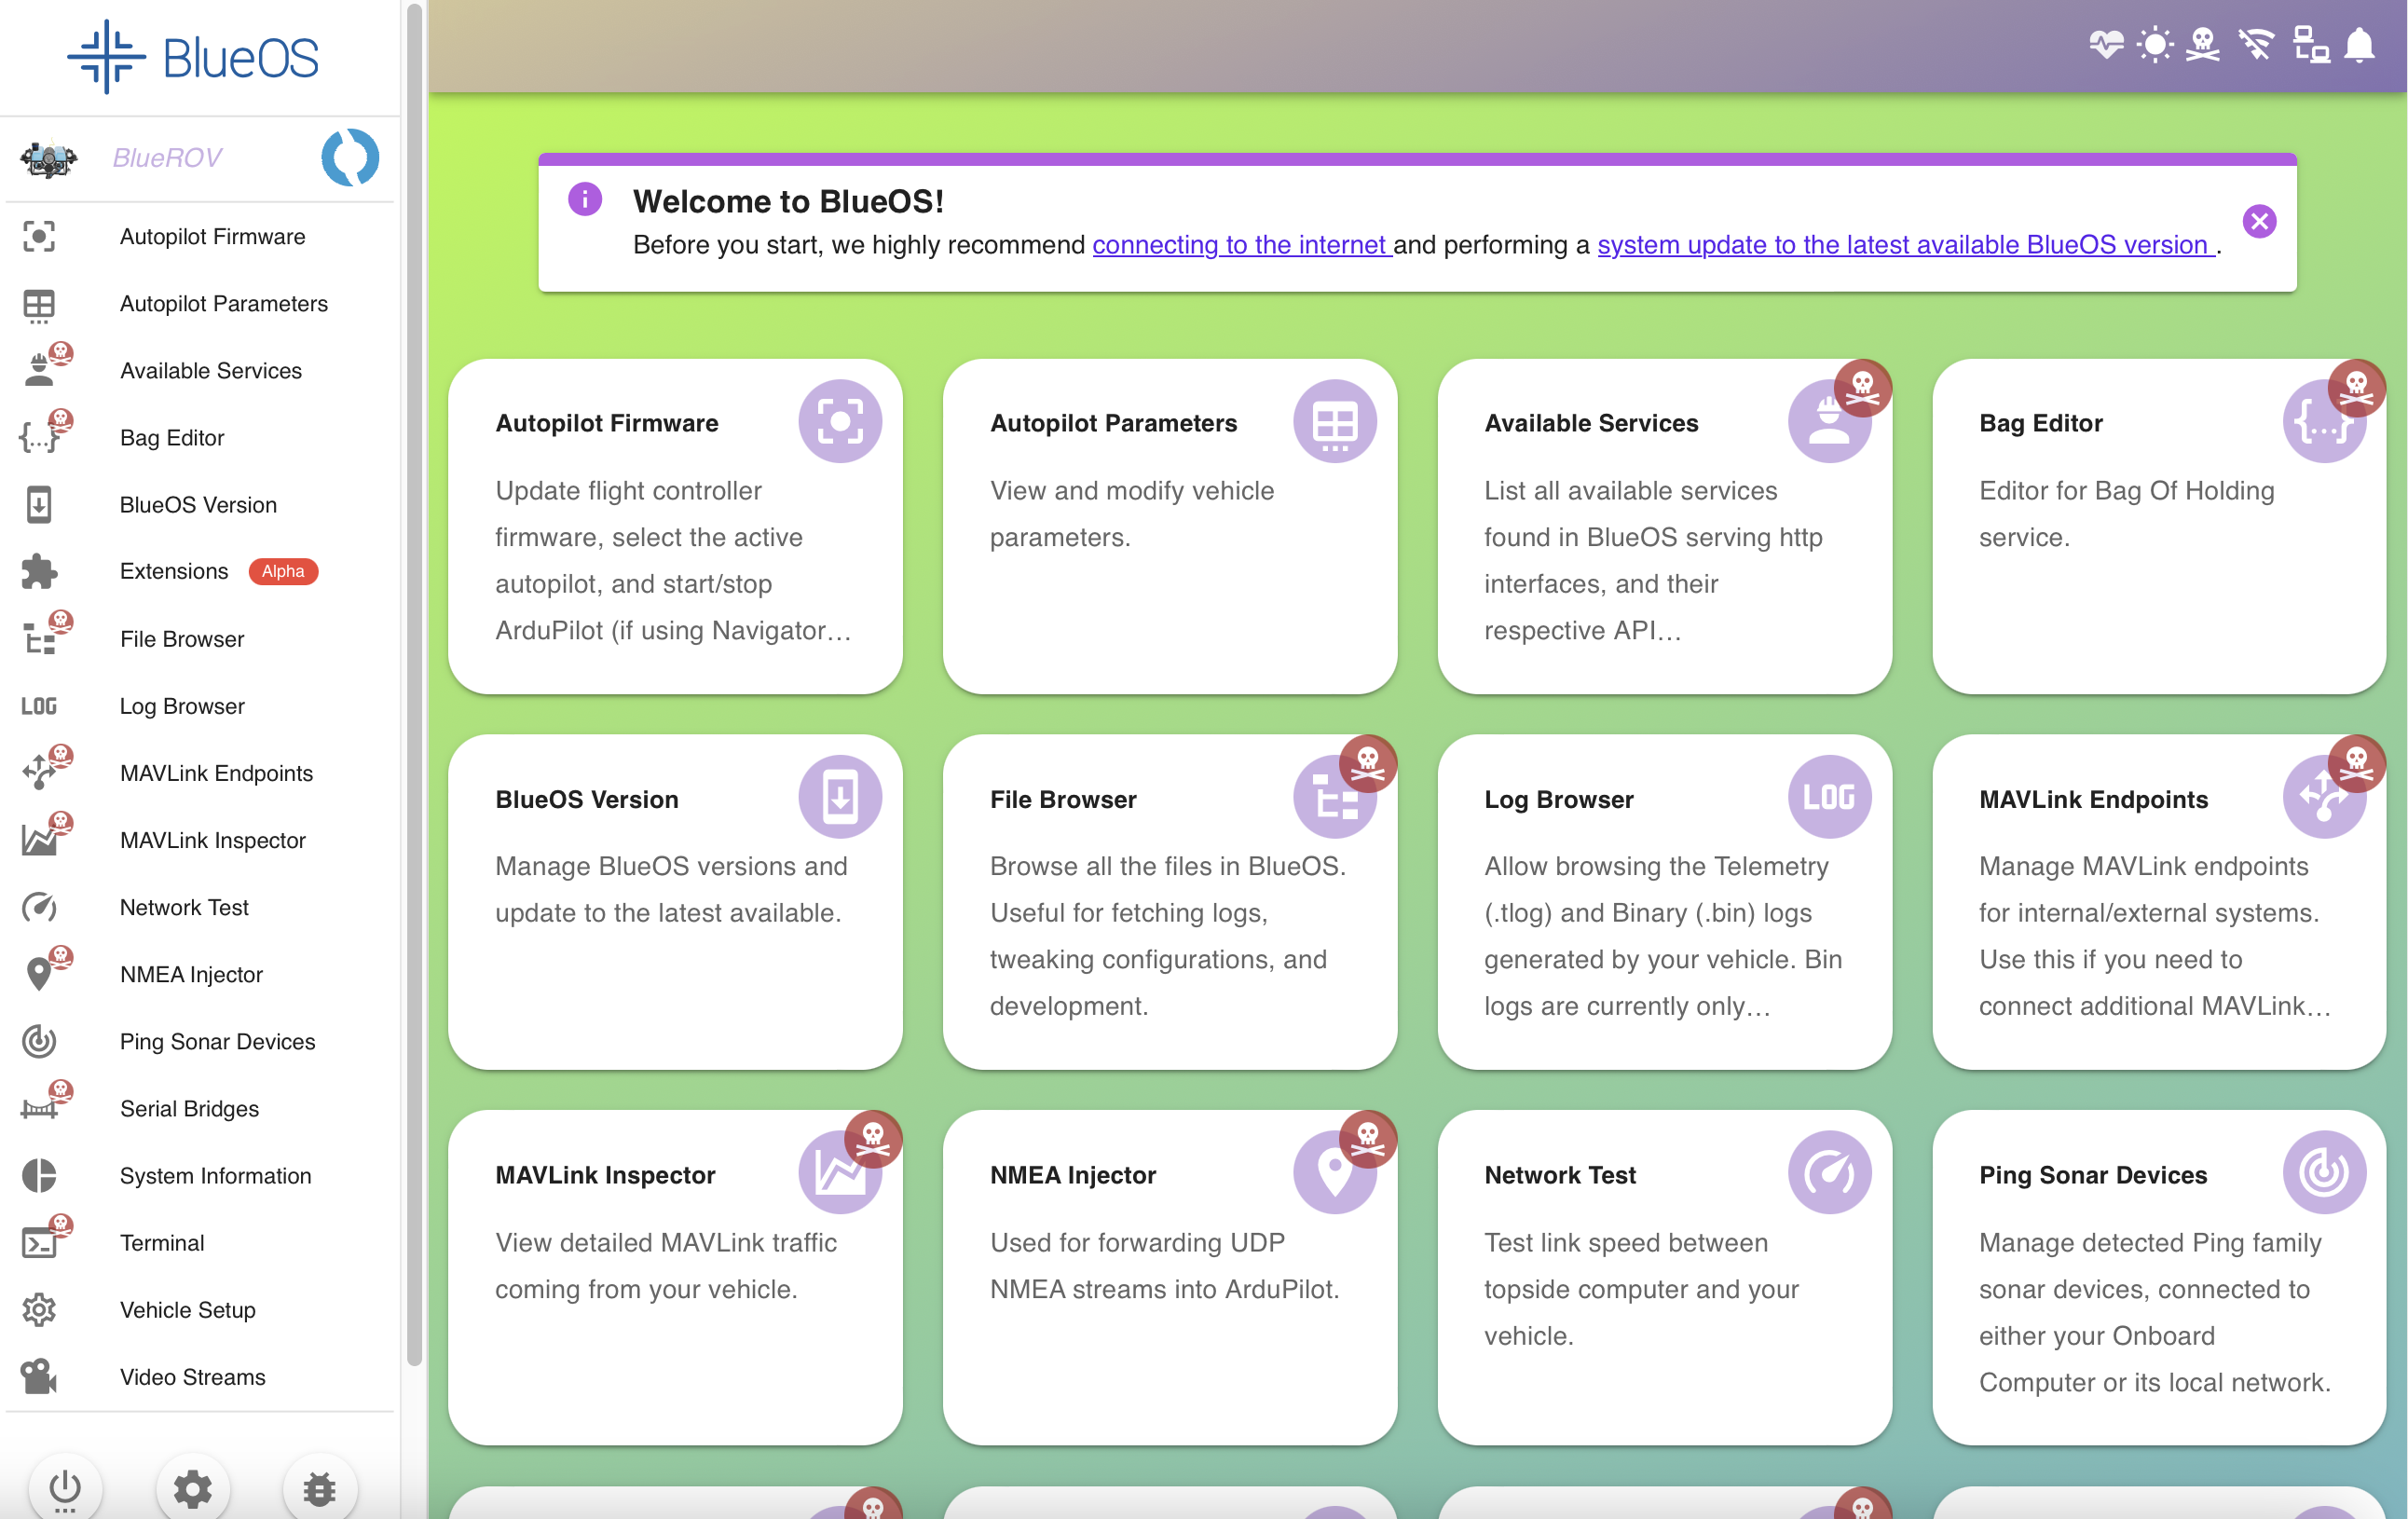
When you first open BlueOS, you'll see a window like the following:
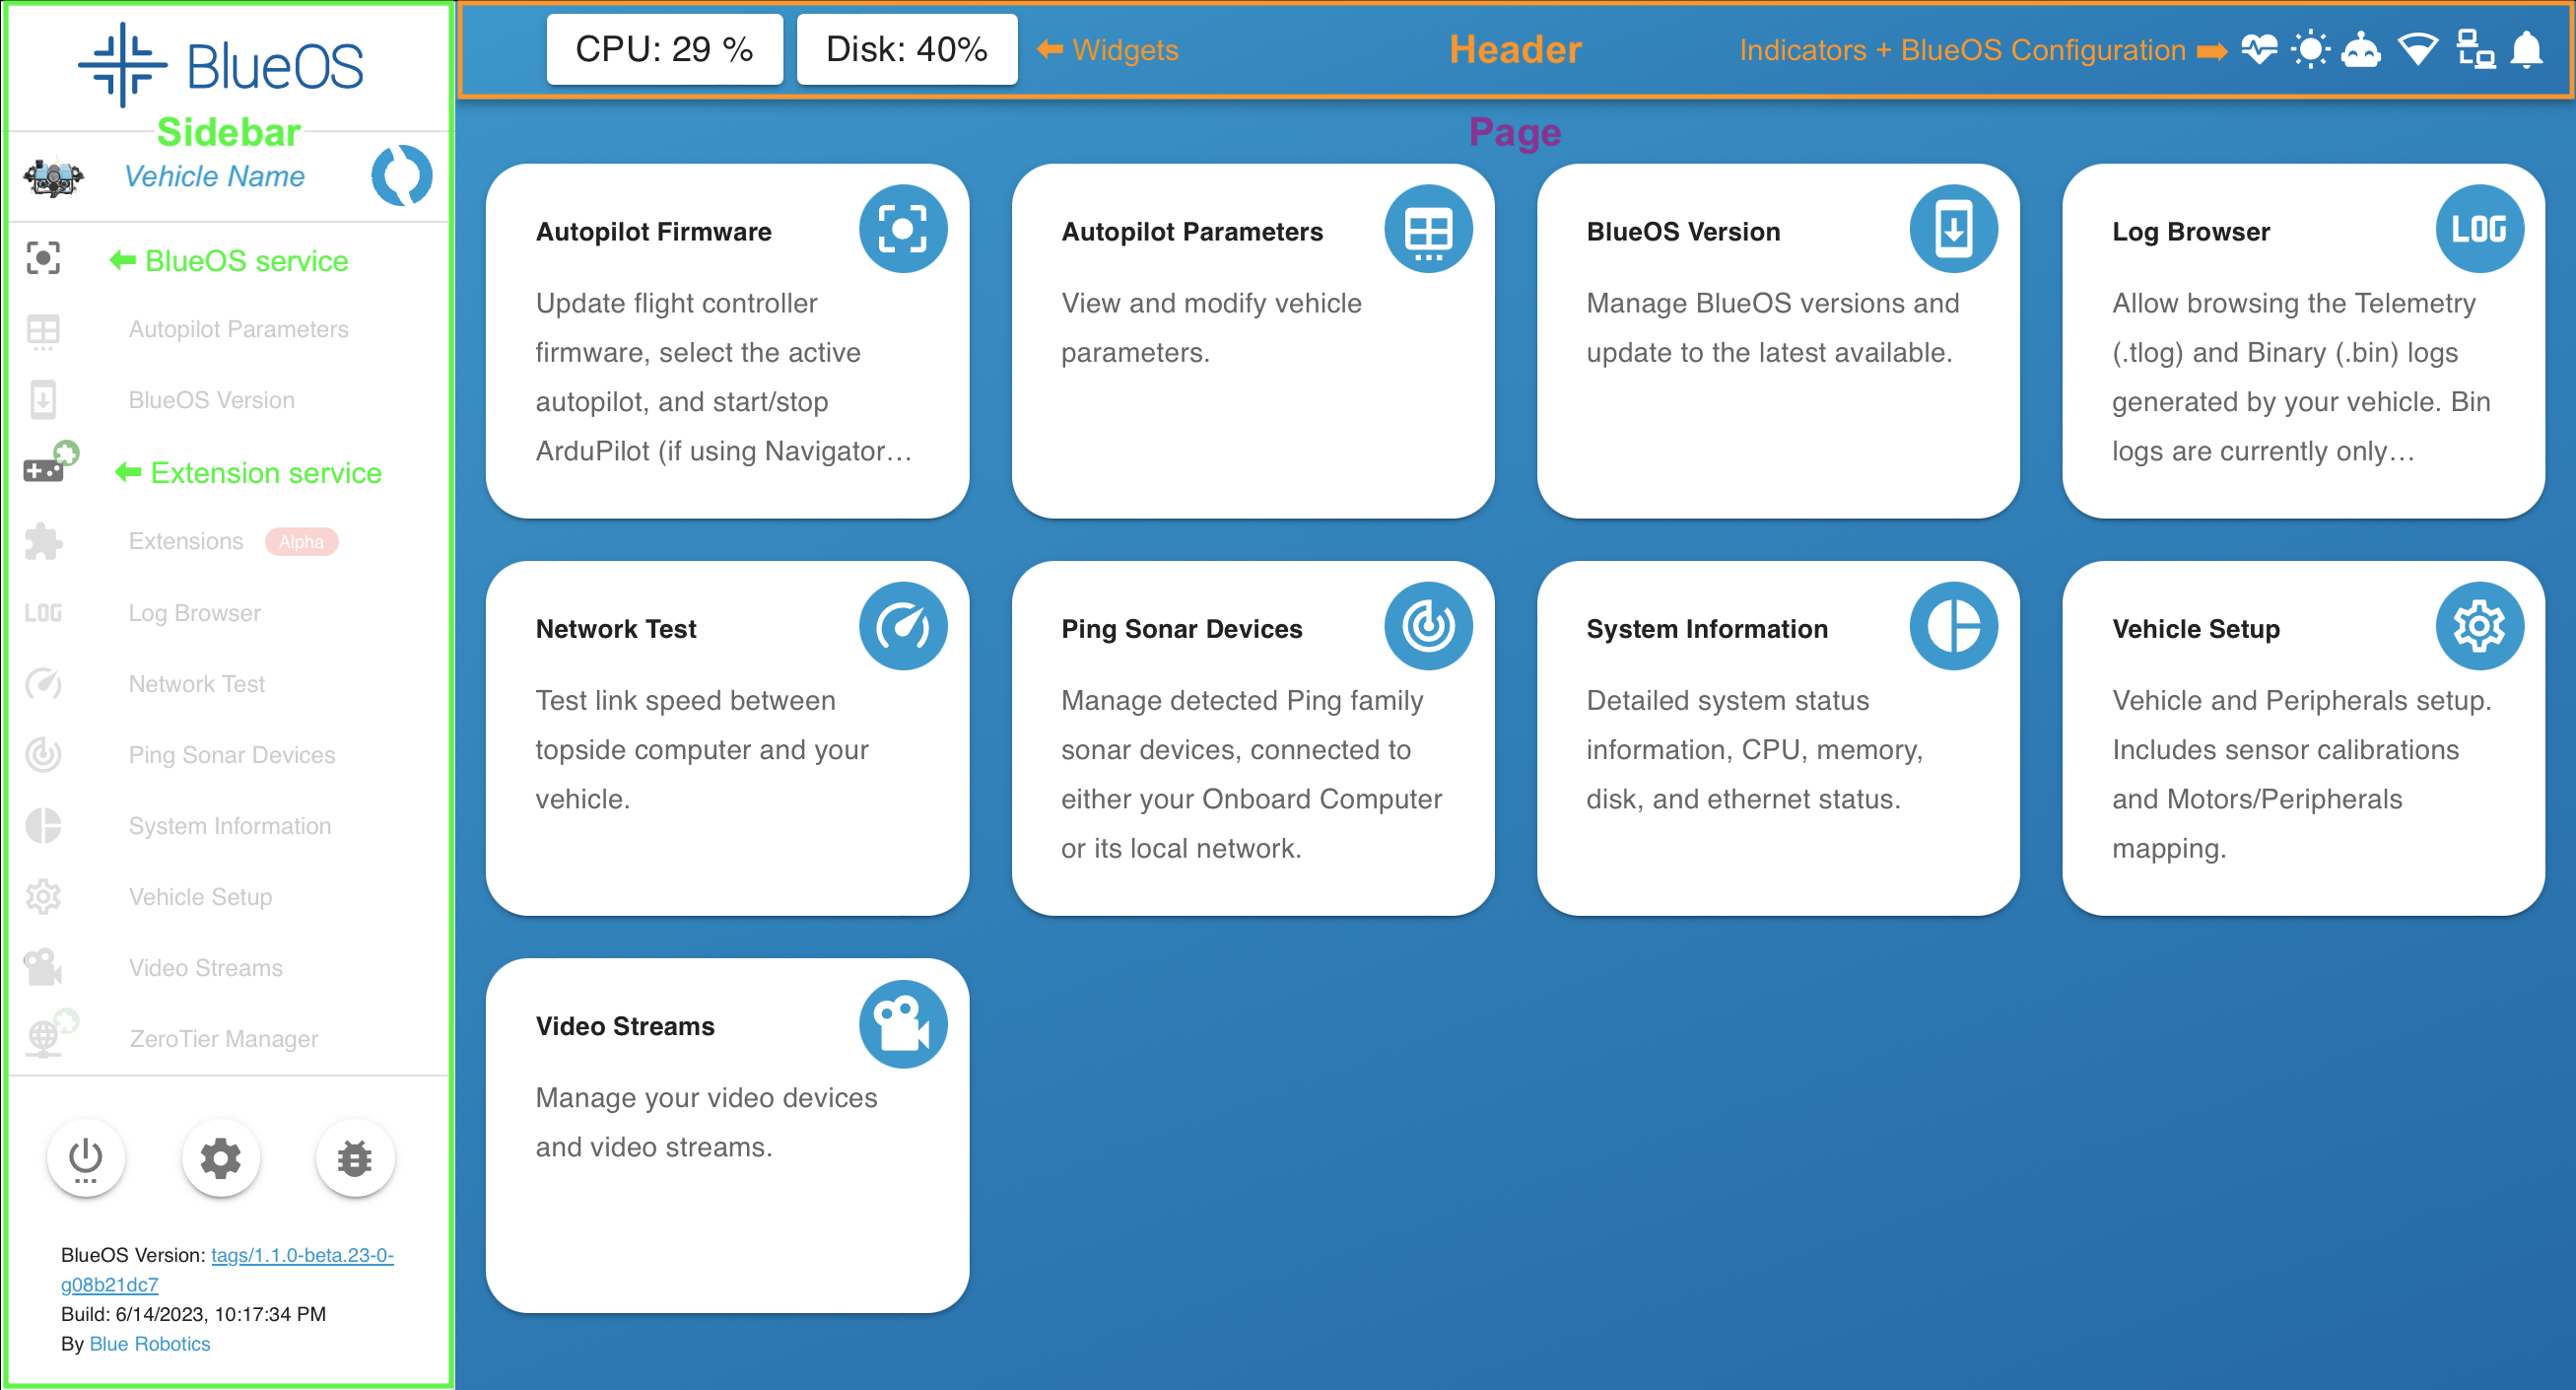
#Header: Indicators and BlueOS Configuration
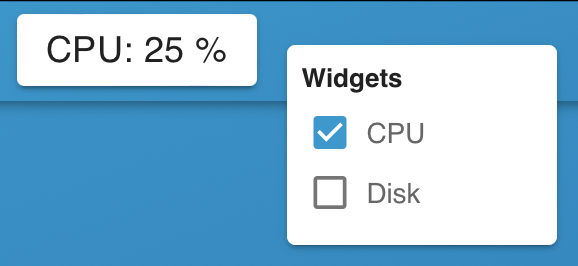
On the left side of the header there is space for widgets, which can be accessed by right clicking and selecting the desired widgets to display. Widgets can be reordered by clicking and dragging.
There are currently widgets available for displaying the CPU and Disk (storage) usage as percentages, which are periodically updated during operation.
On the right side of the header you'll find:
#Notifications
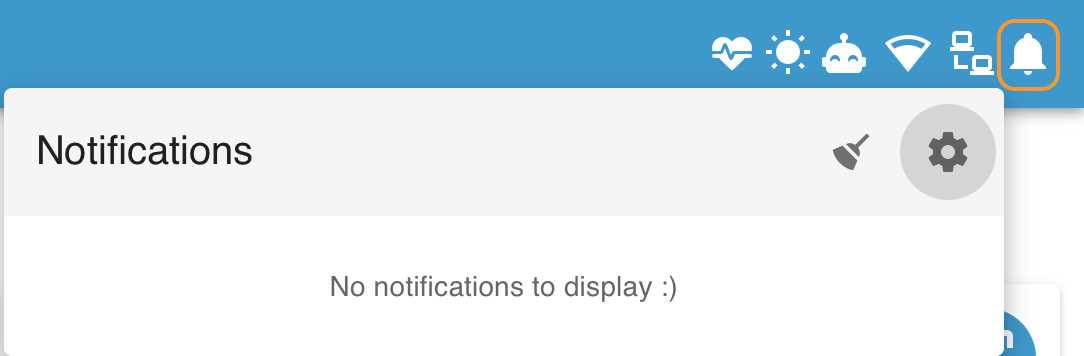
- Press the broom to clear notifications
- Press the gear to toggle showing old messages
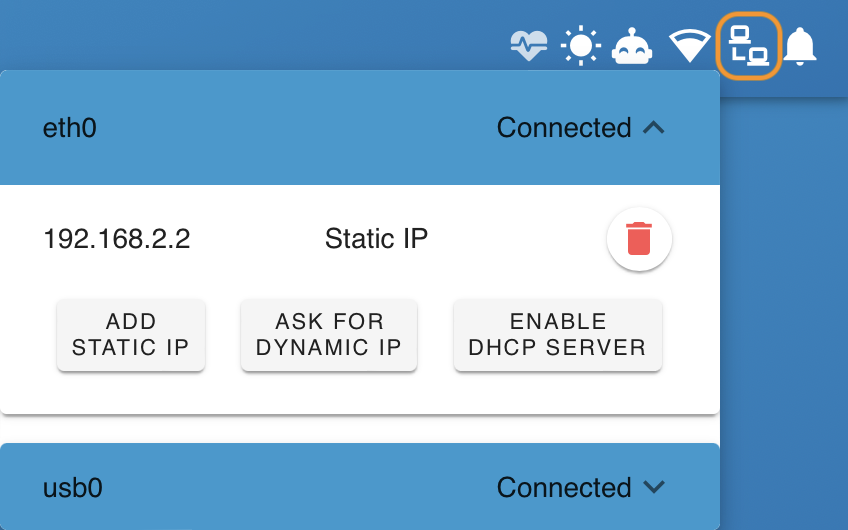
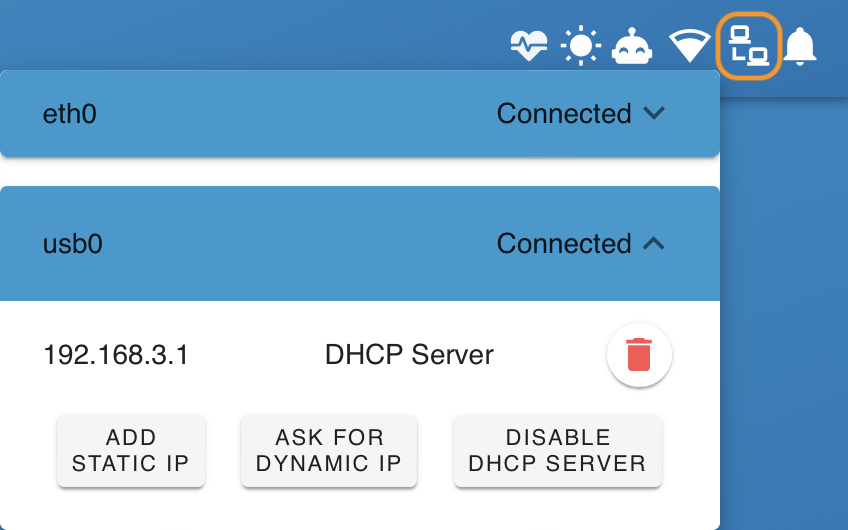
#Wired network management (ethernet / USB-OTG)
Based On: Cable Guy | Port:9090
For each interface, choose between:
- A static IP
- A dynamic IP
- A DHCP server
It is possible to have multiple connections per interface type.
#Wifi + Hotspot network management
Based On: Wifi Manager | Port:9000
- Choose a wifi network to connect to
- The BlueOS web interface is accessible via http://blueos-wifi.local when connected to the same wifi network as your device (including a mobile phone)
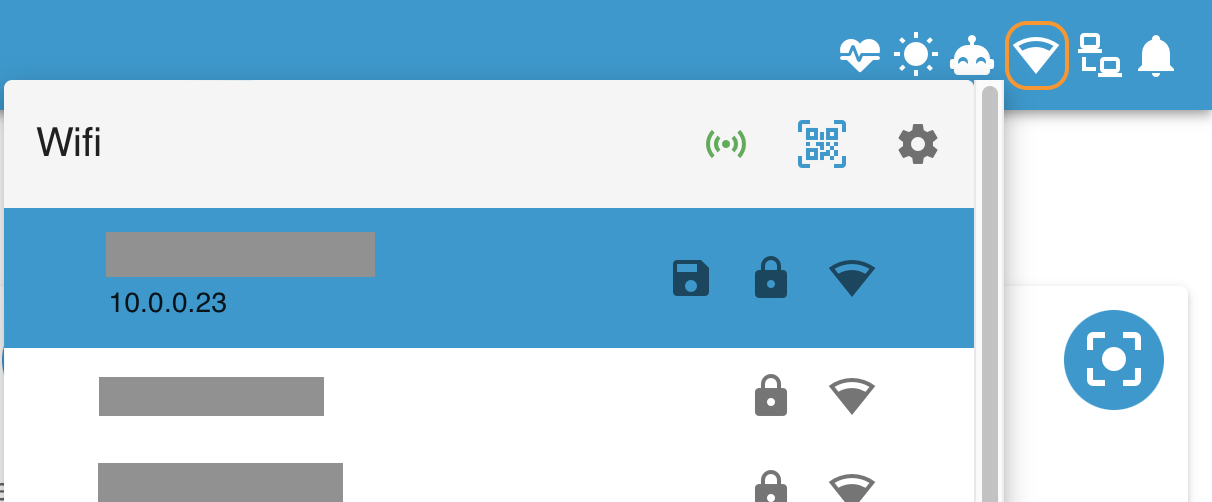
- Forget, connect to, or a force a new password for a saved network

- Configure or turn on/off the BlueOS wireless hotspot, or display a QR code to
easily connect to it from a phone
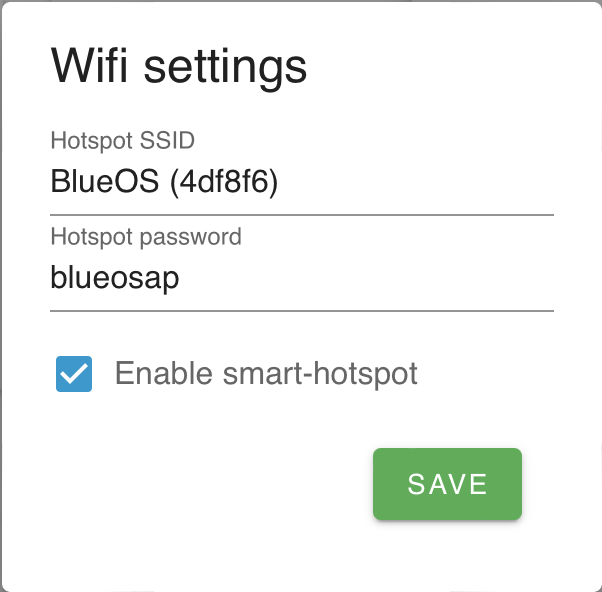
- The hotspot SSID is named
BlueOS (******)by default, where the asterisk field varies for each system- The default password for the hotspot is
blueosap
- The default password for the hotspot is
- The BlueOS web interface is accessible via http://blueos-hotspot.local and http://192.168.42.1 when your device is connected to the BlueOS hotspot network
- The hotspot SSID is named
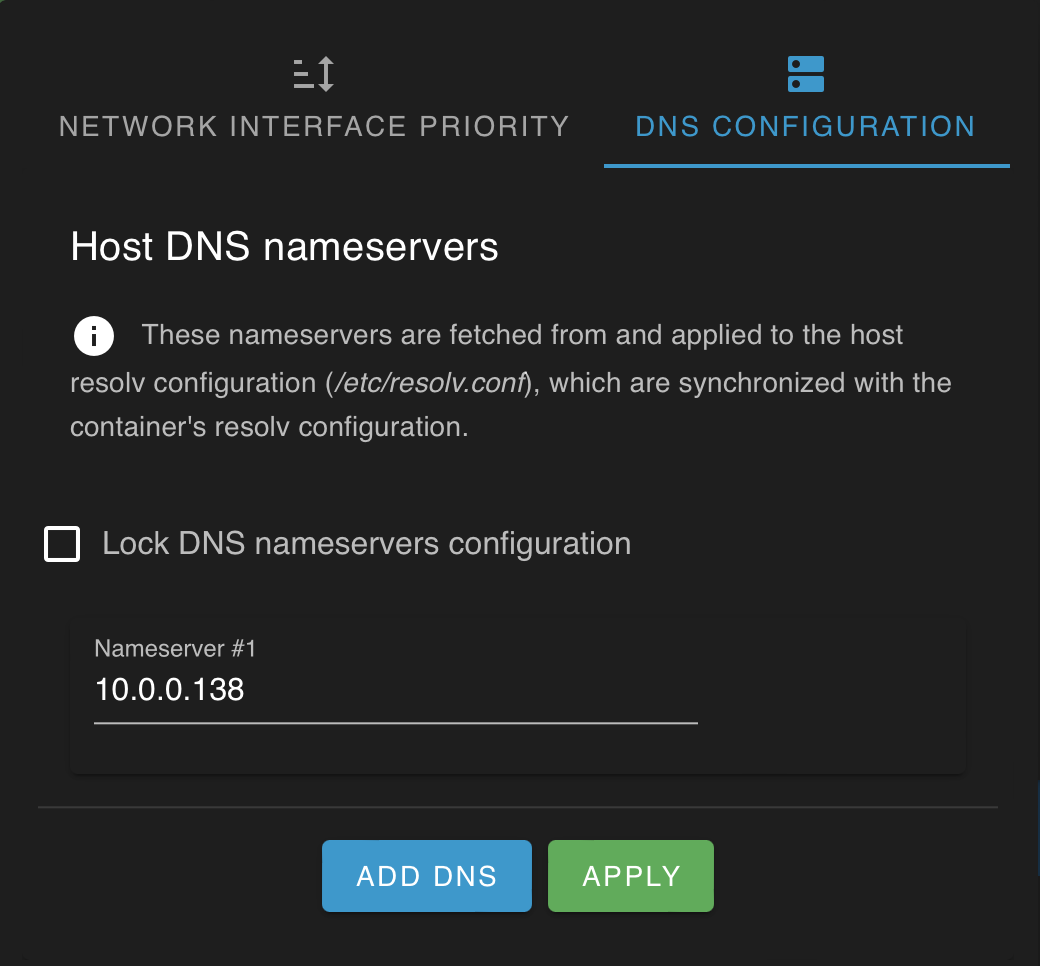
#Internet Status and Management
- See whether the vehicle is connected to the internet (updates every 20 seconds)

- Configure network priority ordering
- Determines which network interface is used for internet connection
- Generally
wlan0should be at the top (for internet via wifi) - Move
eth0to the top if using internet passthrough via the tether
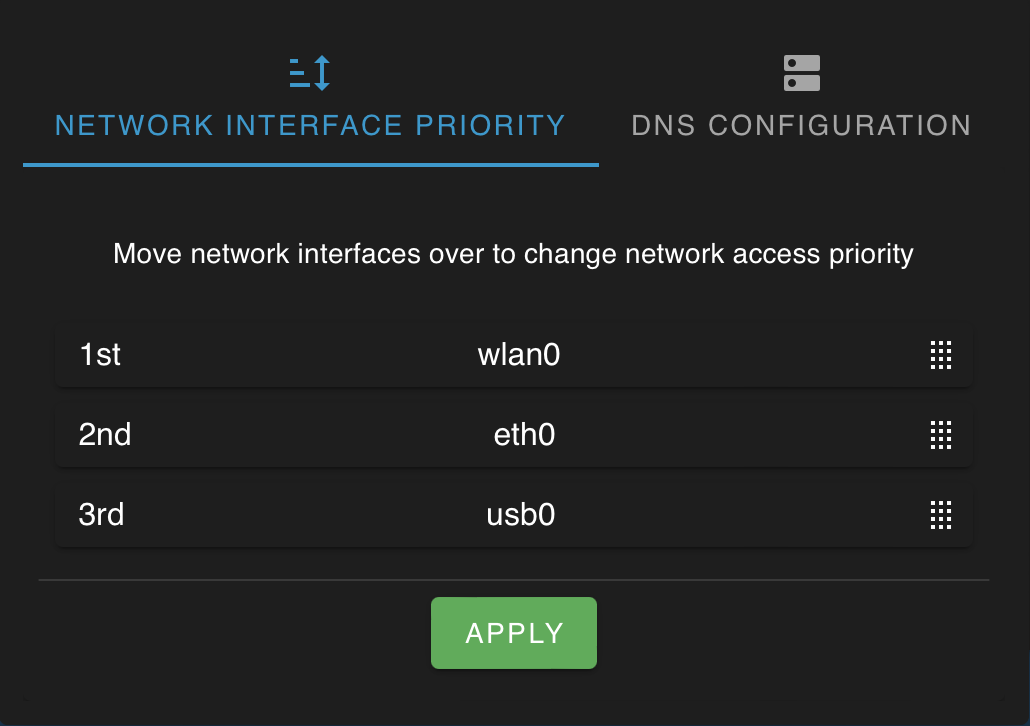
- View and configure DNS name servers
#Display Mode Management
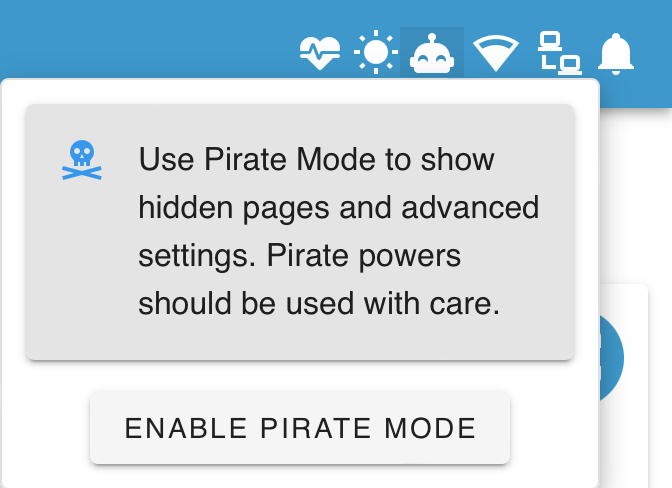
- Pirate mode can be toggled via the happy robot /
skull-and-crossbones icon
- Access or hide advanced functionality
- Advanced users only - pirate mode is not recommended for normal use
- Light and dark display modes can be toggled between with the sun / moon icon
#System status
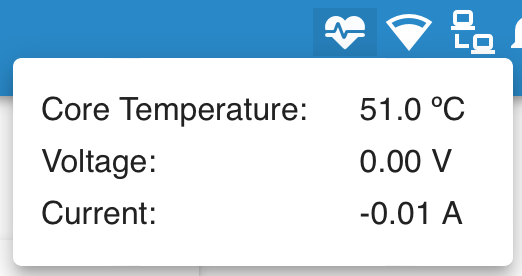
- Heartbeat icon pulses with vehicle heartbeat, and goes red if heartbeat is lost
- On click shows onboard computer temperature, voltage, and current usage
- Additional warning icons appear if a problem is detected on the onboard computer:
- High disk usage
- CPU overheating
- CPU throttling
- CPU under voltage
- Connected wirelessly (instead of through a tether)
- BlueOS cannot connect to its host computer
#Sidebar
The burger menu at the top left of the header opens up the sidebar, for conveniently accessing available pages, tools, and services. When the page is wide enough, the sidebar automatically stays open.
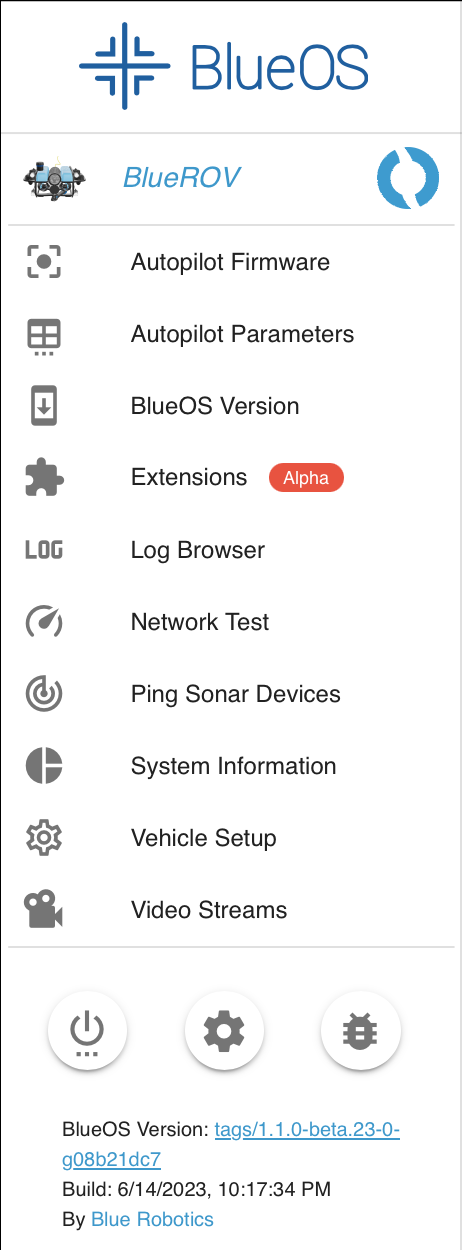
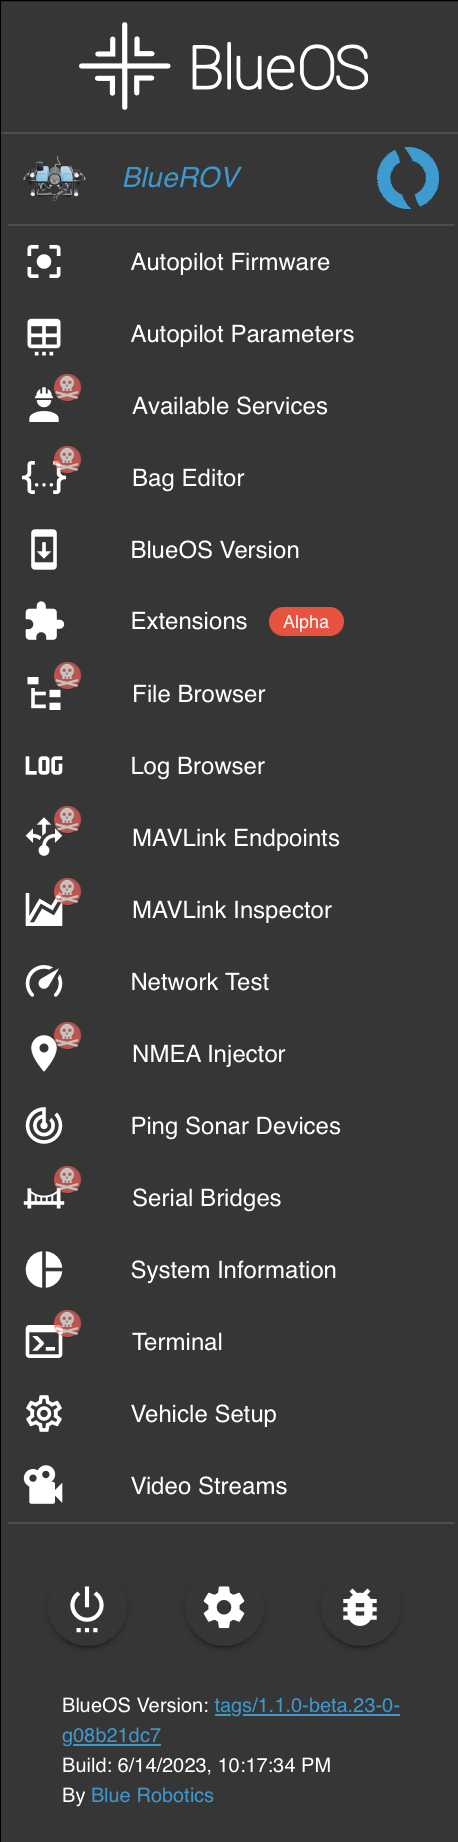
- The theme content at the top is configurable
- The development documentation specifies the requirements for a service page to appear in the sidebar
#BlueOS Settings
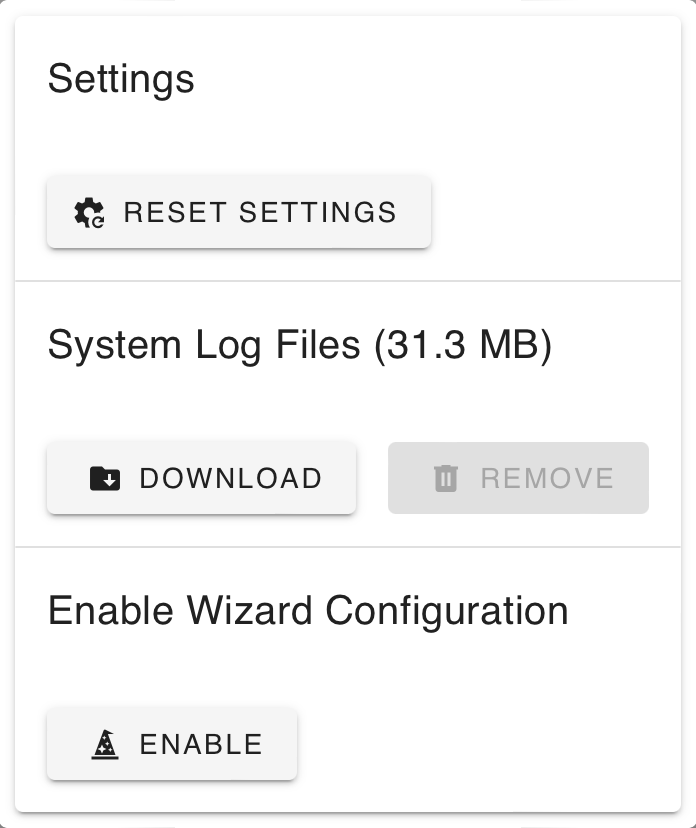
- Reset BlueOS settings
- Remove existing camera/endpoint/bridges configuration
- Remove log files from BlueOS services (to reduce space usage on the SD card)
- Download log files from BlueOS services to report a problem
- Old logs are aggregated and kept as zip files
- Re-enable the configuration wizard
#Power
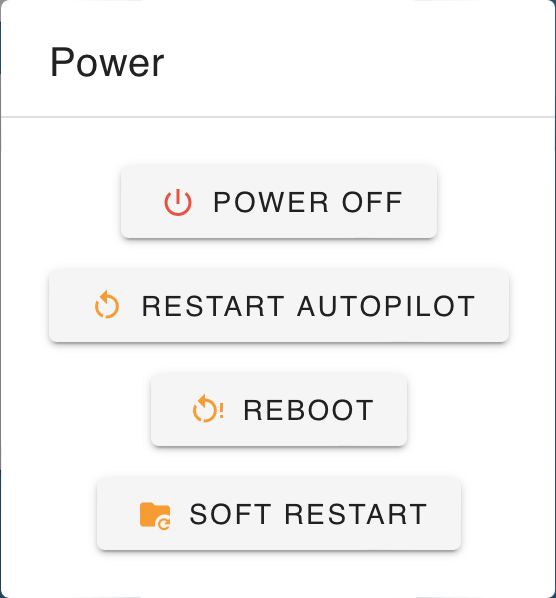
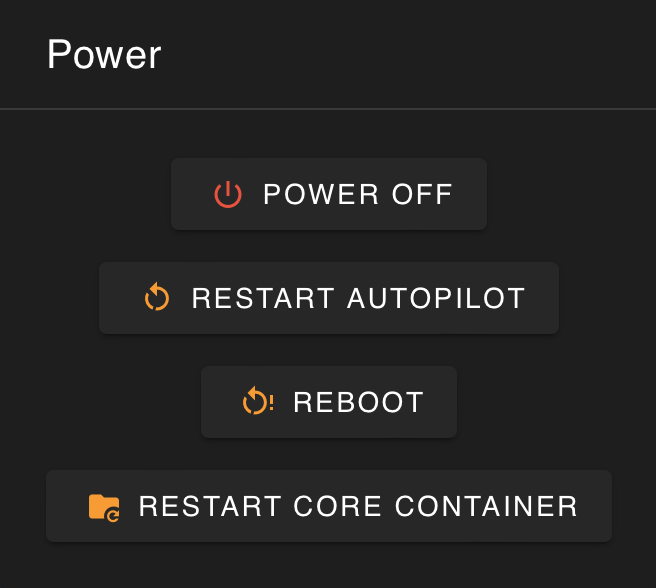
- Power off
- Shut down onboard computer
- Recommended before turning off vehicle power
- Reboot
- Reboot onboard computer
- Restart core container (same as "Soft restart")
- Restart the core BlueOS docker container
- Generally sufficient for most 'reboot' requirements
#Feedback
Submit feedback about BlueOS via:
- Issues on the GitHub repository
- allows easily tracking changes, and notification when complete/fixed
- Posts on the Blue Robotics forum
- allows easy discussion with the community
#Dashboard
The "Dashboard" page provides an overview of the available pages. In future it will provide an overview of the vehicle state and main configuration options. Click the BlueOS logo to return to the dashboard at any point.

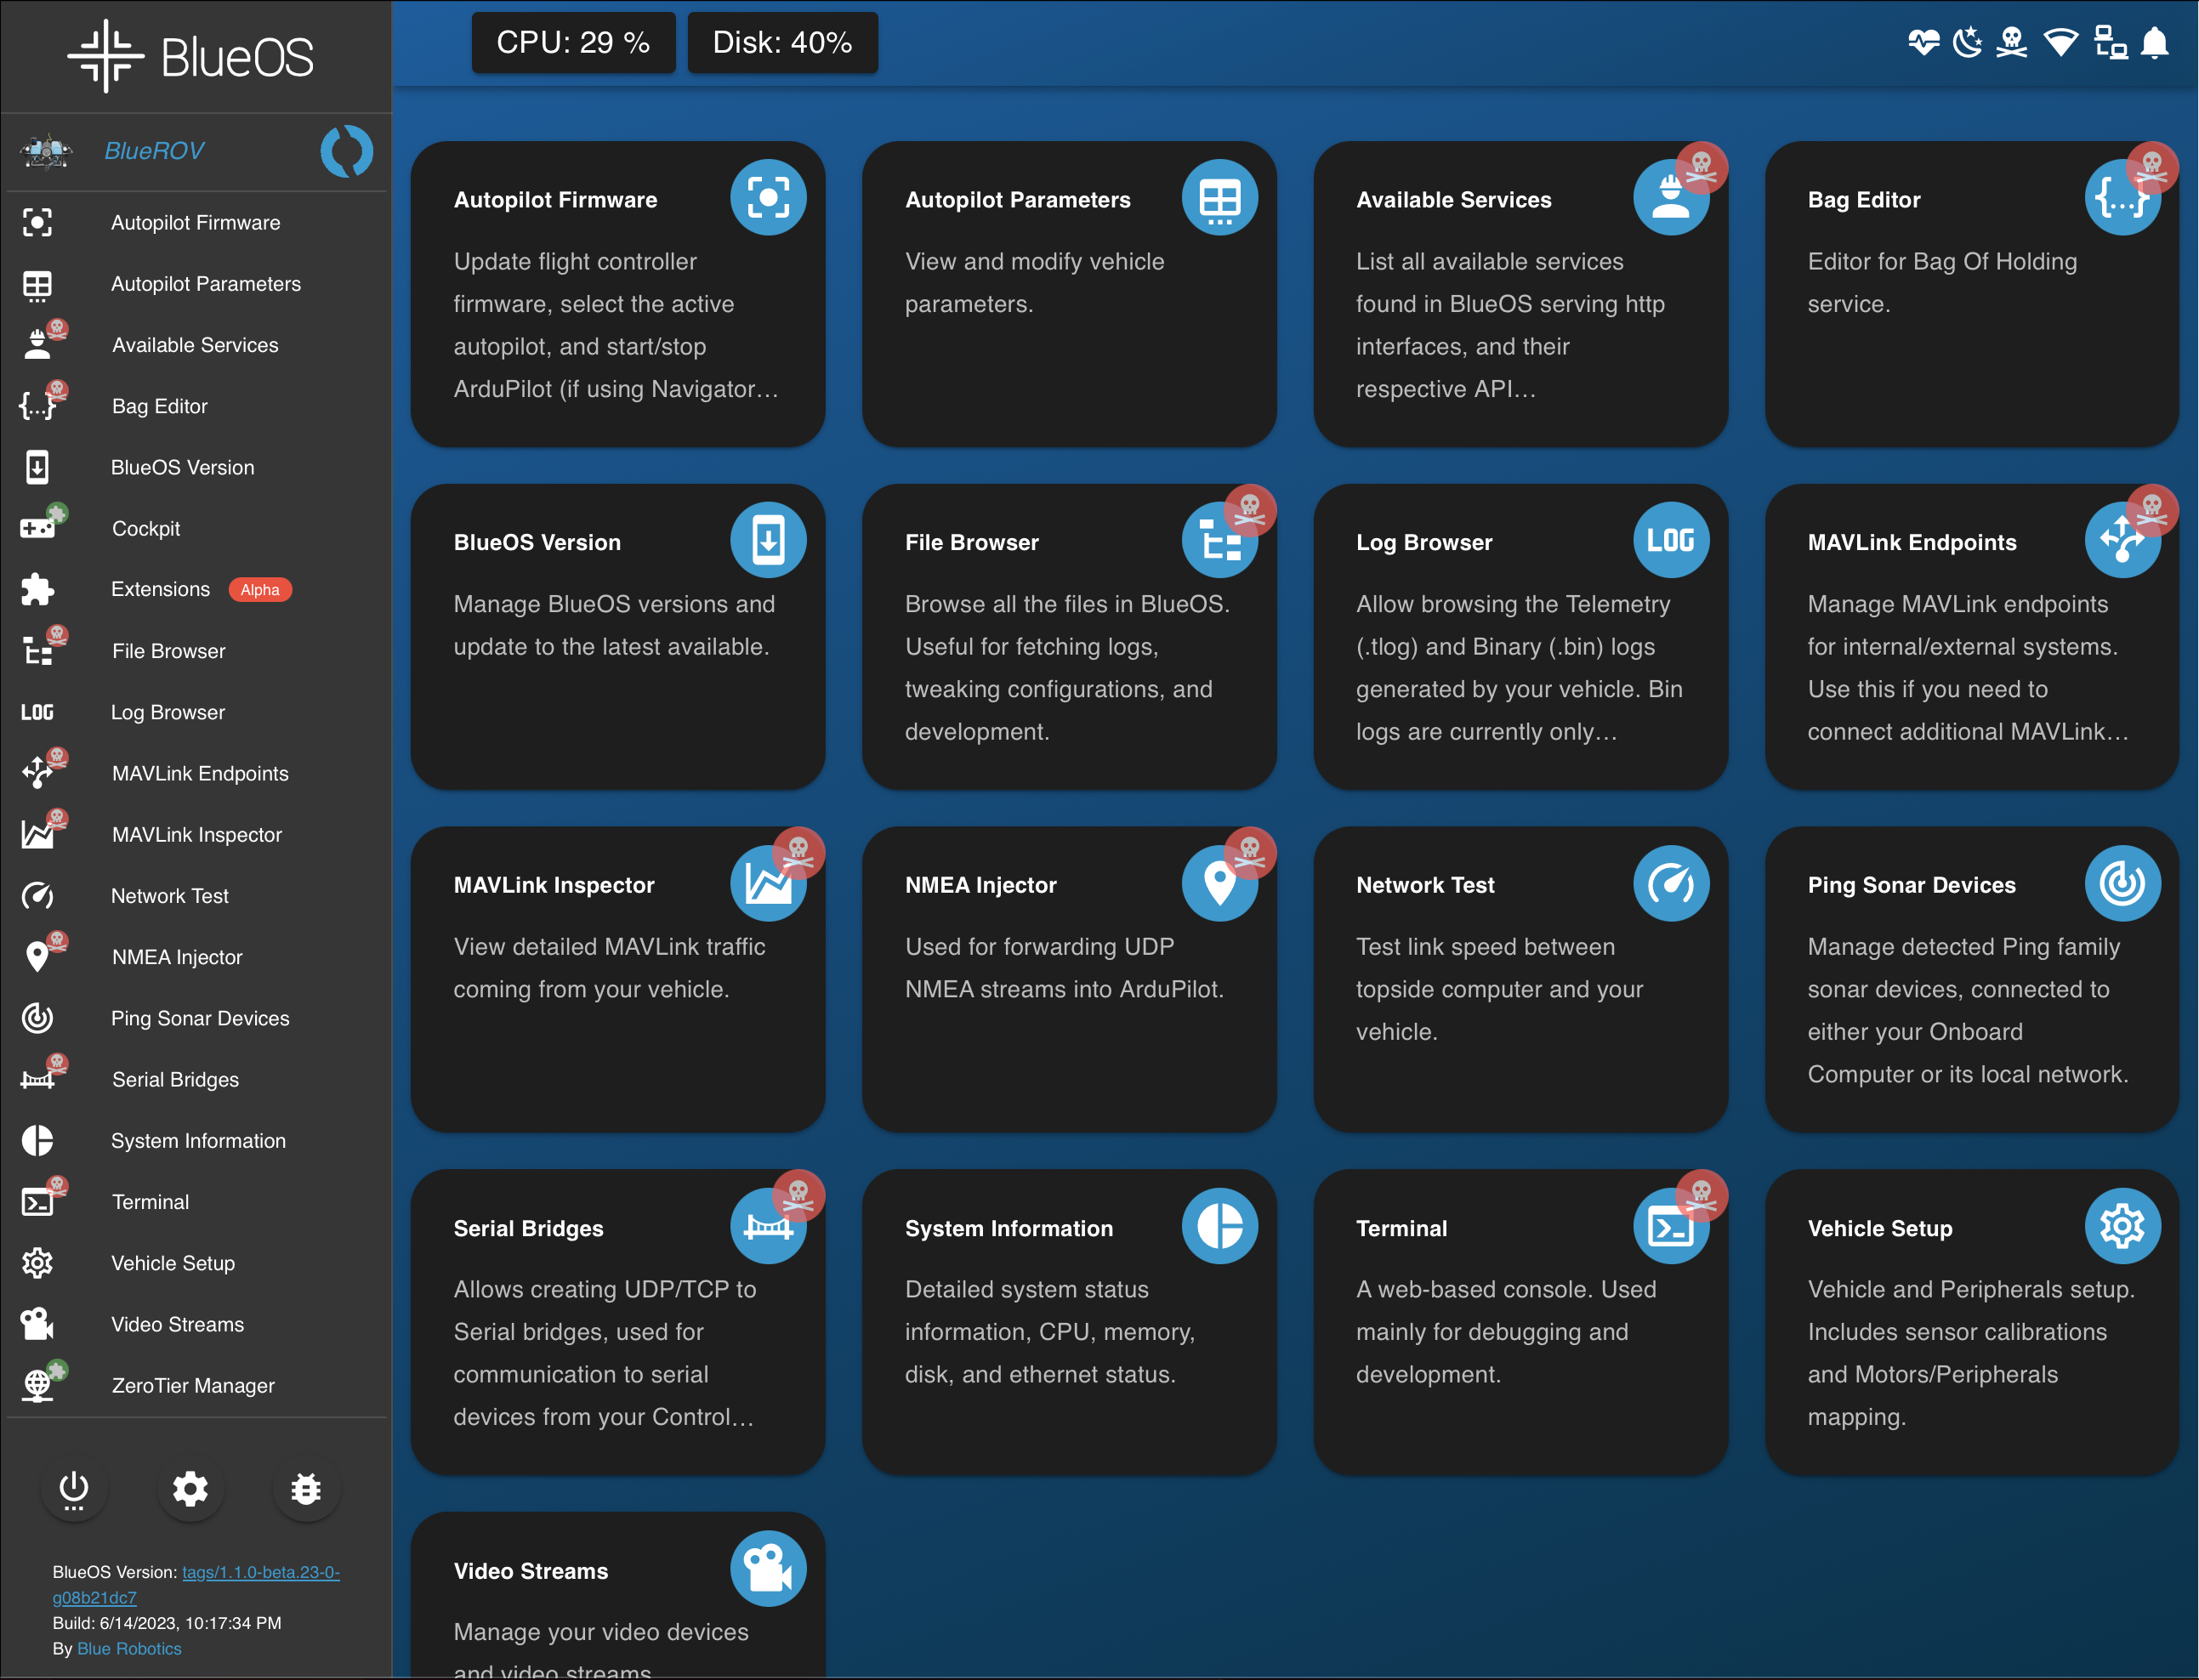
#BlueOS Service Pages
Pages are sorted alphabetically.
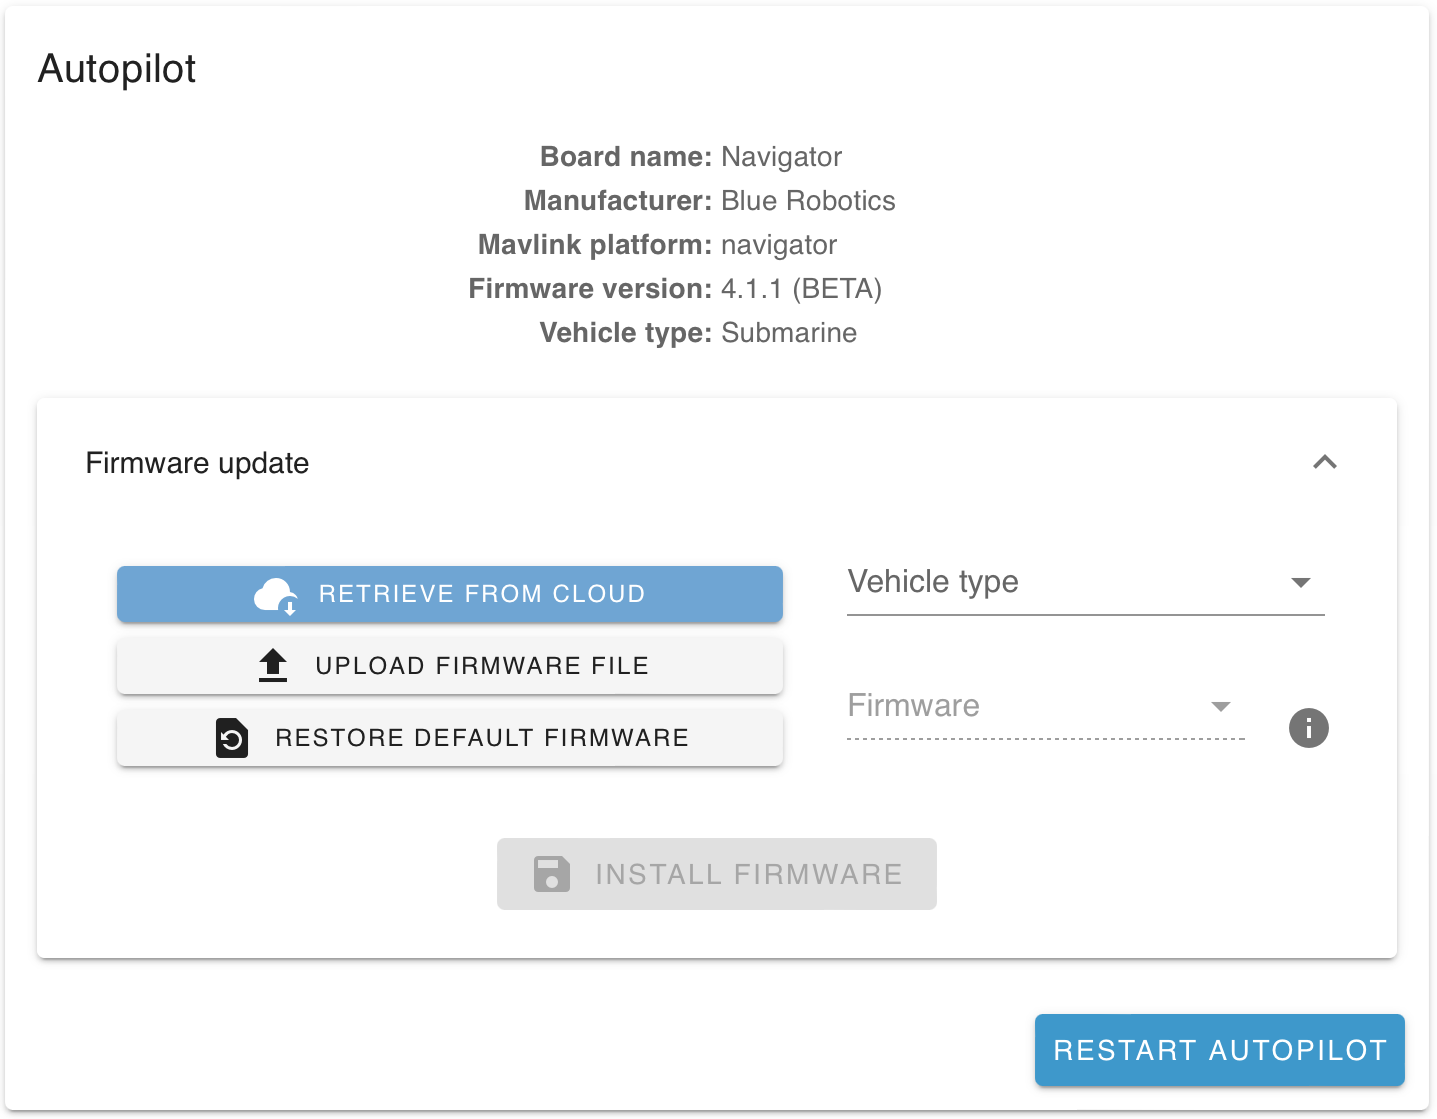
#Autopilot Firmware
Based On: ArduPilot Manager | Port:8000
The Autopilot Firmware page provides basic information about the active autopilot, along with options to:
- Change board (select a connected board, or run an SITL simulation)
- Start the autopilot
- Stop the autopilot
- Restart the autopilot
- Update the firmware
- ArduPilot family of firmwares only
- Choose firmware to install
- Select from the online repository
- Select vehicle type (Sub / Rover / Plane / Copter)
- Select desired release and stability level
- Stable - A production-ready release.
- The latest Stable is recommended for most users.
- e.g.
Stable-4.1.1
- Beta - In-testing release, with new features and improvements, aiming to become stable. May have bugs.
- Dev - Development branch, with all the newest features. Intentionally unstable (changes quickly), and possible untested/dangerous.
- Stable - A production-ready release.
- Upload a custom firmware file from the surface computer
- Restore the default (ArduSub) firmware for the connected flight controller
- Select from the online repository
- Flash firmware onto a connected compatible flight controller board
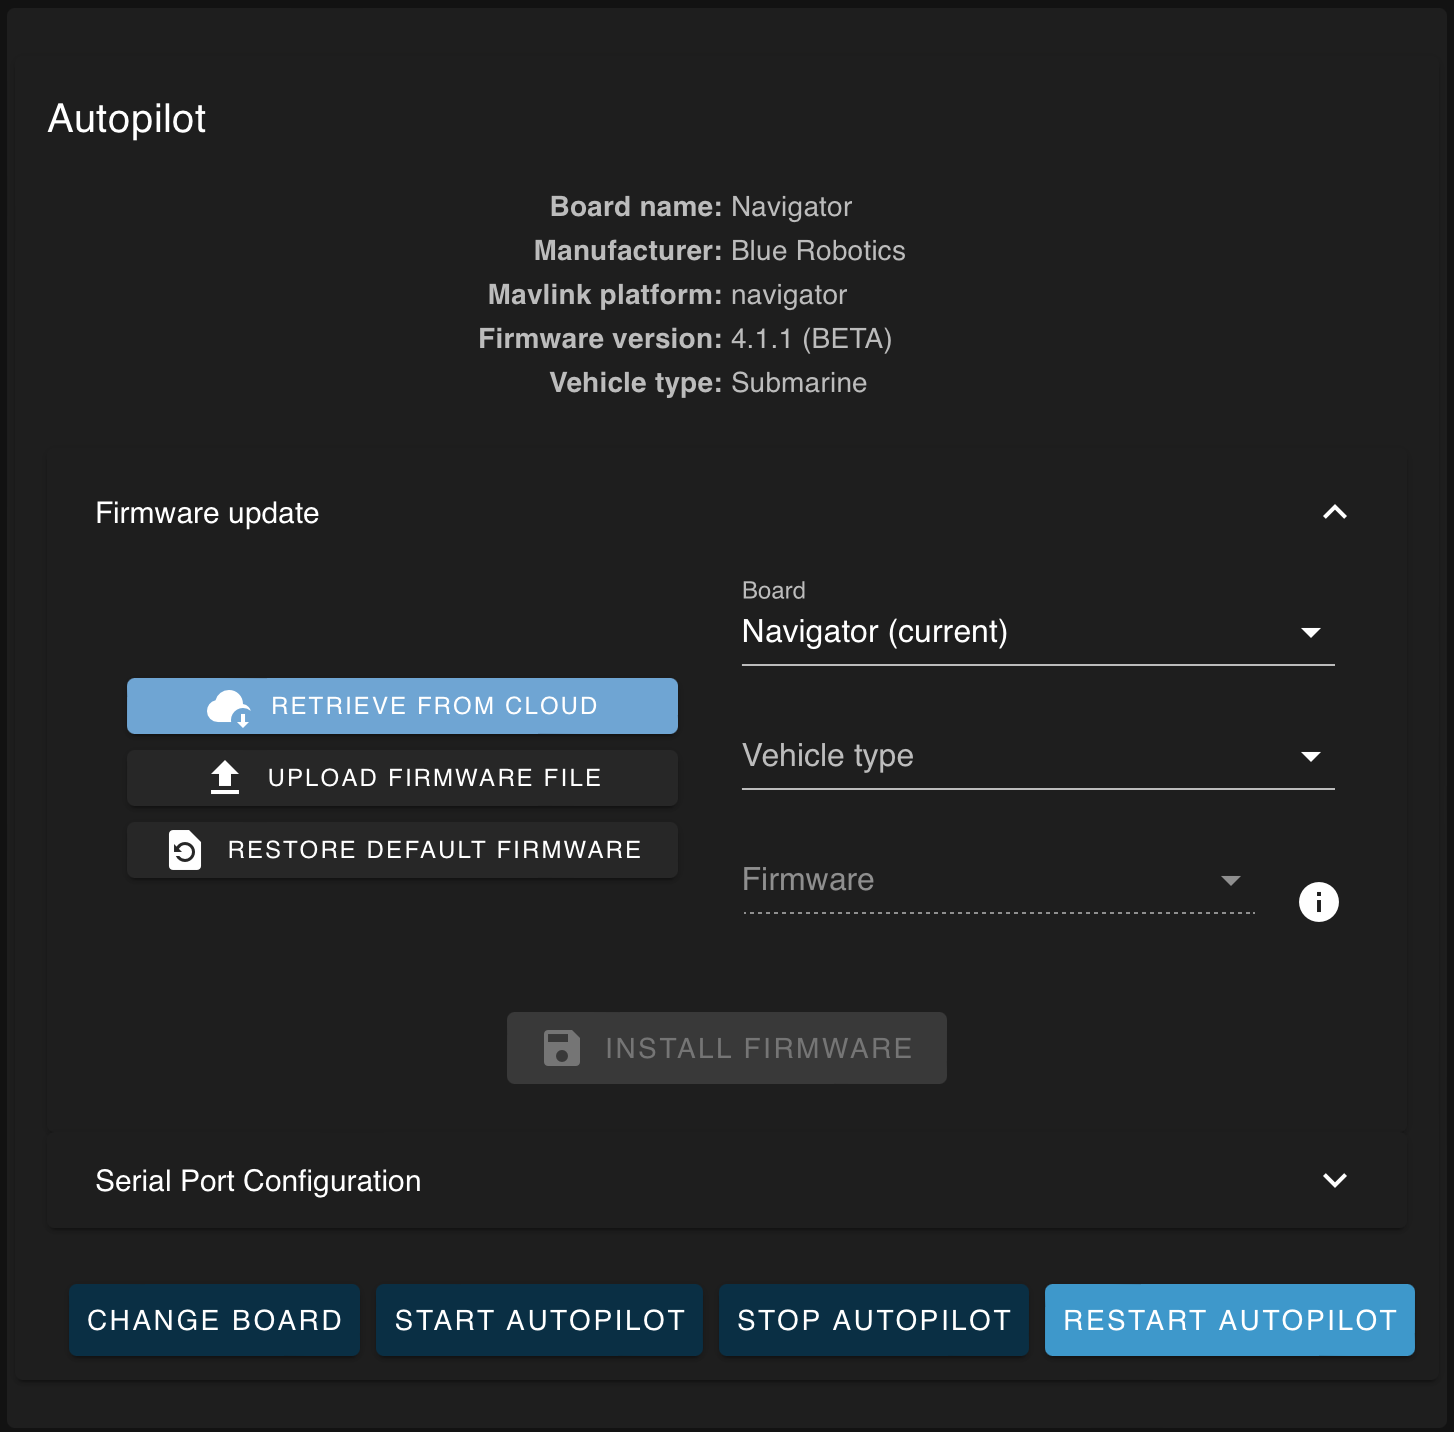
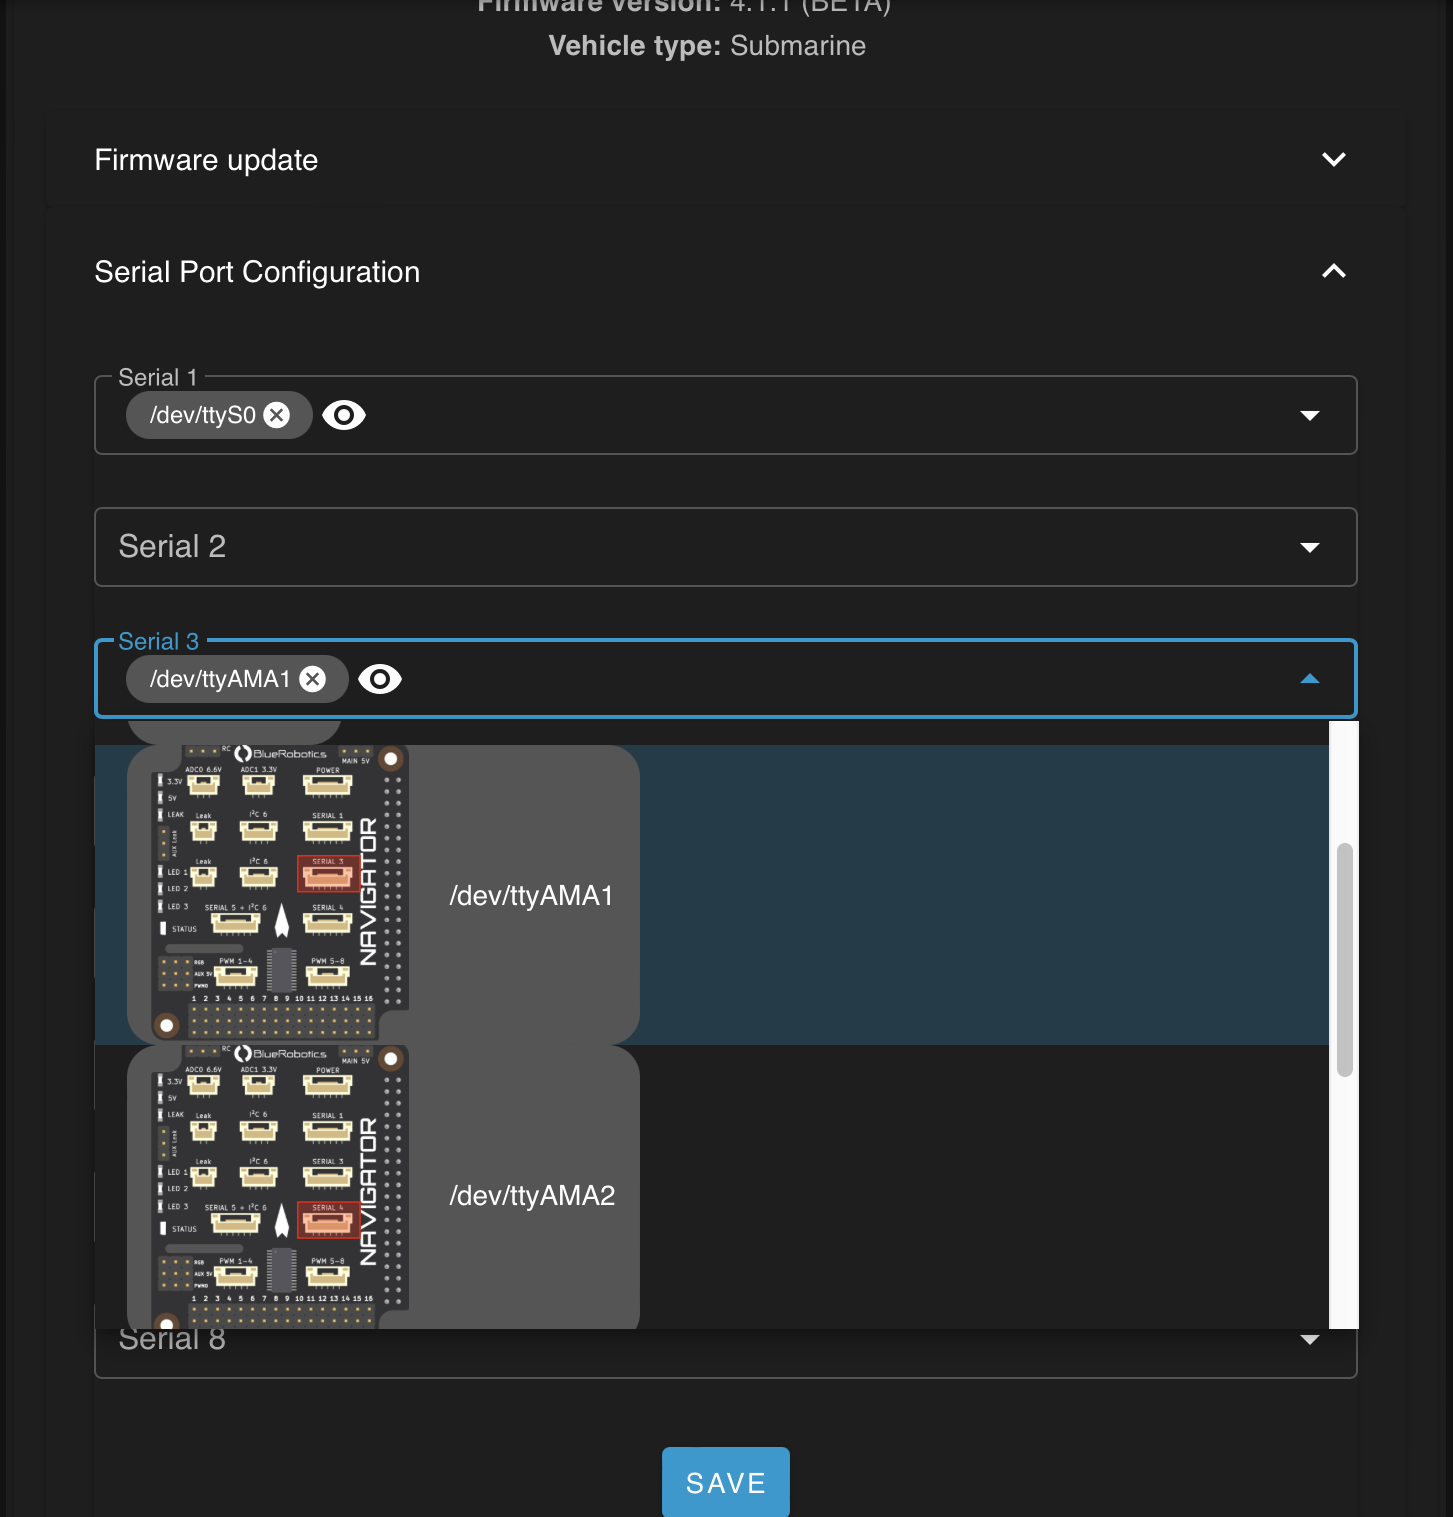
Systems with a Navigator flight controller also have the option to configure serial-compatible ports from the onboard computer (including USB ports) as serial ports accessible to the autopilot.
#Autopilot Parameters
New in 1.1
The Autopilot Parameters page allows checking and changing the autopilot's configuration.
- Includes fuzzy searching of names and descriptions, to help find relevant parameters
- Allows loading parameters from a file, and saving the current parameters to a file

#Available Services
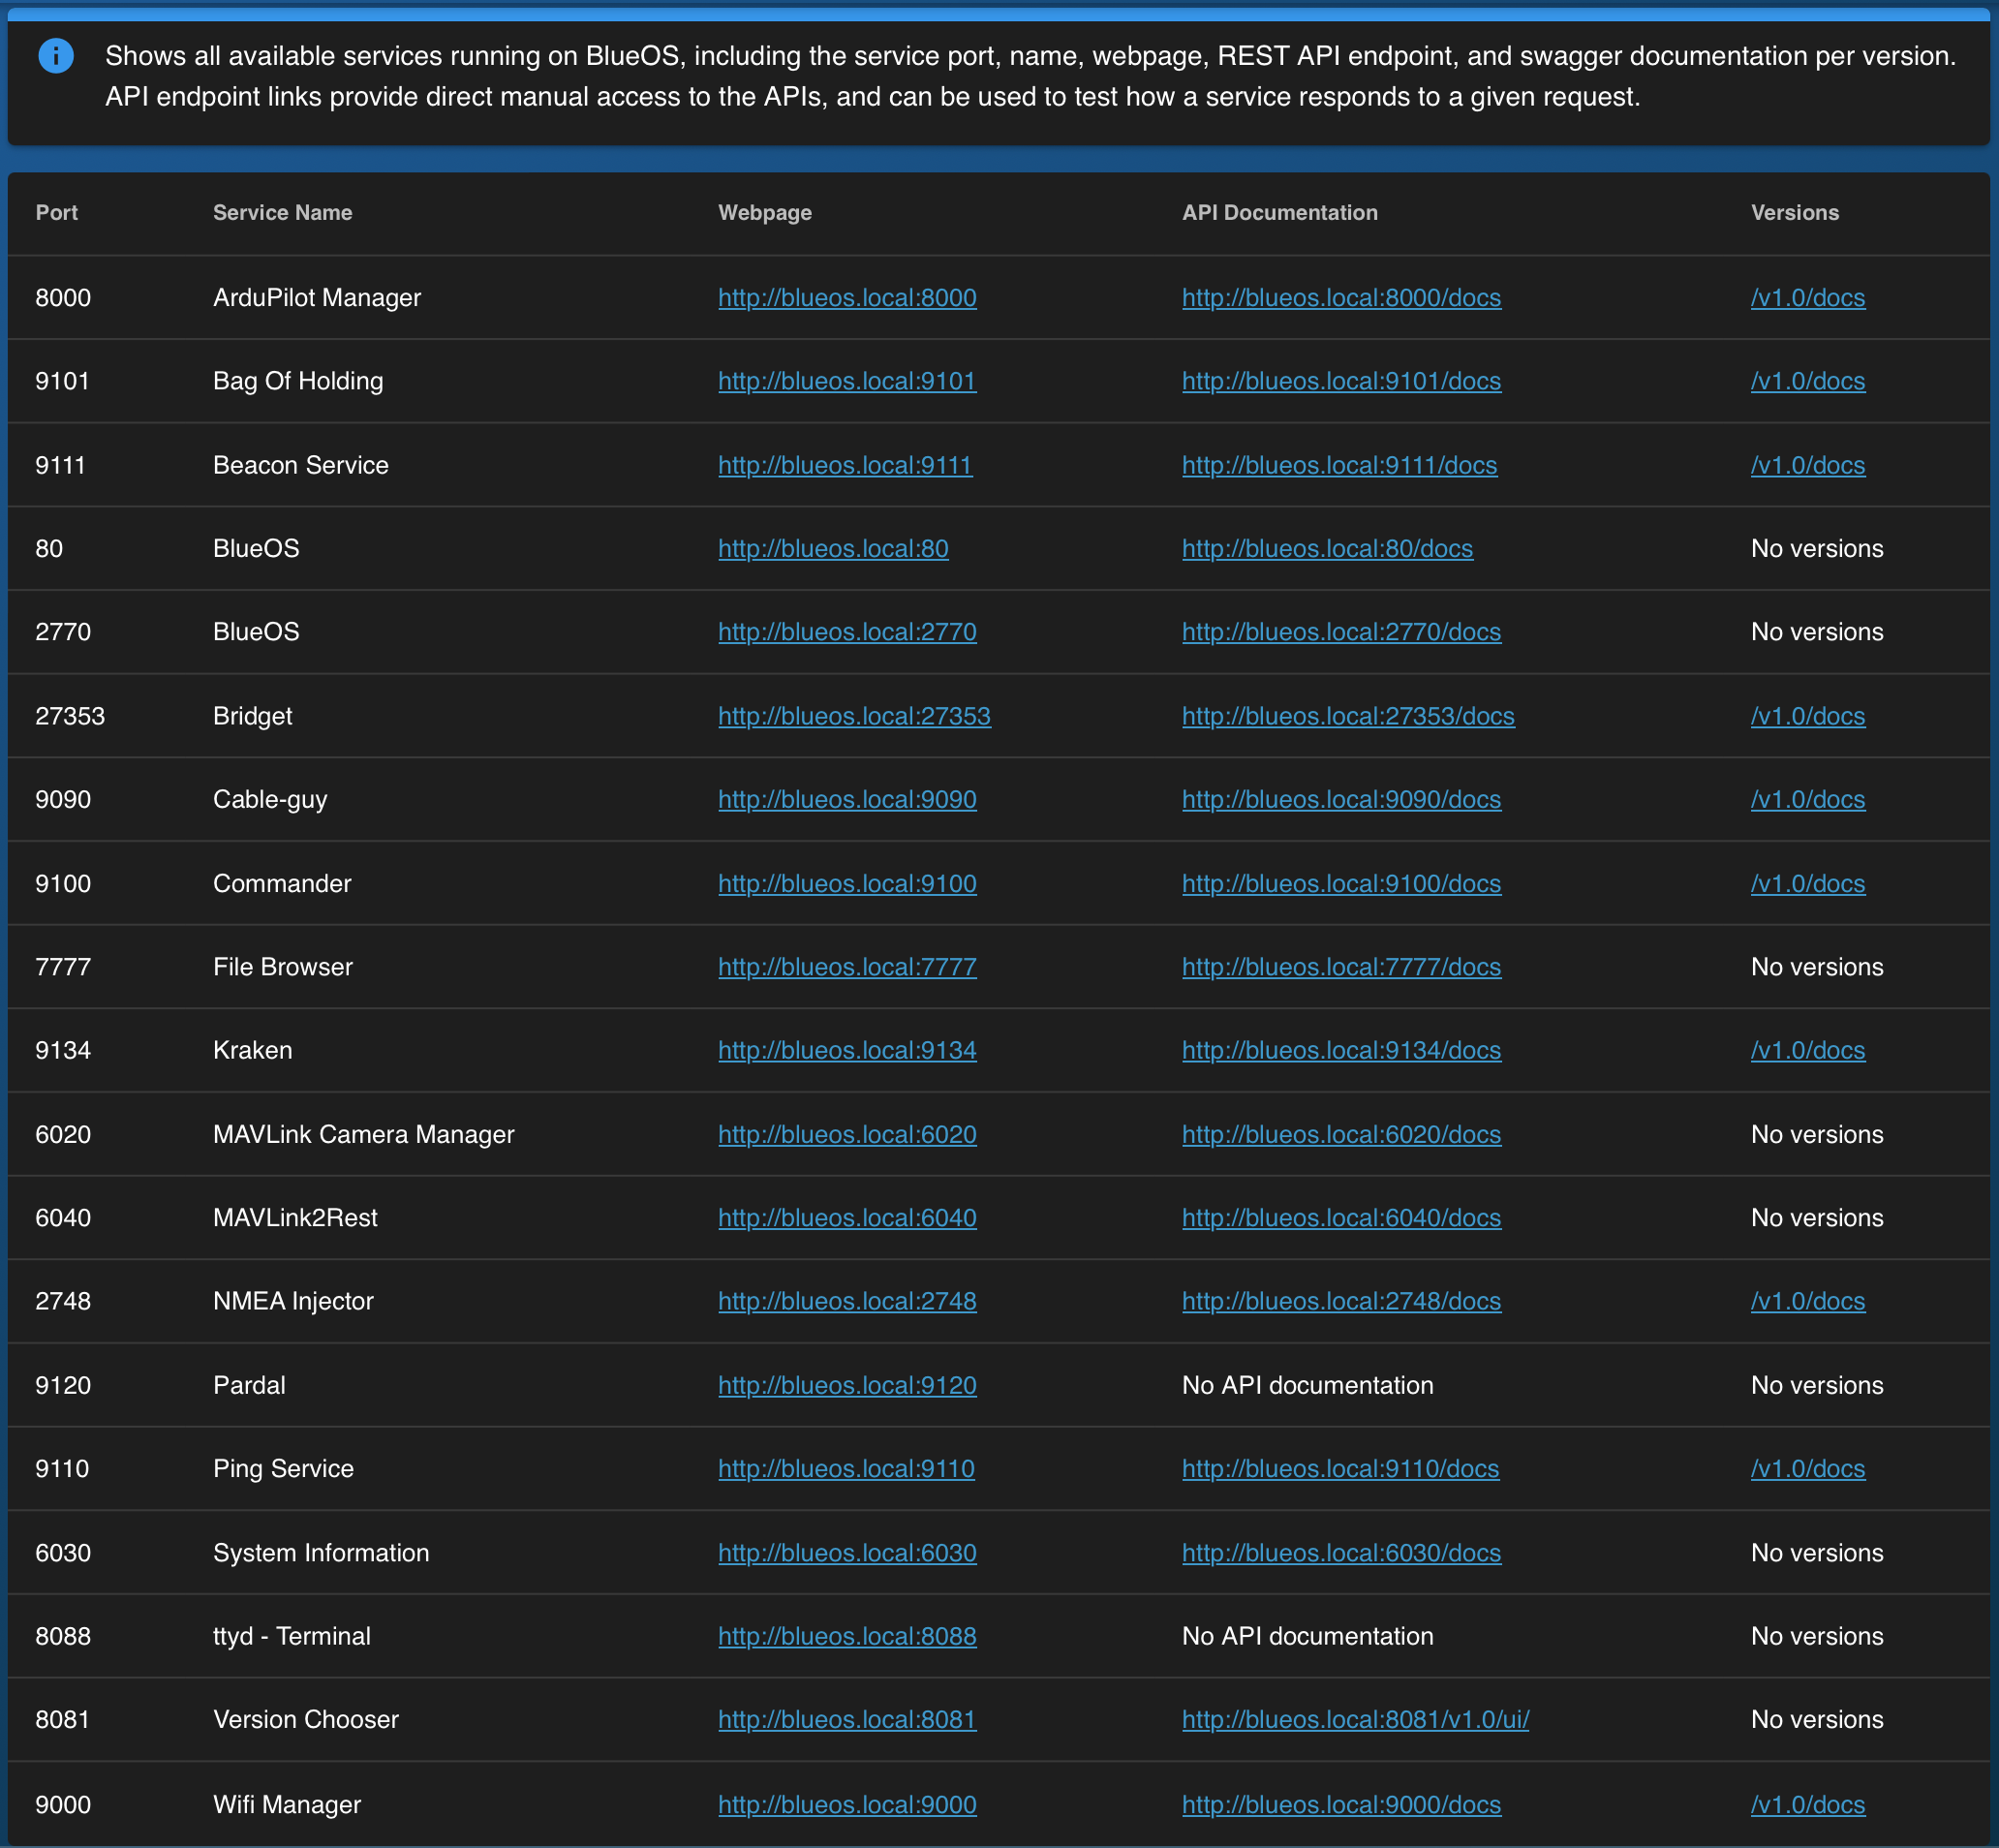
The Available Services page provides developer access to the underlying http server interfaces of the services upon which BlueOS is based. Each service is listed with
- the port it is served at
- a meaningful name
- a web-page link using the active network configuration
and where relevant
- its API documentation (in a live-testable form)
- the current API version
The individual services are documented in the development documentation.
#Bag Editor
Based On: Bag of Holding | Port:9101
The Bag Editor is a helper service for advanced users, which allows modifying the database used to handle frontend interface changes.

#BlueOS Version
Based On: Version Chooser | Port:8081
The Version Chooser is a major component in the robust backbone of BlueOS. It runs independently from the main interface, and is monitored such that if it somehow fails a backup version will be run in its place.
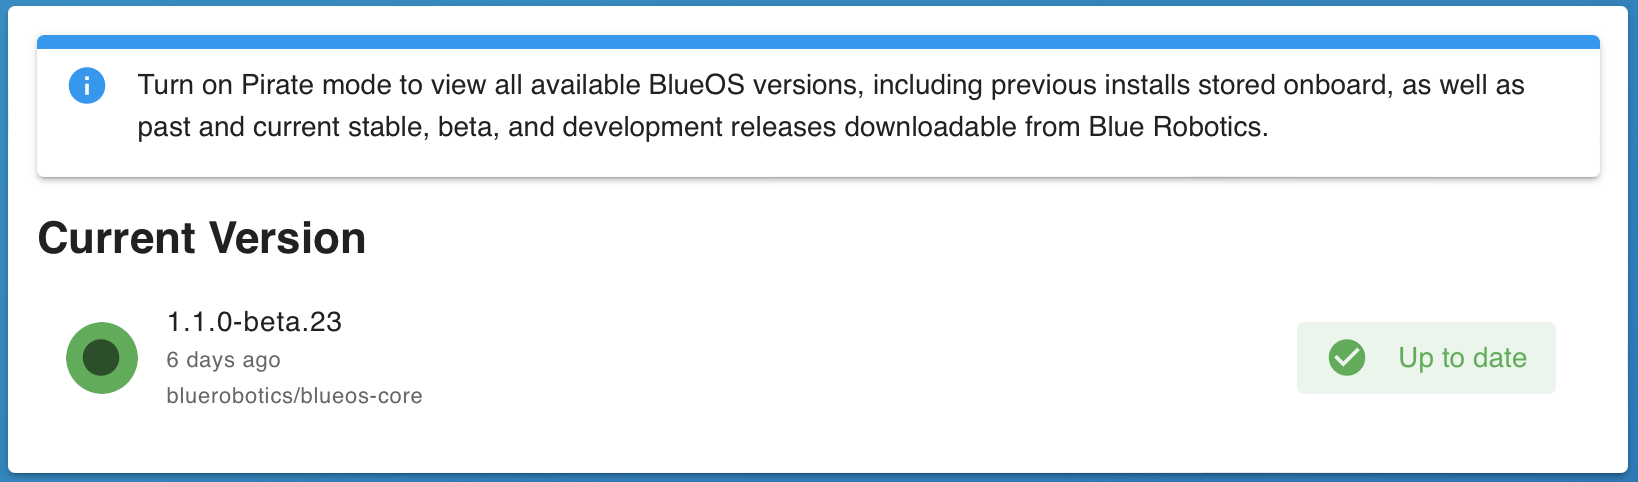
- The simplified interface provides an easy way to update to the latest version that is as stable or more stable than the currently installed version
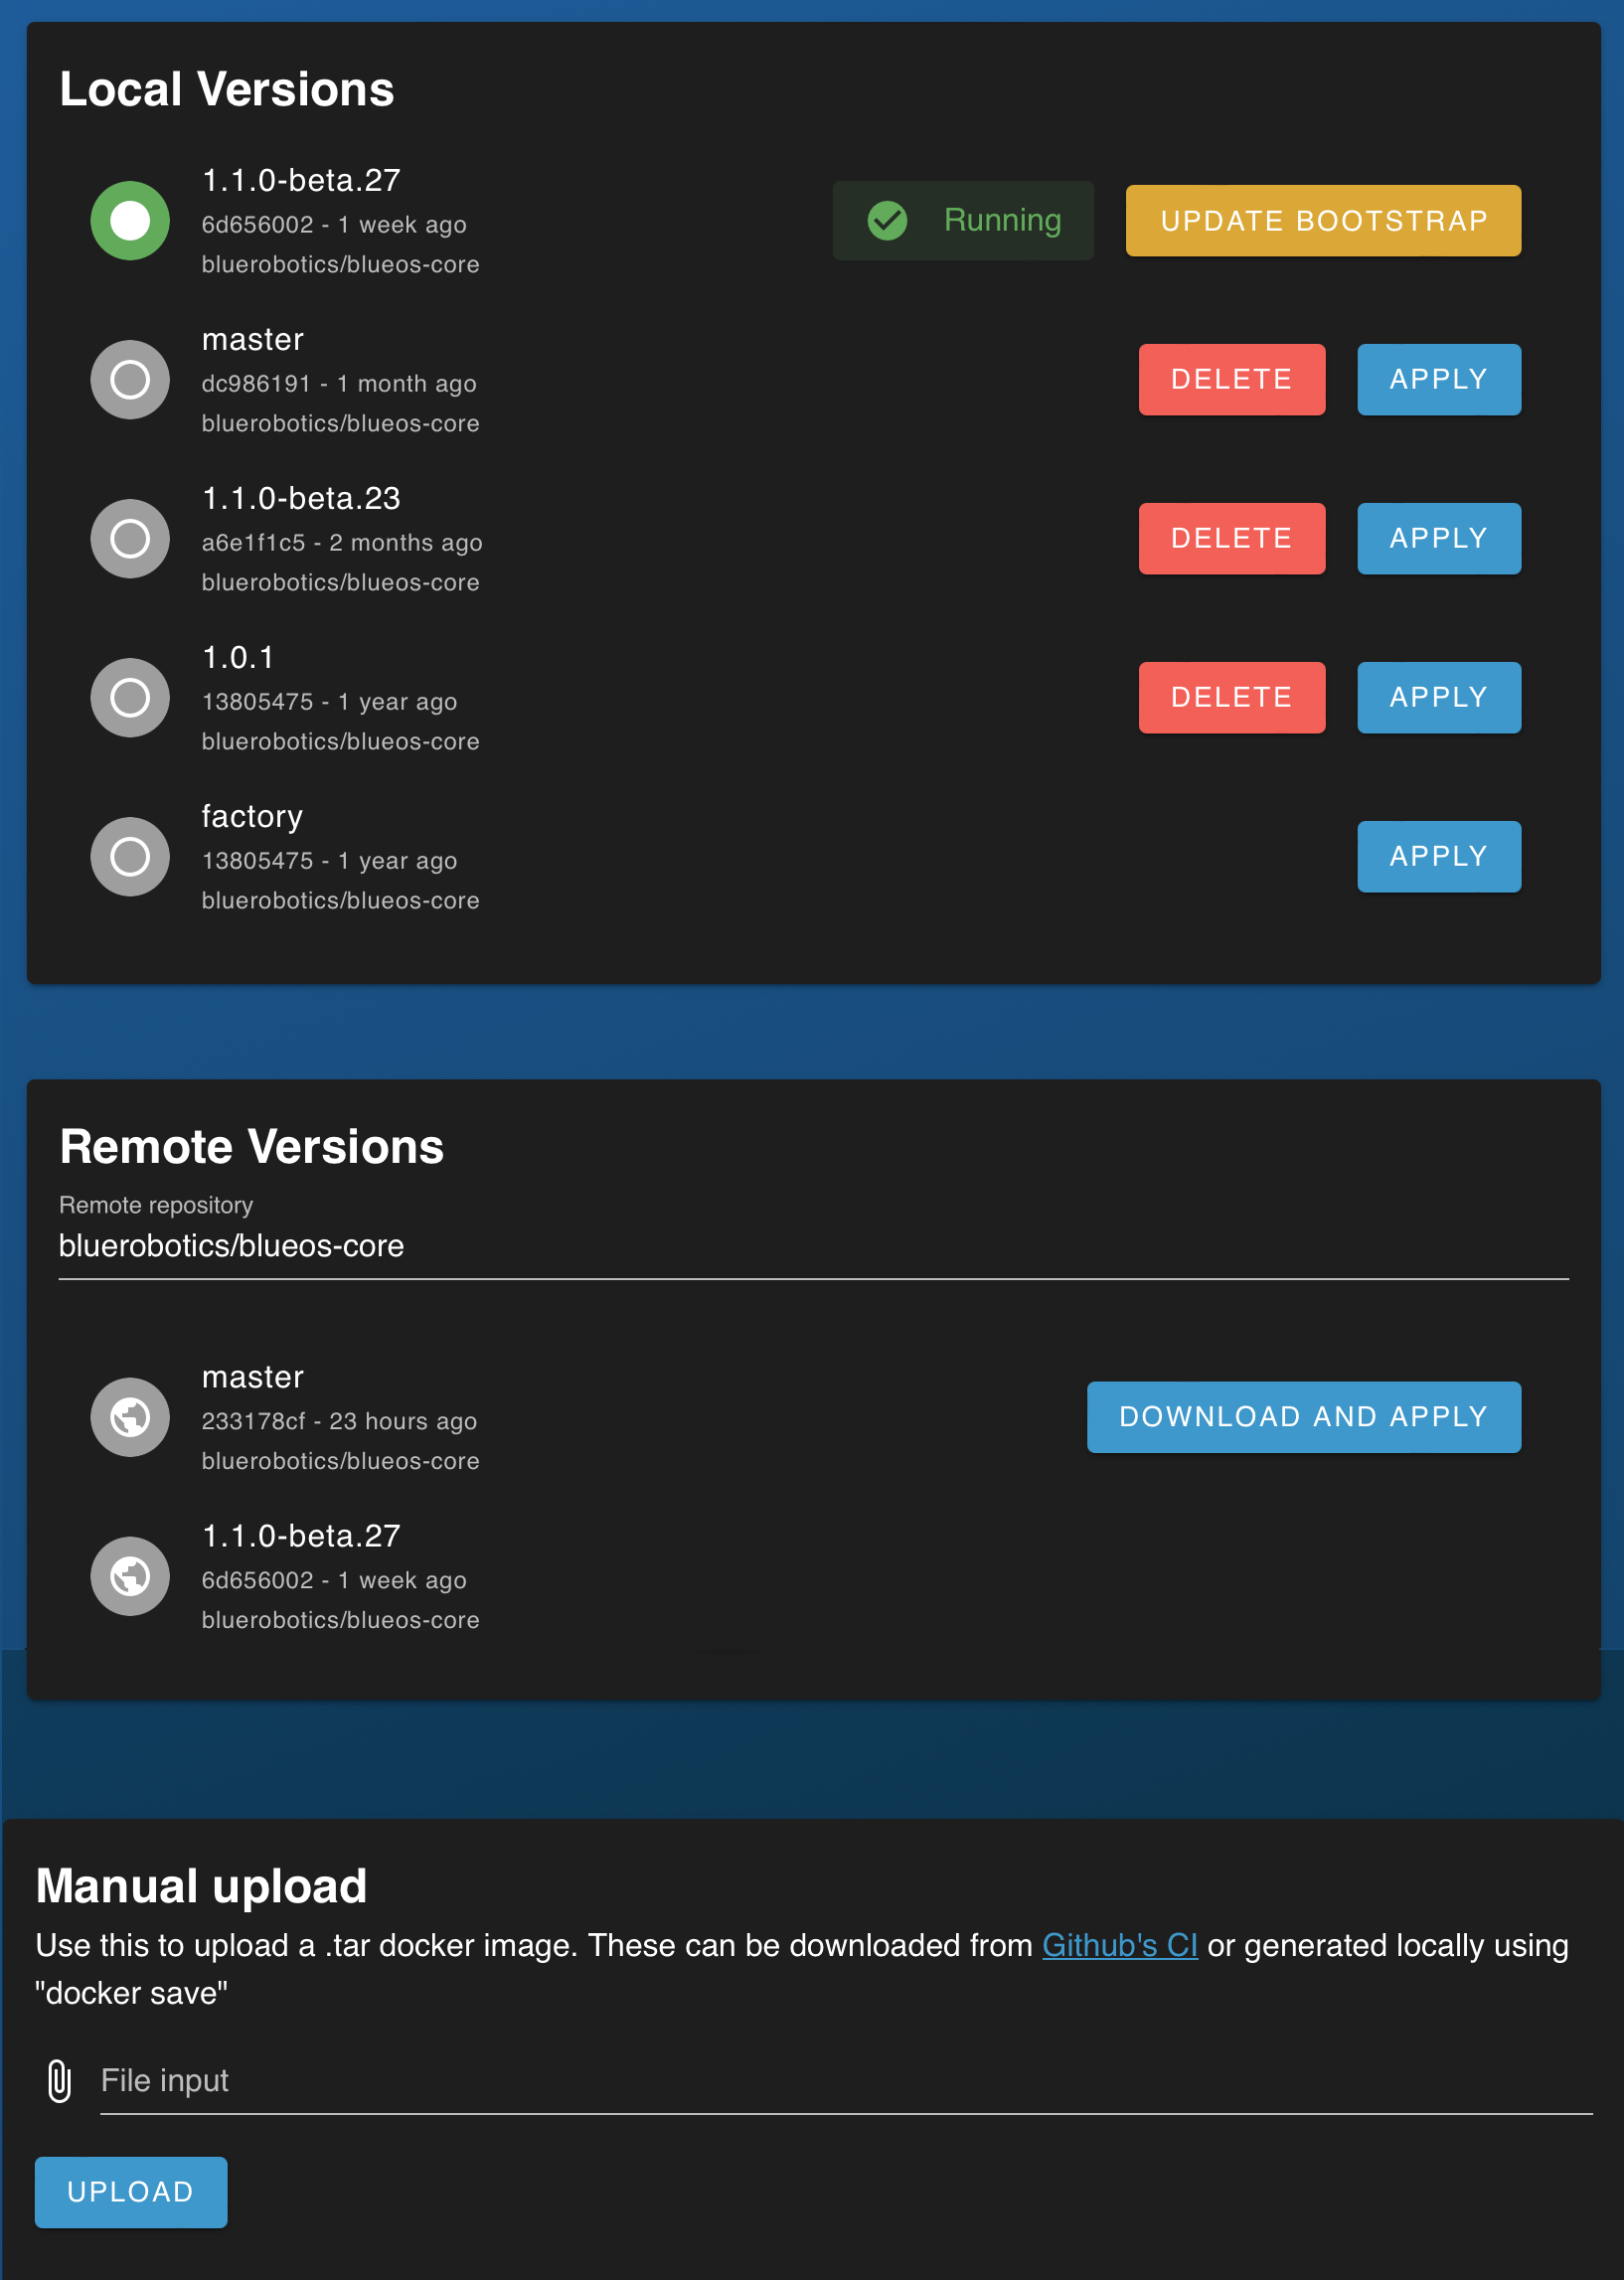
- The full interface supports easily changing forwards and backwards between
versions
- Previously-installed versions are kept locally on the device, unless manually deleted, which provides an easy route for roll-backs to undesired changes (e.g. during development)
- Allows updating the bootstrap image to match the current version
- Allows loading remote versions (including from custom docker-hub repositories)
- Allows manually uploading docker images from the surface computer
- If an undetected failure somehow occurs in BlueOS (or if a broken version gets
installed) it's possible to easily roll back to a working version from
- on the device
- manual upload, or
- downloaded from the internet
- If necessary, the underlying service can be accessed directly
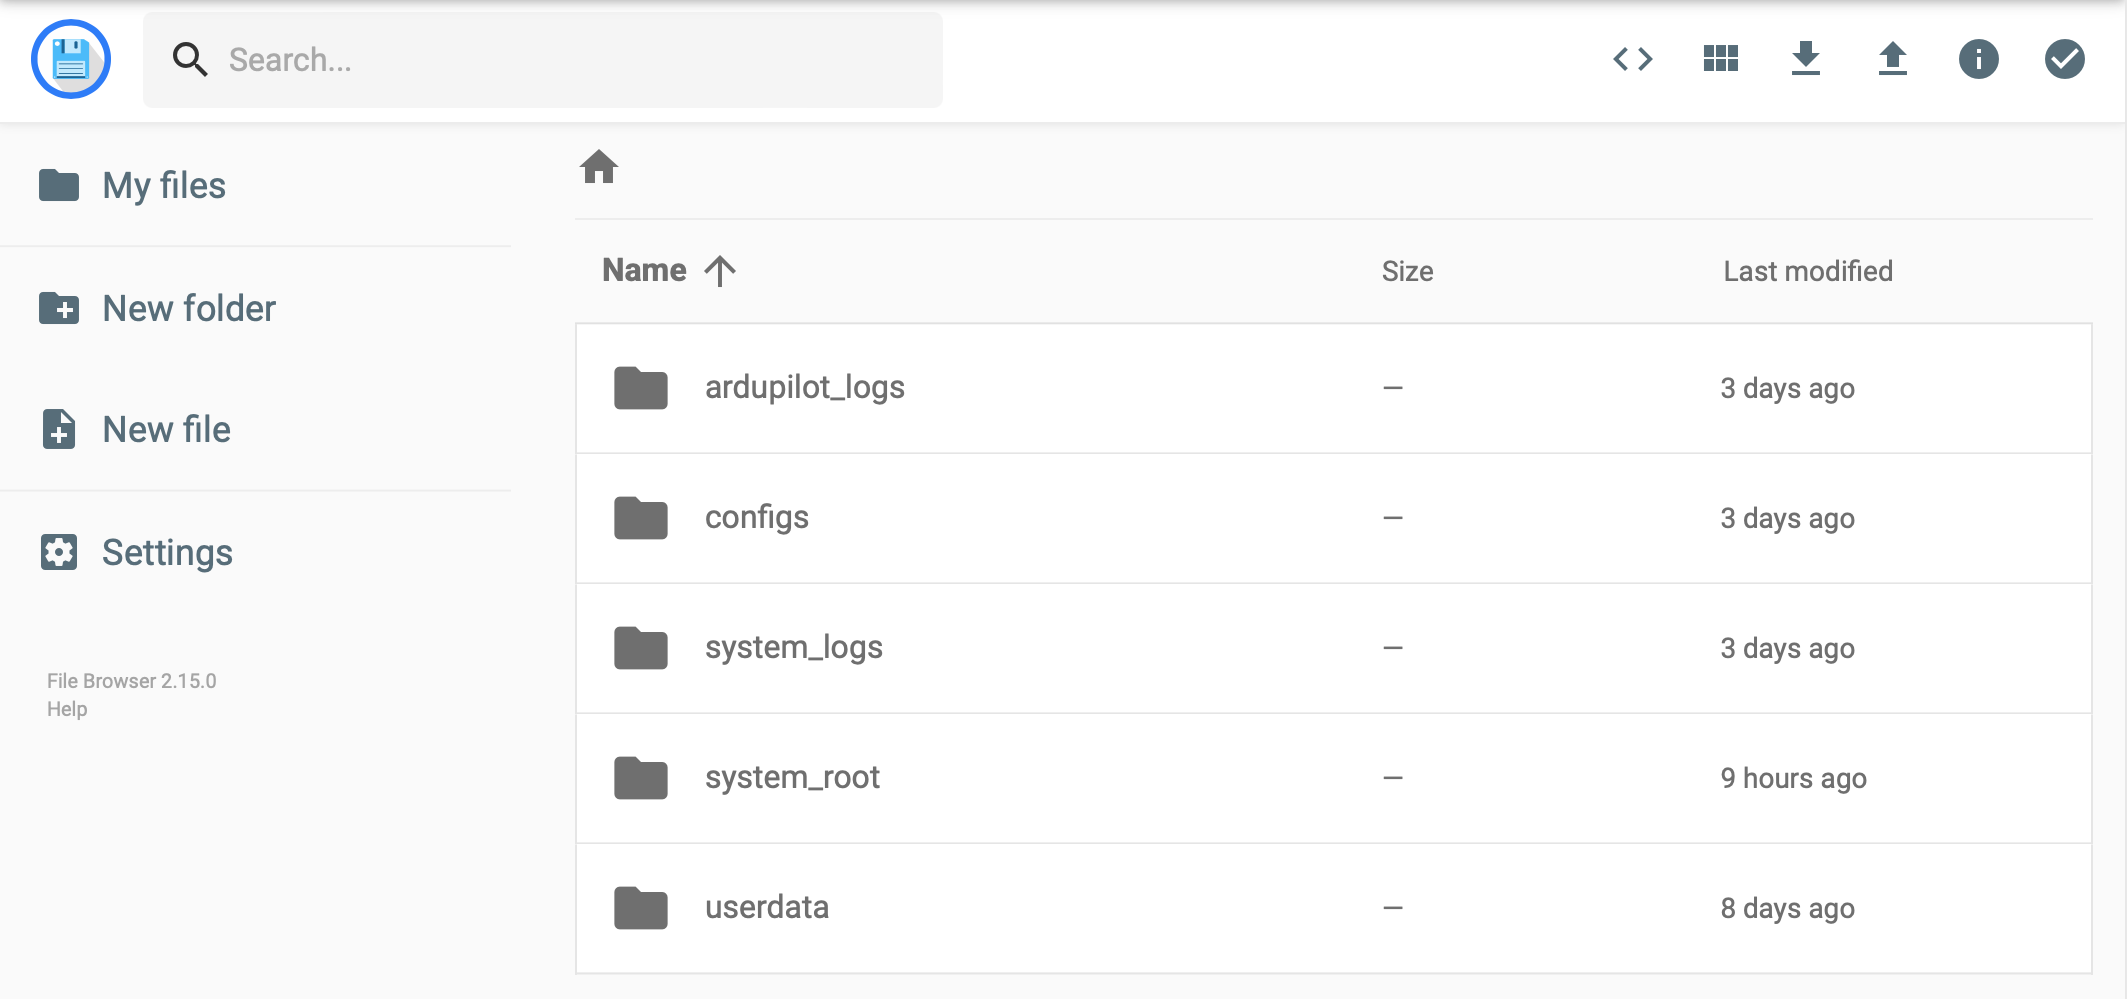
#File Browser
Based On: File Browser | Port:7777
The File Browser allows viewing, editing, downloading, and uploading BlueOS files.
#Log Browser
Based On: UAV LogViewer
- Allows downloading telemetry
.binlogs from Linux-based autopilots- Set the
BRD_RTC_TYPESautopilot parameter to includeMAVLINK_SYSTEM_TIMEso the filenames use timestamps
- Set the
- Can stream logs from external flight controllers (e.g. Pixhawks) if the
LOG_BACKEND_TYPEautopilot parameter is set toMAVLink
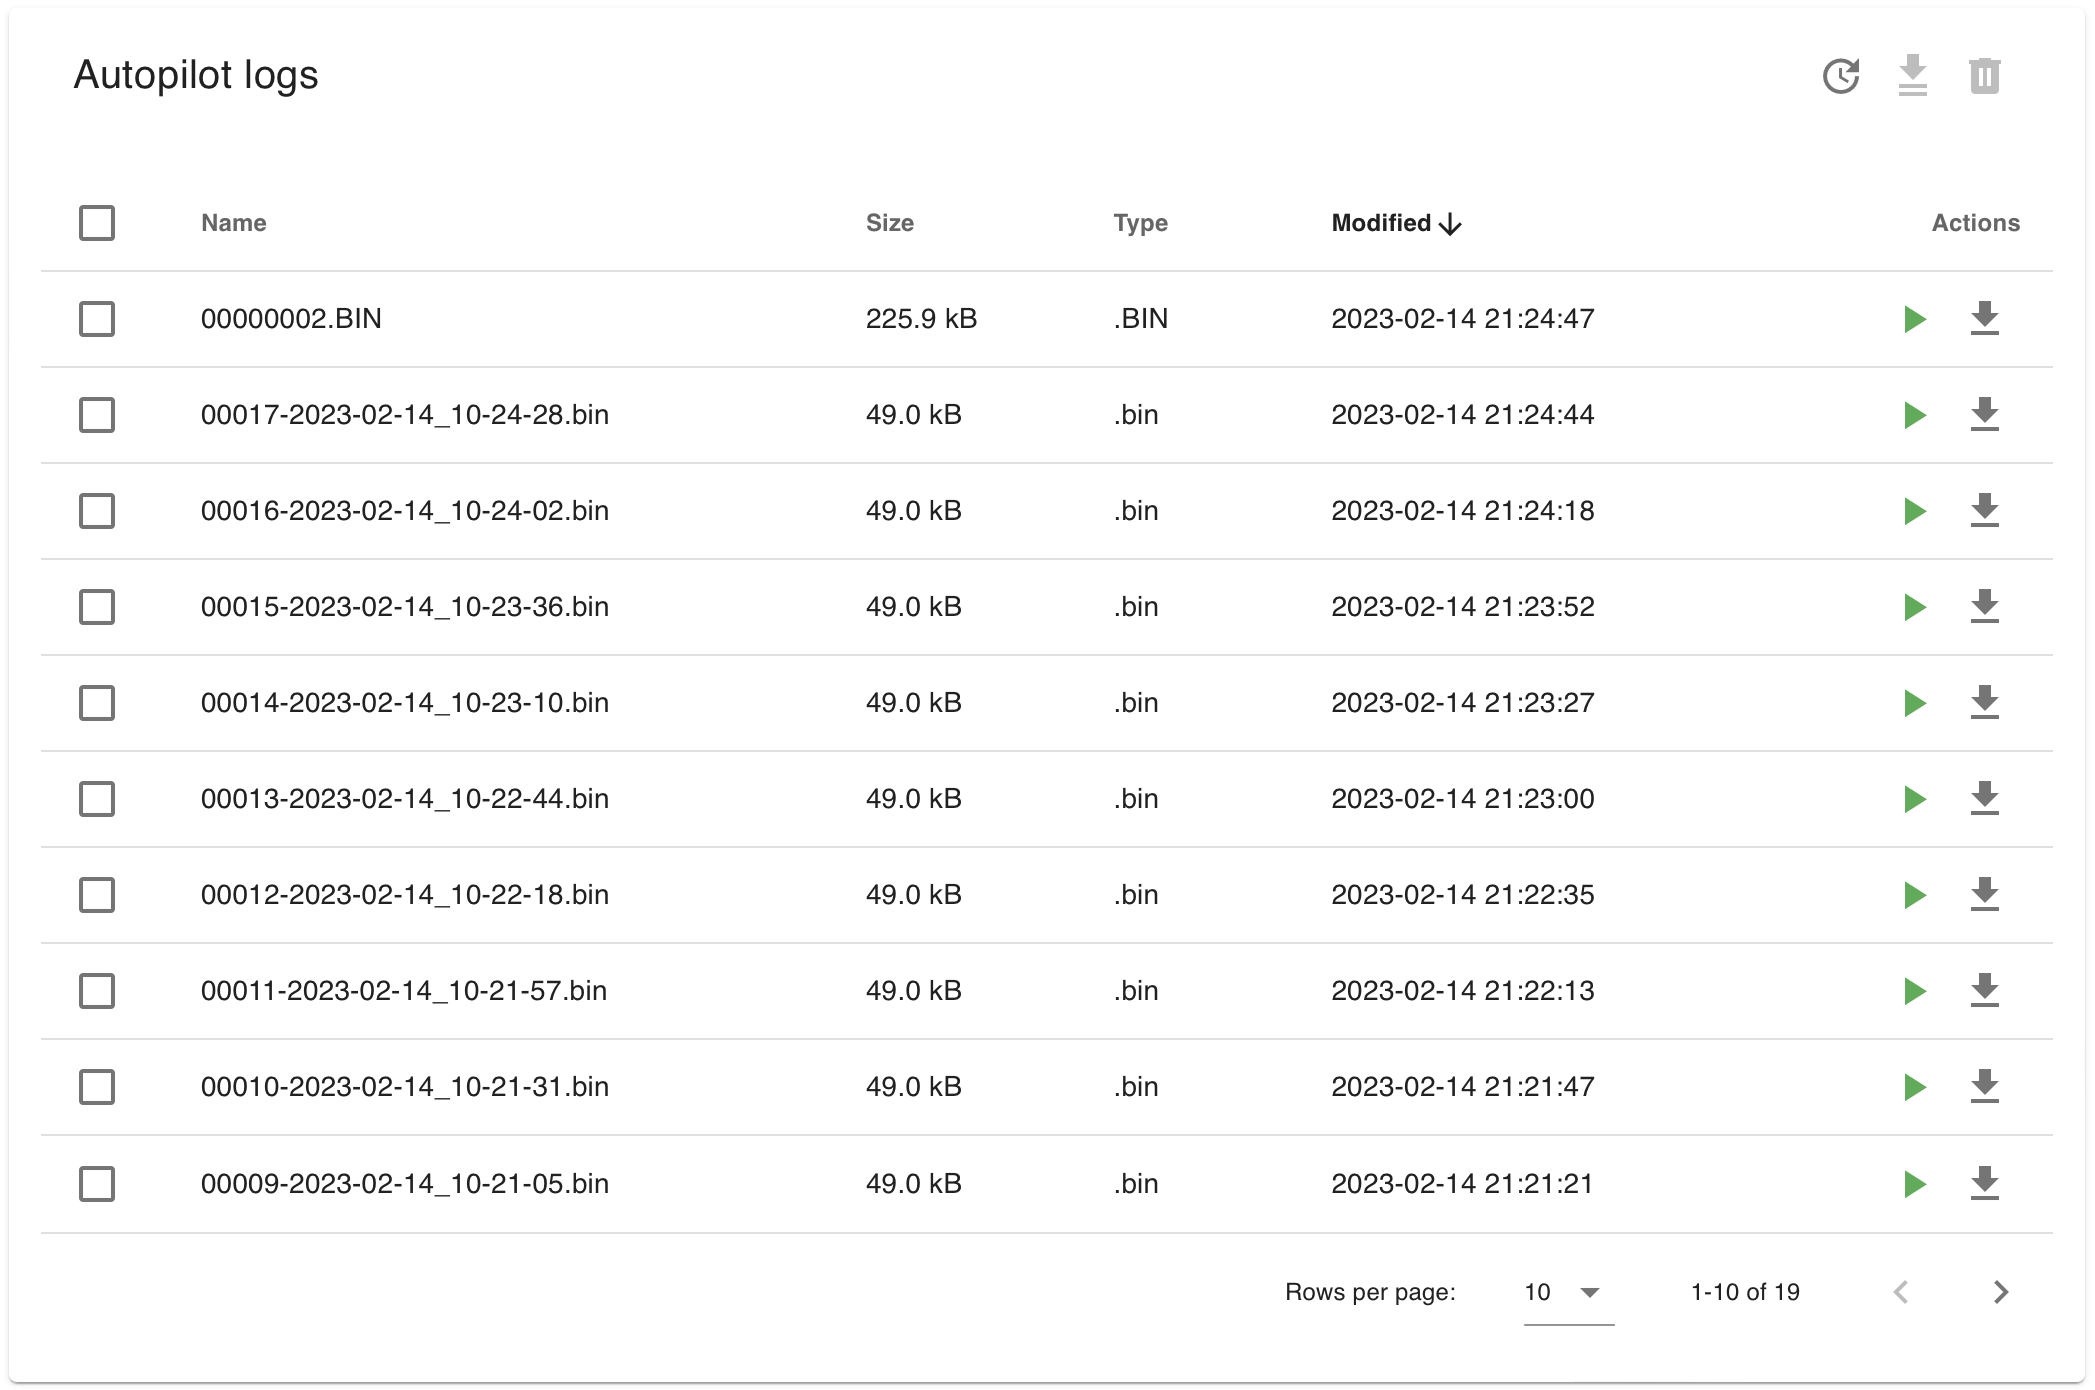
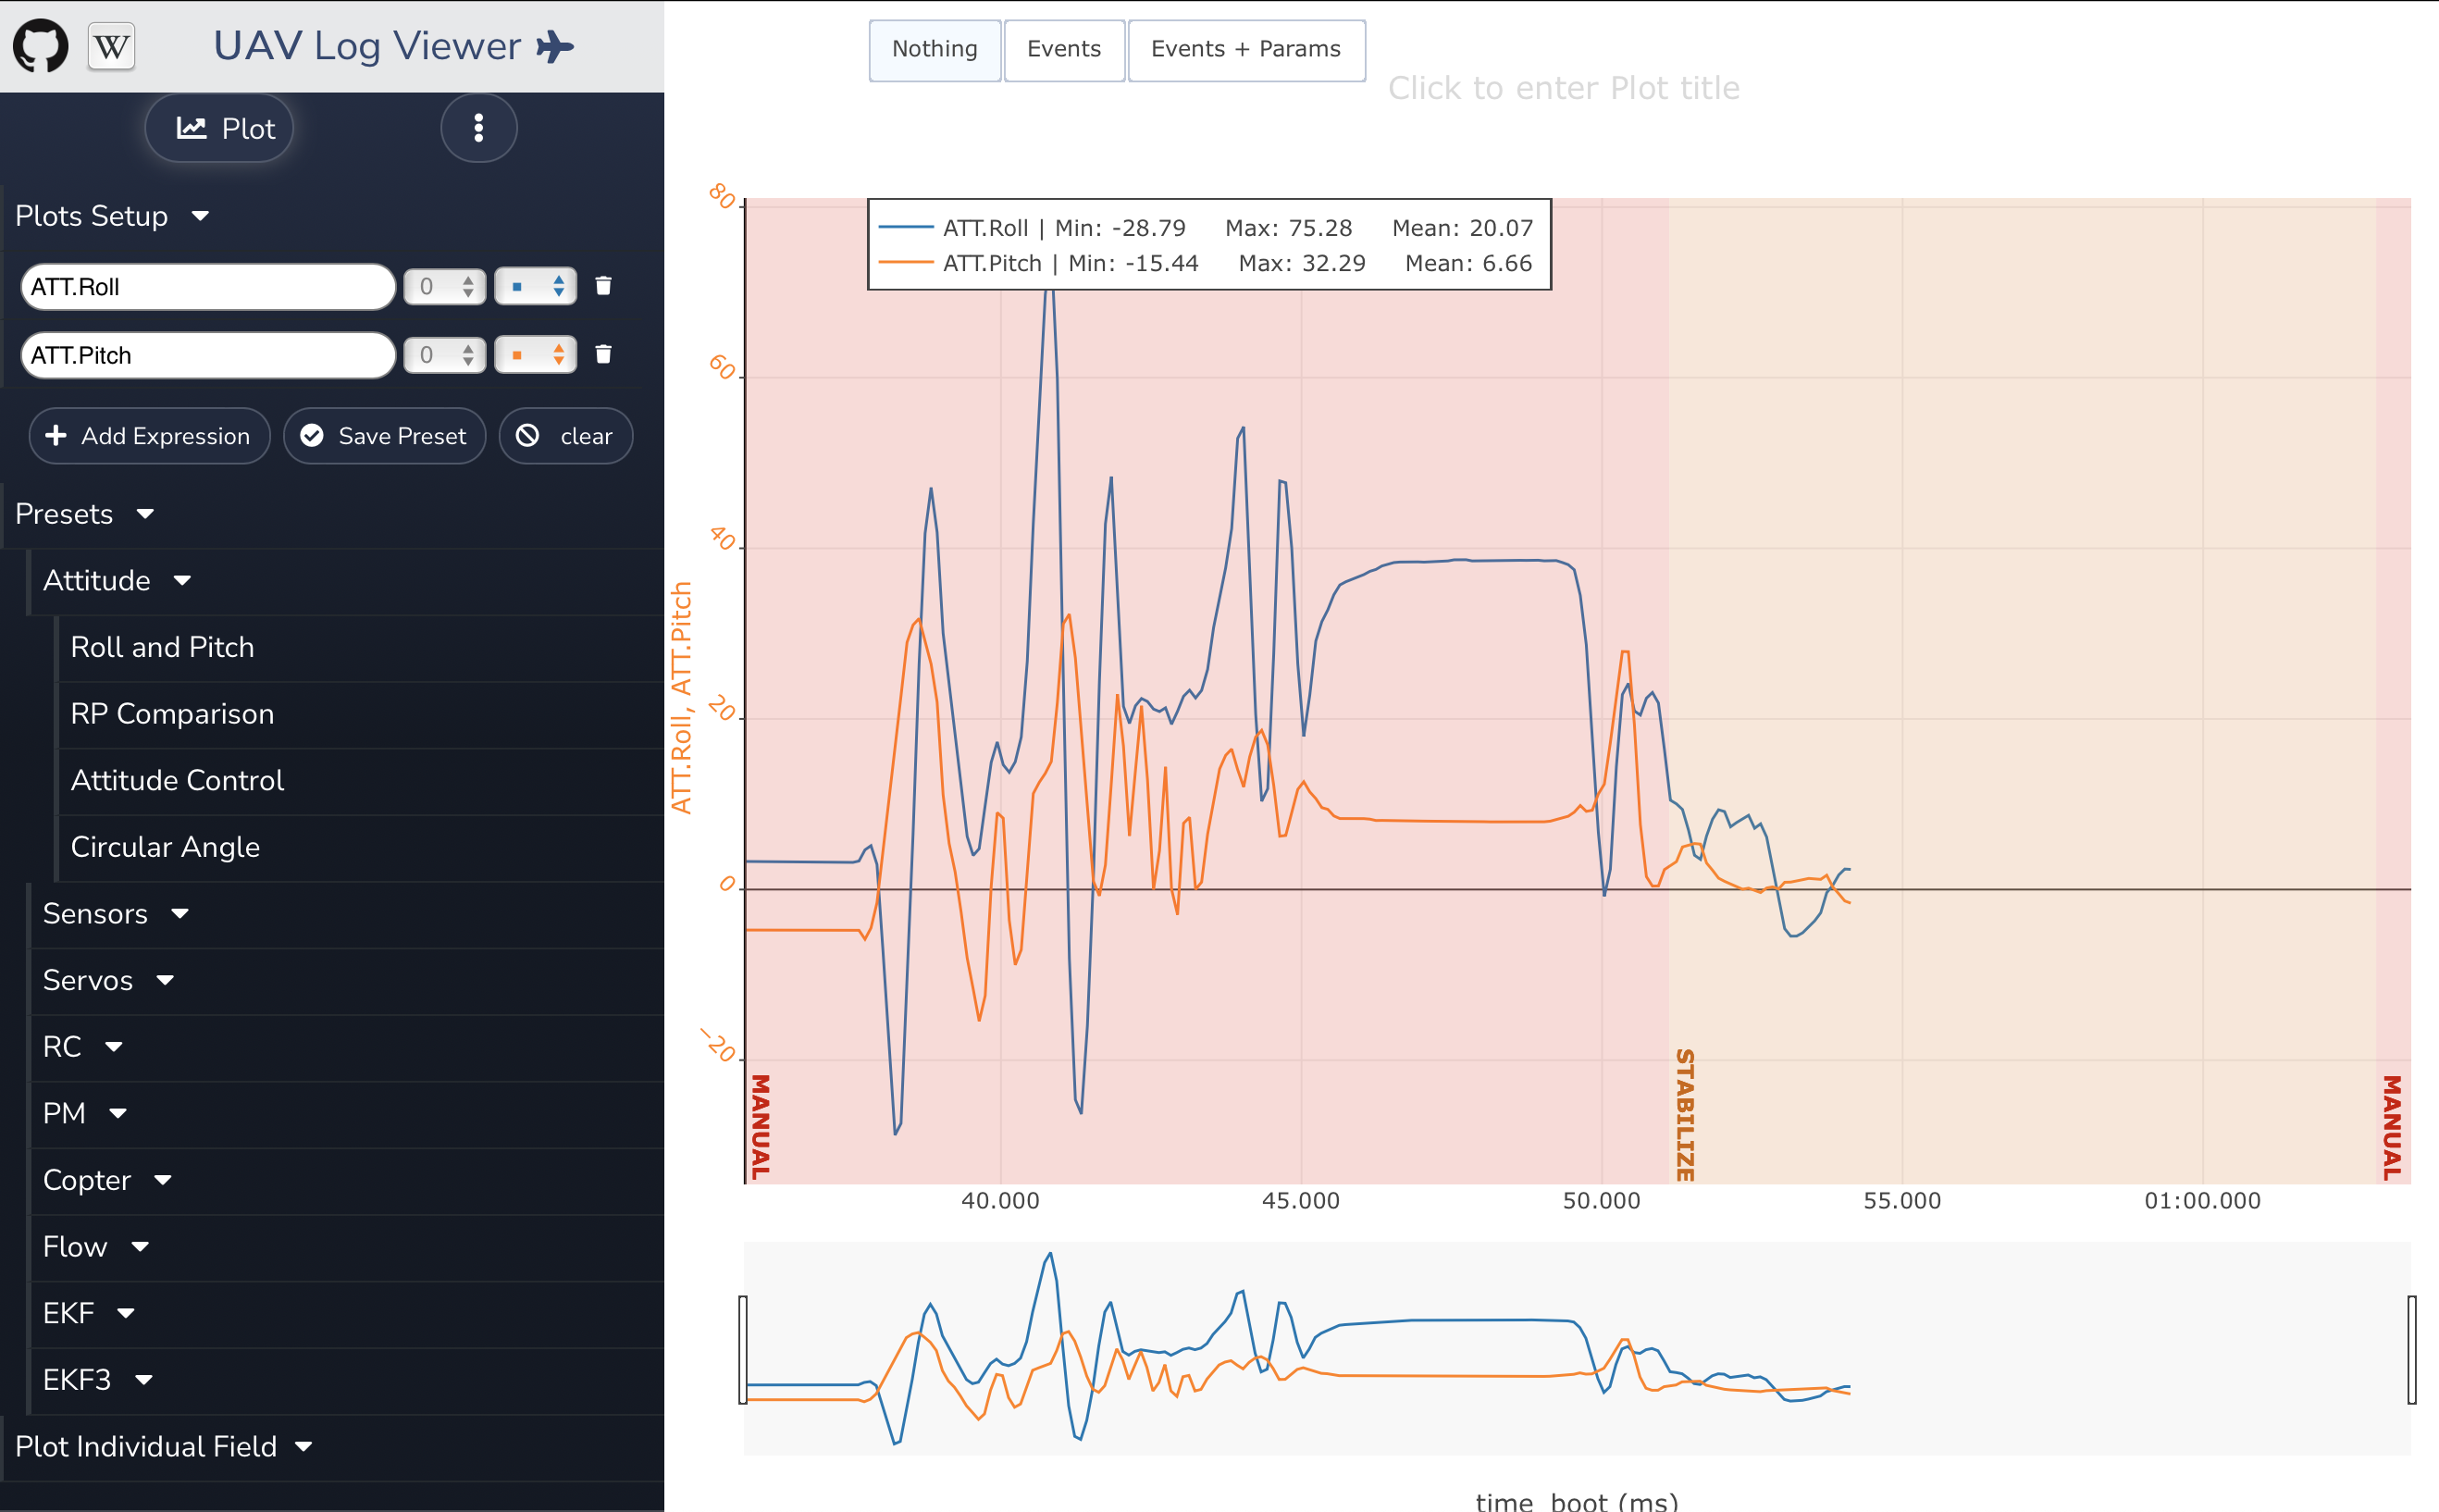
- Press the green play button to access the built in Log Viewer, to visualise and analyse vehicle telemetry (including position if a positioning system is equipped)
#MAVLink Endpoints
Based On: ArduPilot Manager | Port:8000
The MAVLink Endpoints manager allows configuring the serial, UDP, and TCP endpoints for MAVLink-based services and programs to access.
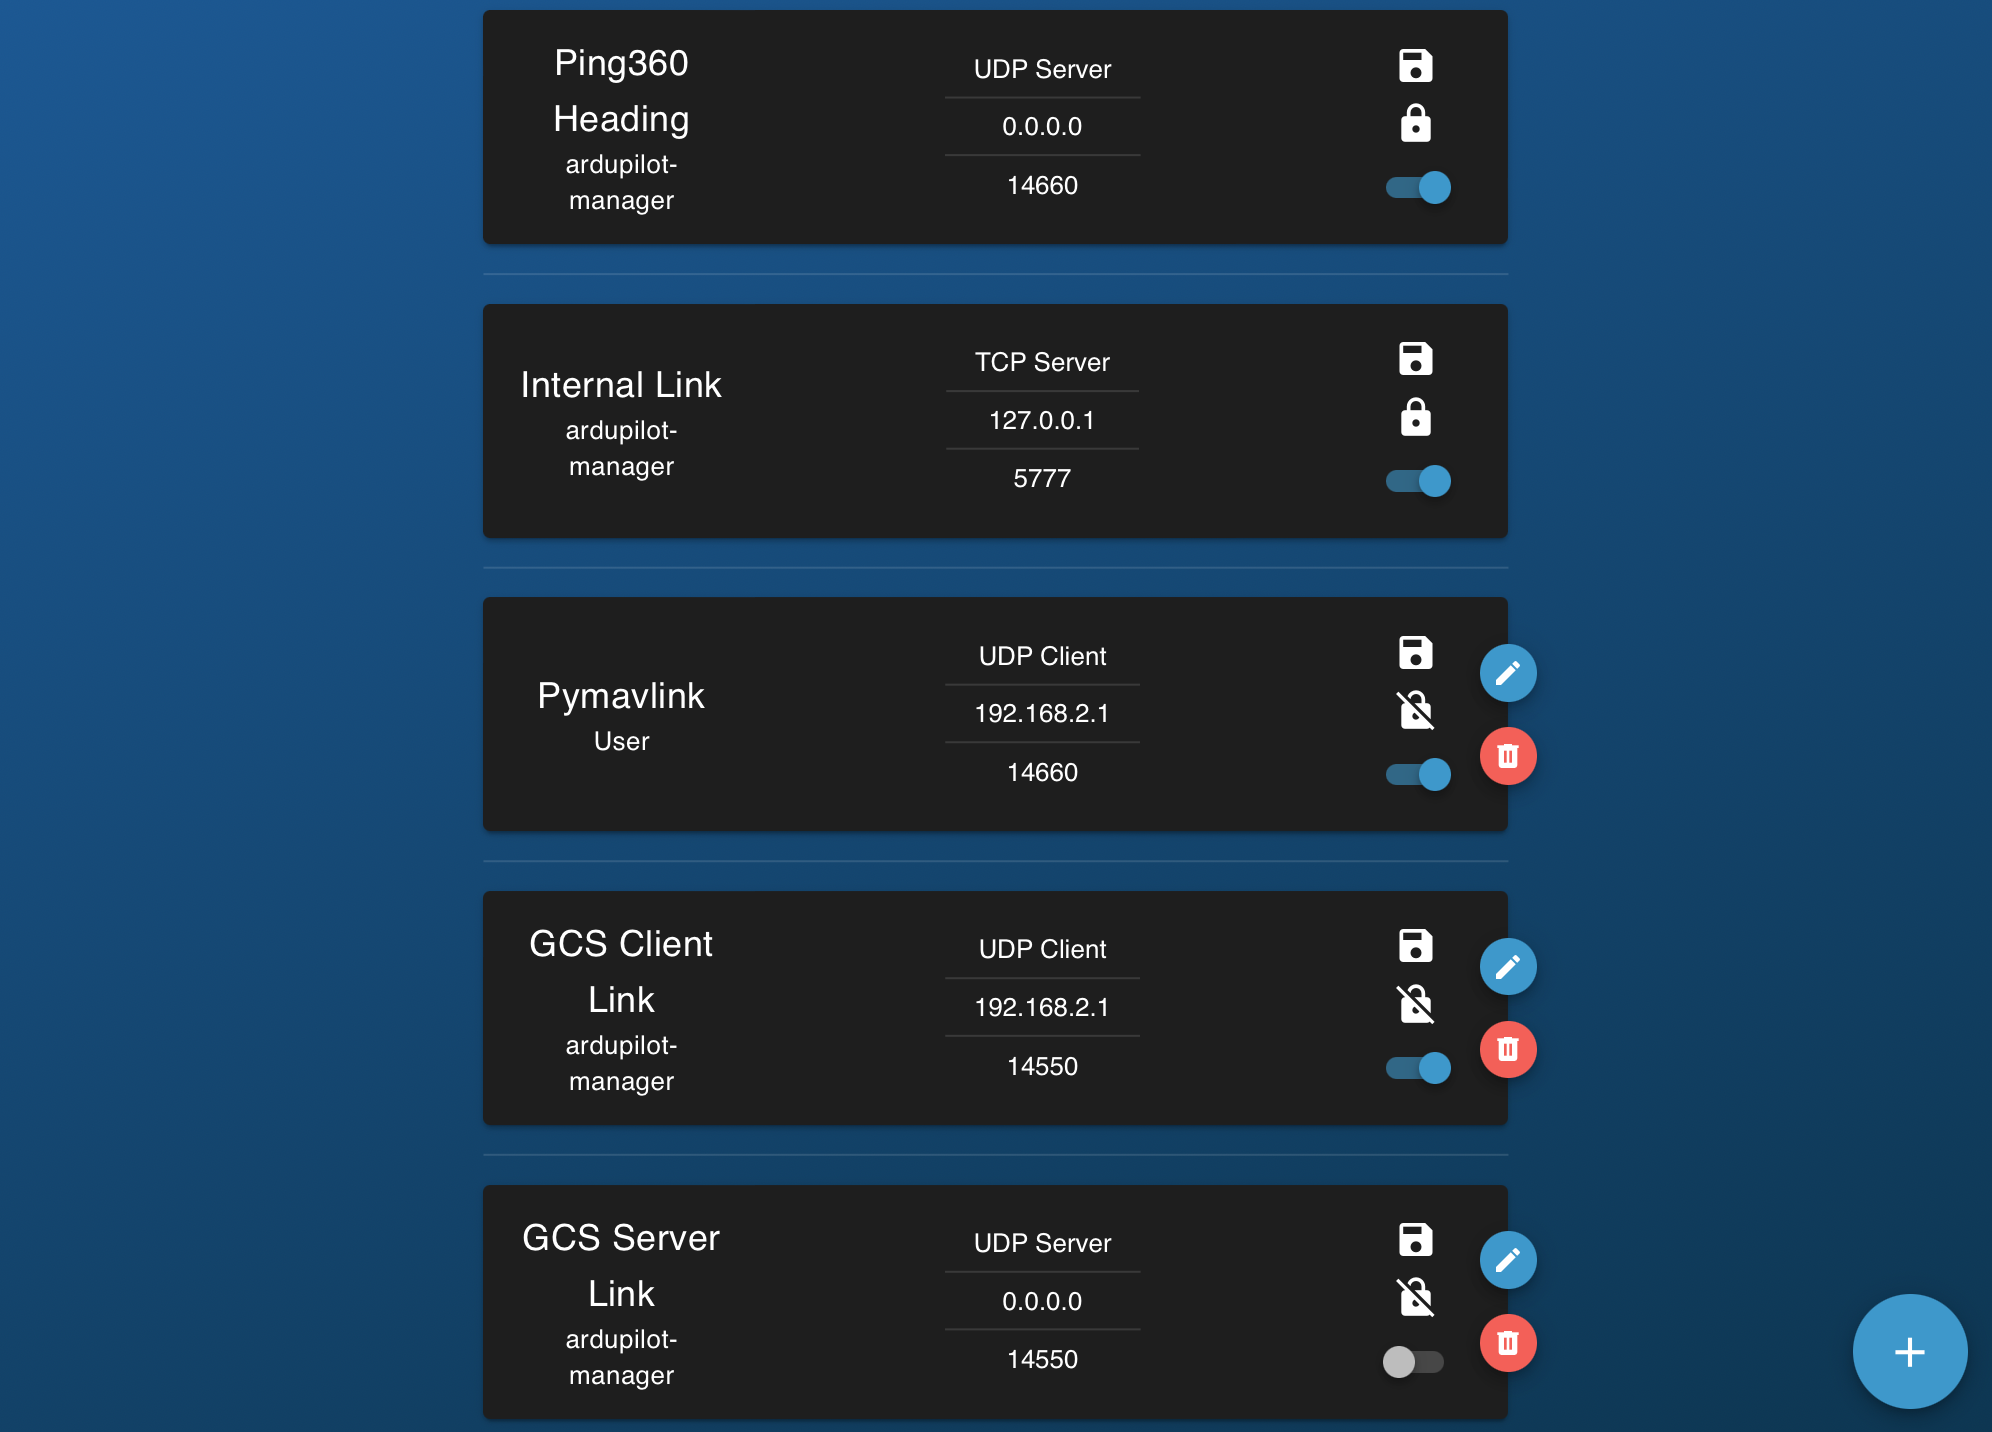
- Endpoints intended for internal BlueOS operations are configured to the
loopback IP
127.0.0.1 - Server endpoints for external use are configured to the localhost IP
- e.g.
0.0.0.0 192.168.2.2may also work
- e.g.
- Client endpoints for external use are configured to the external IP
- e.g.
192.168.2.1for connecting to a UDP server on the Control Station Computer
- e.g.
- Client endpoints seem to operate more stably than server ones
- Unprotected endpoints can be removed or disabled
- Modifying an endpoint is not possible - a new one must be created instead
- e.g. some users may wish to set up a UDP endpoint for connecting to with Pymavlink from the surface:
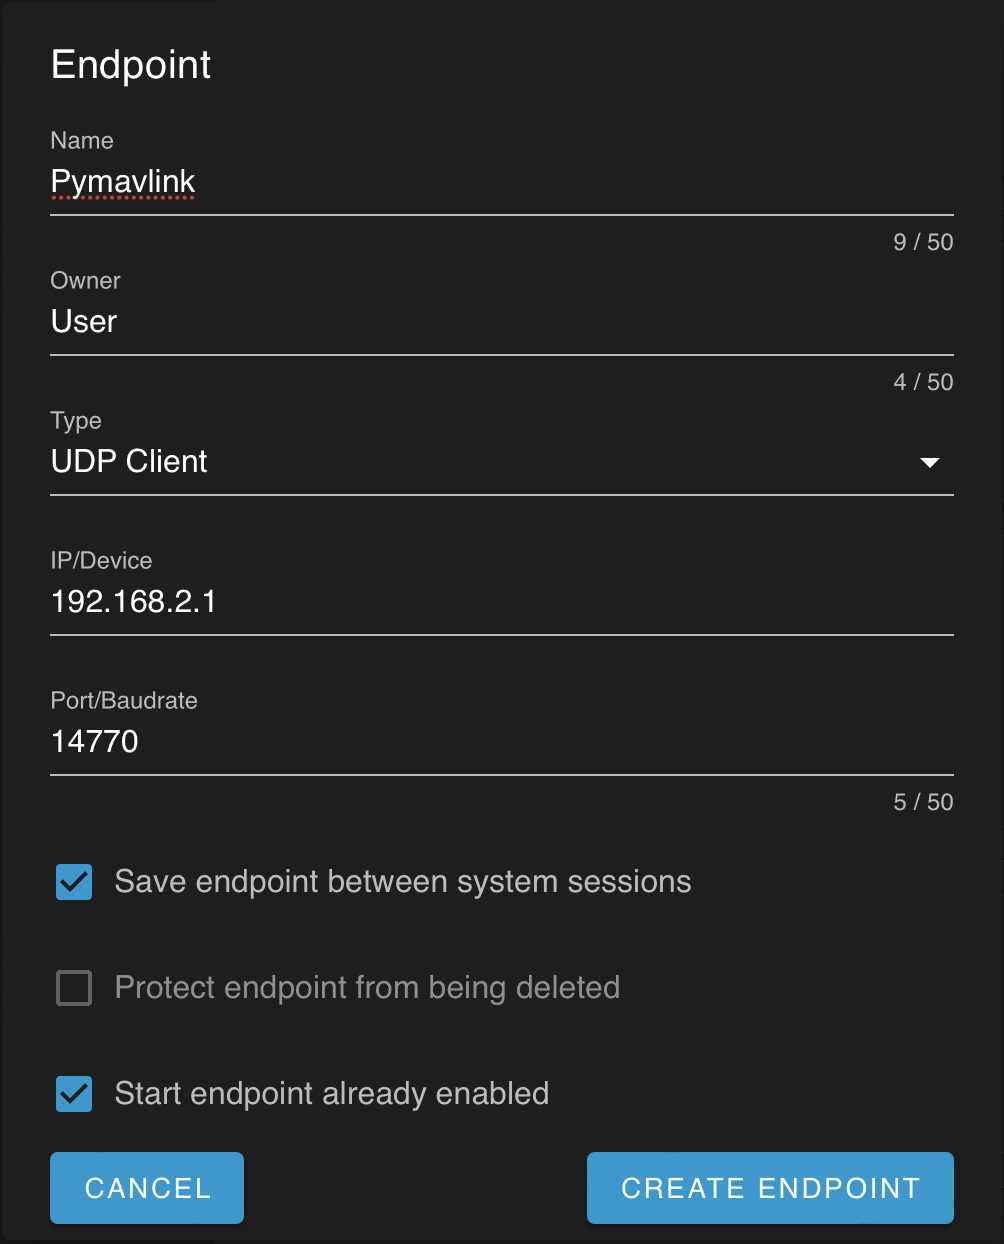
#MAVLink Inspector
Based On: MAVLink2Rest | Port:6040
The MAVLink Inspector provides real-time access to the MAVLink messages being sent to the topside computer. It is possible to
- filter for particular messages
- view past and current messages
- click on messages to see their full details

Future improvements will include plotting and comparisons, along with more powerful filtering options.
For tracking the latest value of a single message type, use the "watcher"
functionality of the MAVLink2REST service (access via the
Available Services page).
#Network Test
Based On: Pardal | Port:9120
The Local Network Test measures real-time latency between BlueOS and the surface computer, and allows checking the upload and download speeds between them.
A plot is provided of each test, to help diagnose intermittent issues.

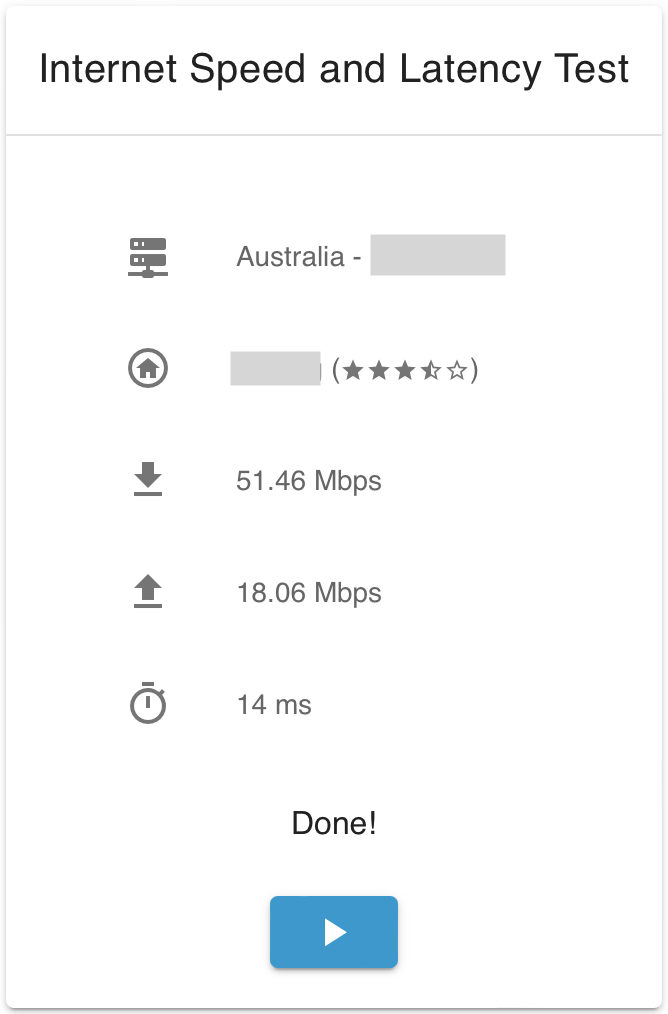
The Internet Speed Test allows measuring the latency and upload and download speeds between BlueOS and its internet connection (if one is available).
#NMEA Injector
Based On: NMEA Injector | Port:2748
- Conveys GPS positions (from an NMEA device) to the vehicle via MAVLink messages
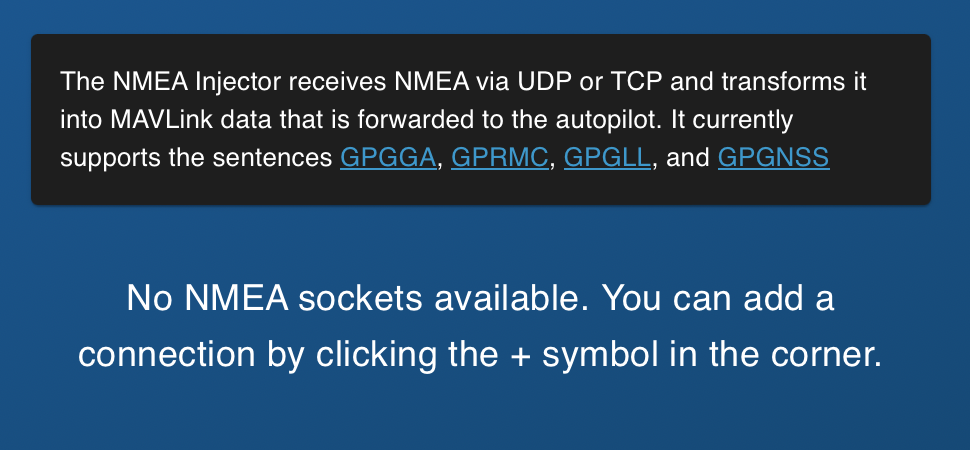
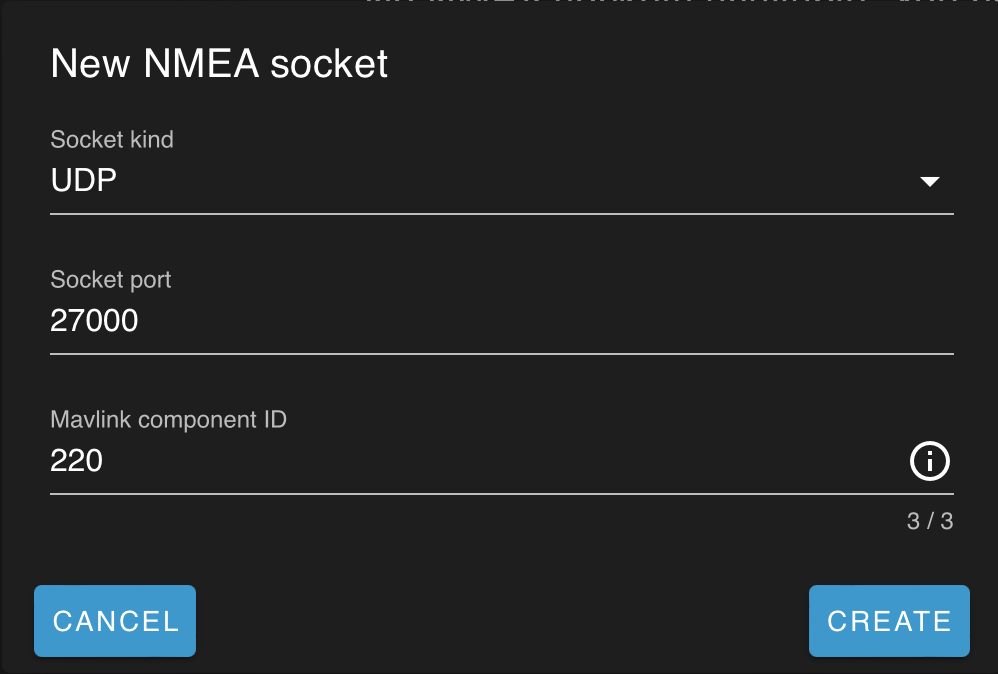
- Setup requires a UDP or TCP socket for the NMEA device to connect to, and a MAVLink ID for the component that will send the location data to the vehicle
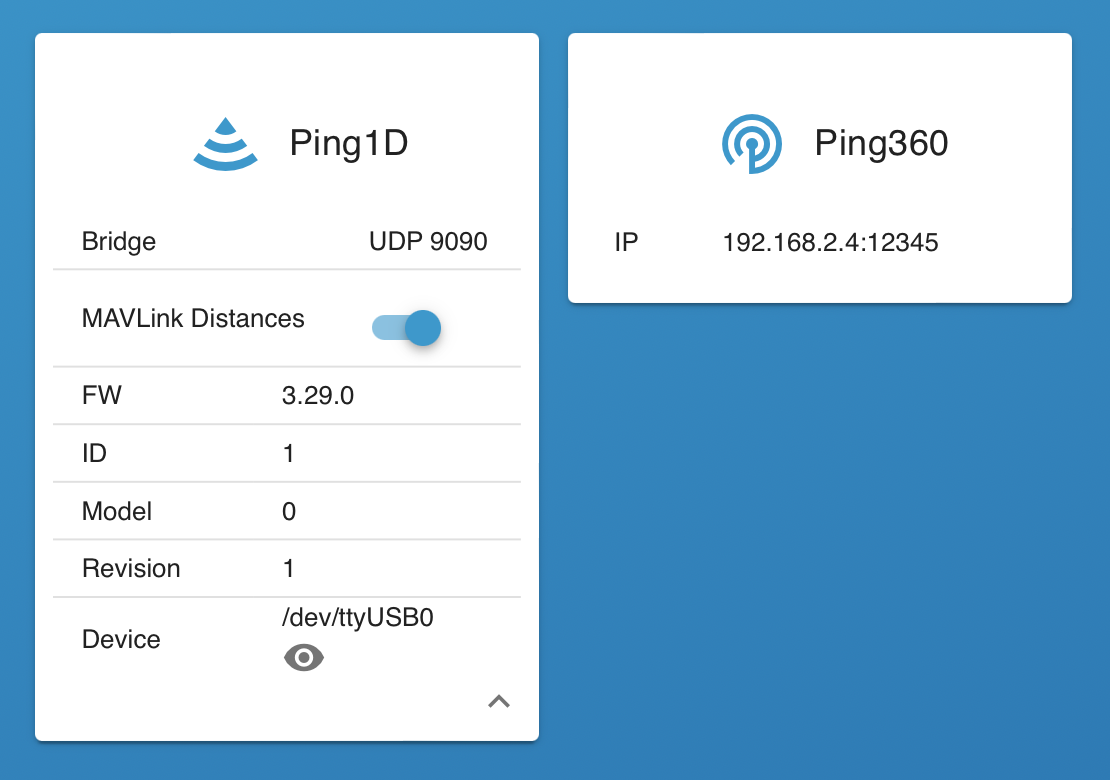
#Ping Sonar Devices
Based On: Ping Service | Port:9110
New in 1.1
The Ping Sonar Devices page shows any detected sonars from the Ping family, including ethernet-configured Ping360s that are visible on the local network (e.g. via an Ethernet Switch).
- Allows configuring Ping Sonar distance estimates to send as MAVLink
DISTANCE_SENSORmessages to the autopilot, for viewing in the Control Station Software and logging as part of the telemetry stream - Provides a viewing utility for devices connected via USB/serial, to show which port they are plugged into
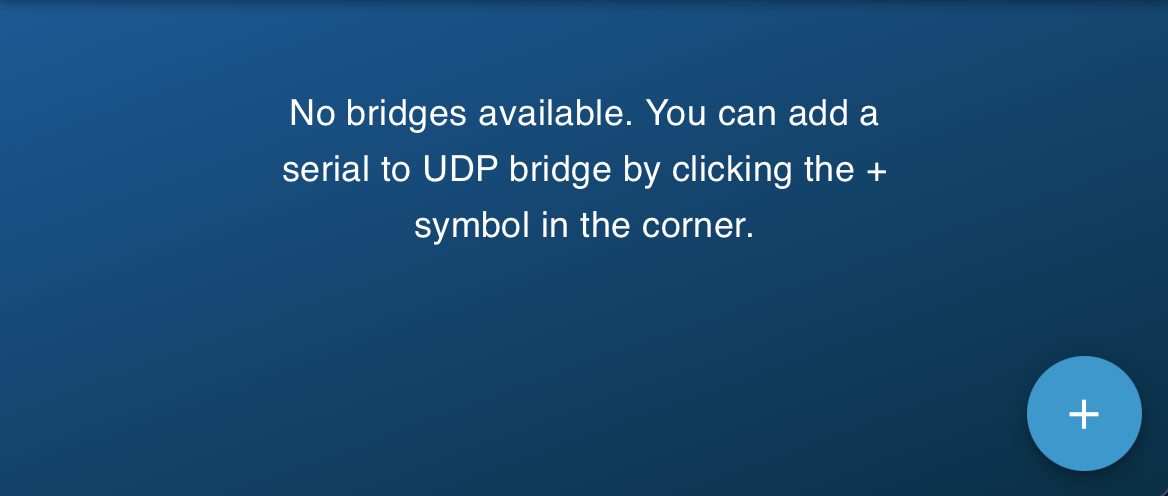
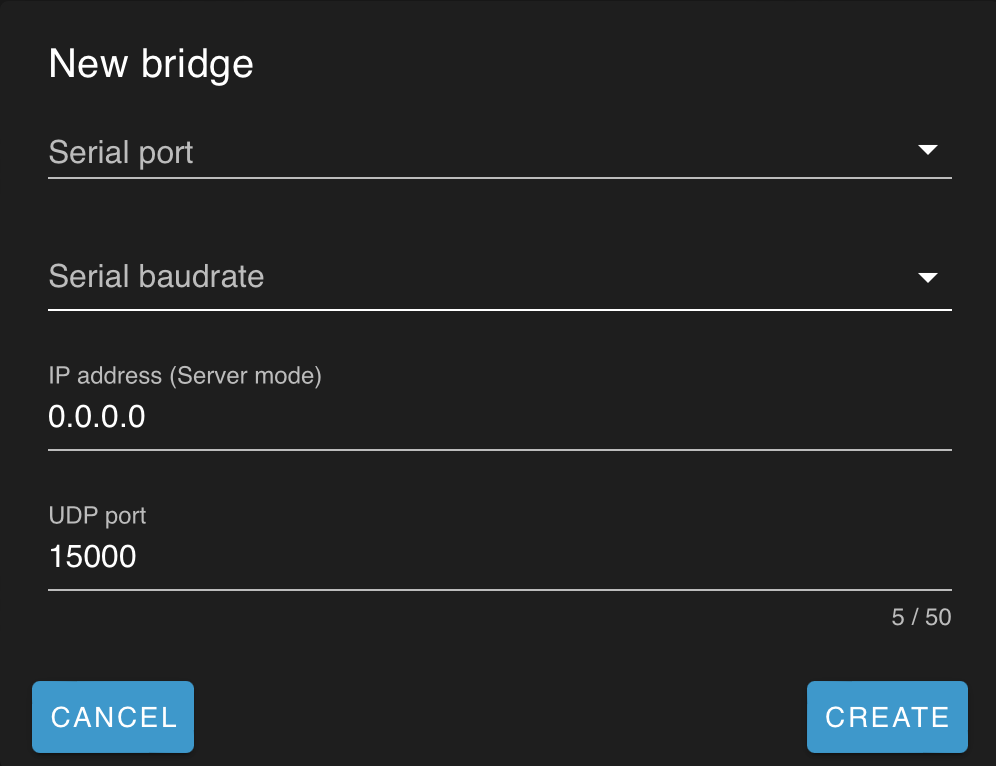
#Serial Bridges
Based On: Bridget | Port:27353
The Serial Bridges page allows creating high performance links between serial devices that are connected to the onboard computer, to a UDP port.
Replaces the Routing functionality from the old Companion Software.
For making connections to the autopilot, see MAVLink Endpoints.
- NOTE: UDP-based systems do not guarantee packet delivery or sequential alignment
- Bridges to the Control Station Computer
will generally use the localhost IP
0.0.0.0, which creates a UDP server that waits for a UDP client on the control computer to connect to it- other IP addesses create a UDP client on the onboard computer, which expects the serial device to initiate communication before the connected UDP server (on the control computer) can respond
- NOTE: a client should communicate with the server at least once every 10 seconds to avoid being disconnected
- Bridges to internal programs can use the loopback IP
127.0.0.1, which creates a local server
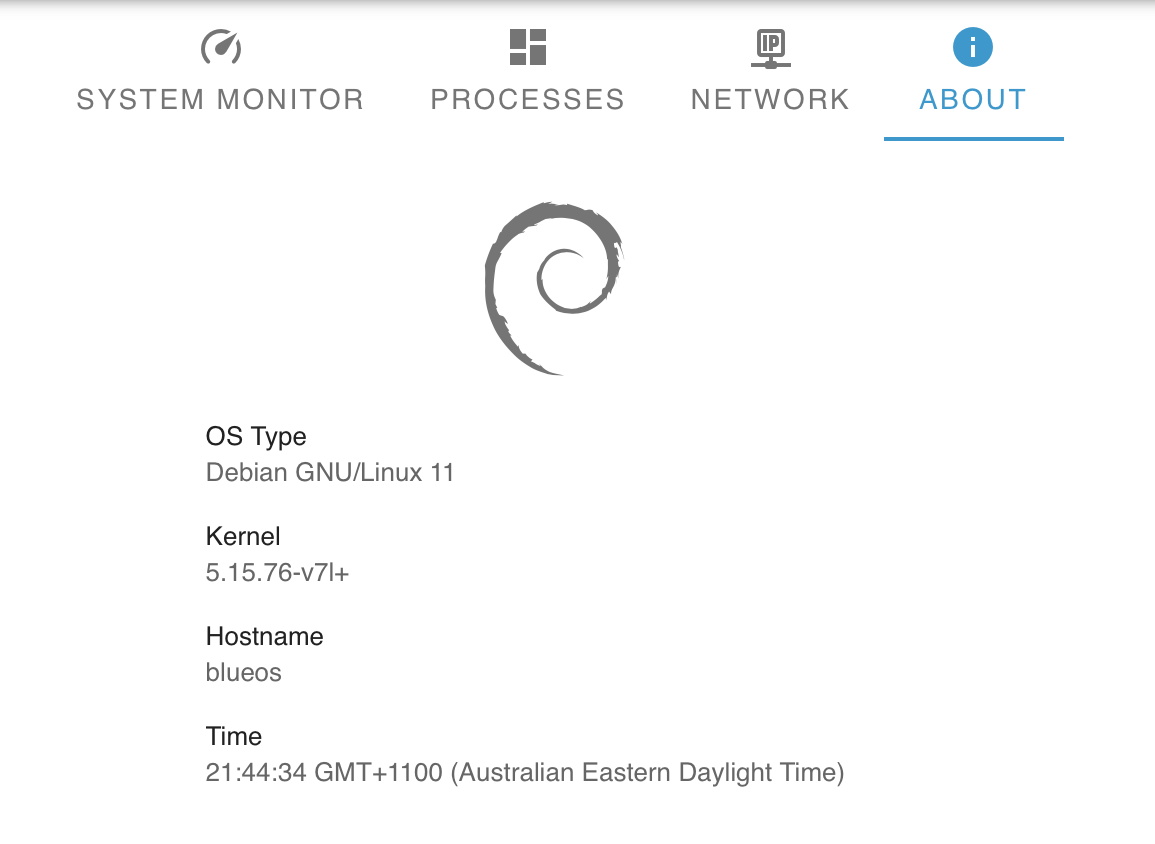
#System Information
Based On: System Information | Port:6030
The System Information page provides useful information about the processes, network configuration, and computer system BlueOS is running on. It can be useful for troubleshooting, and finding if a particular program is using excessive resources.
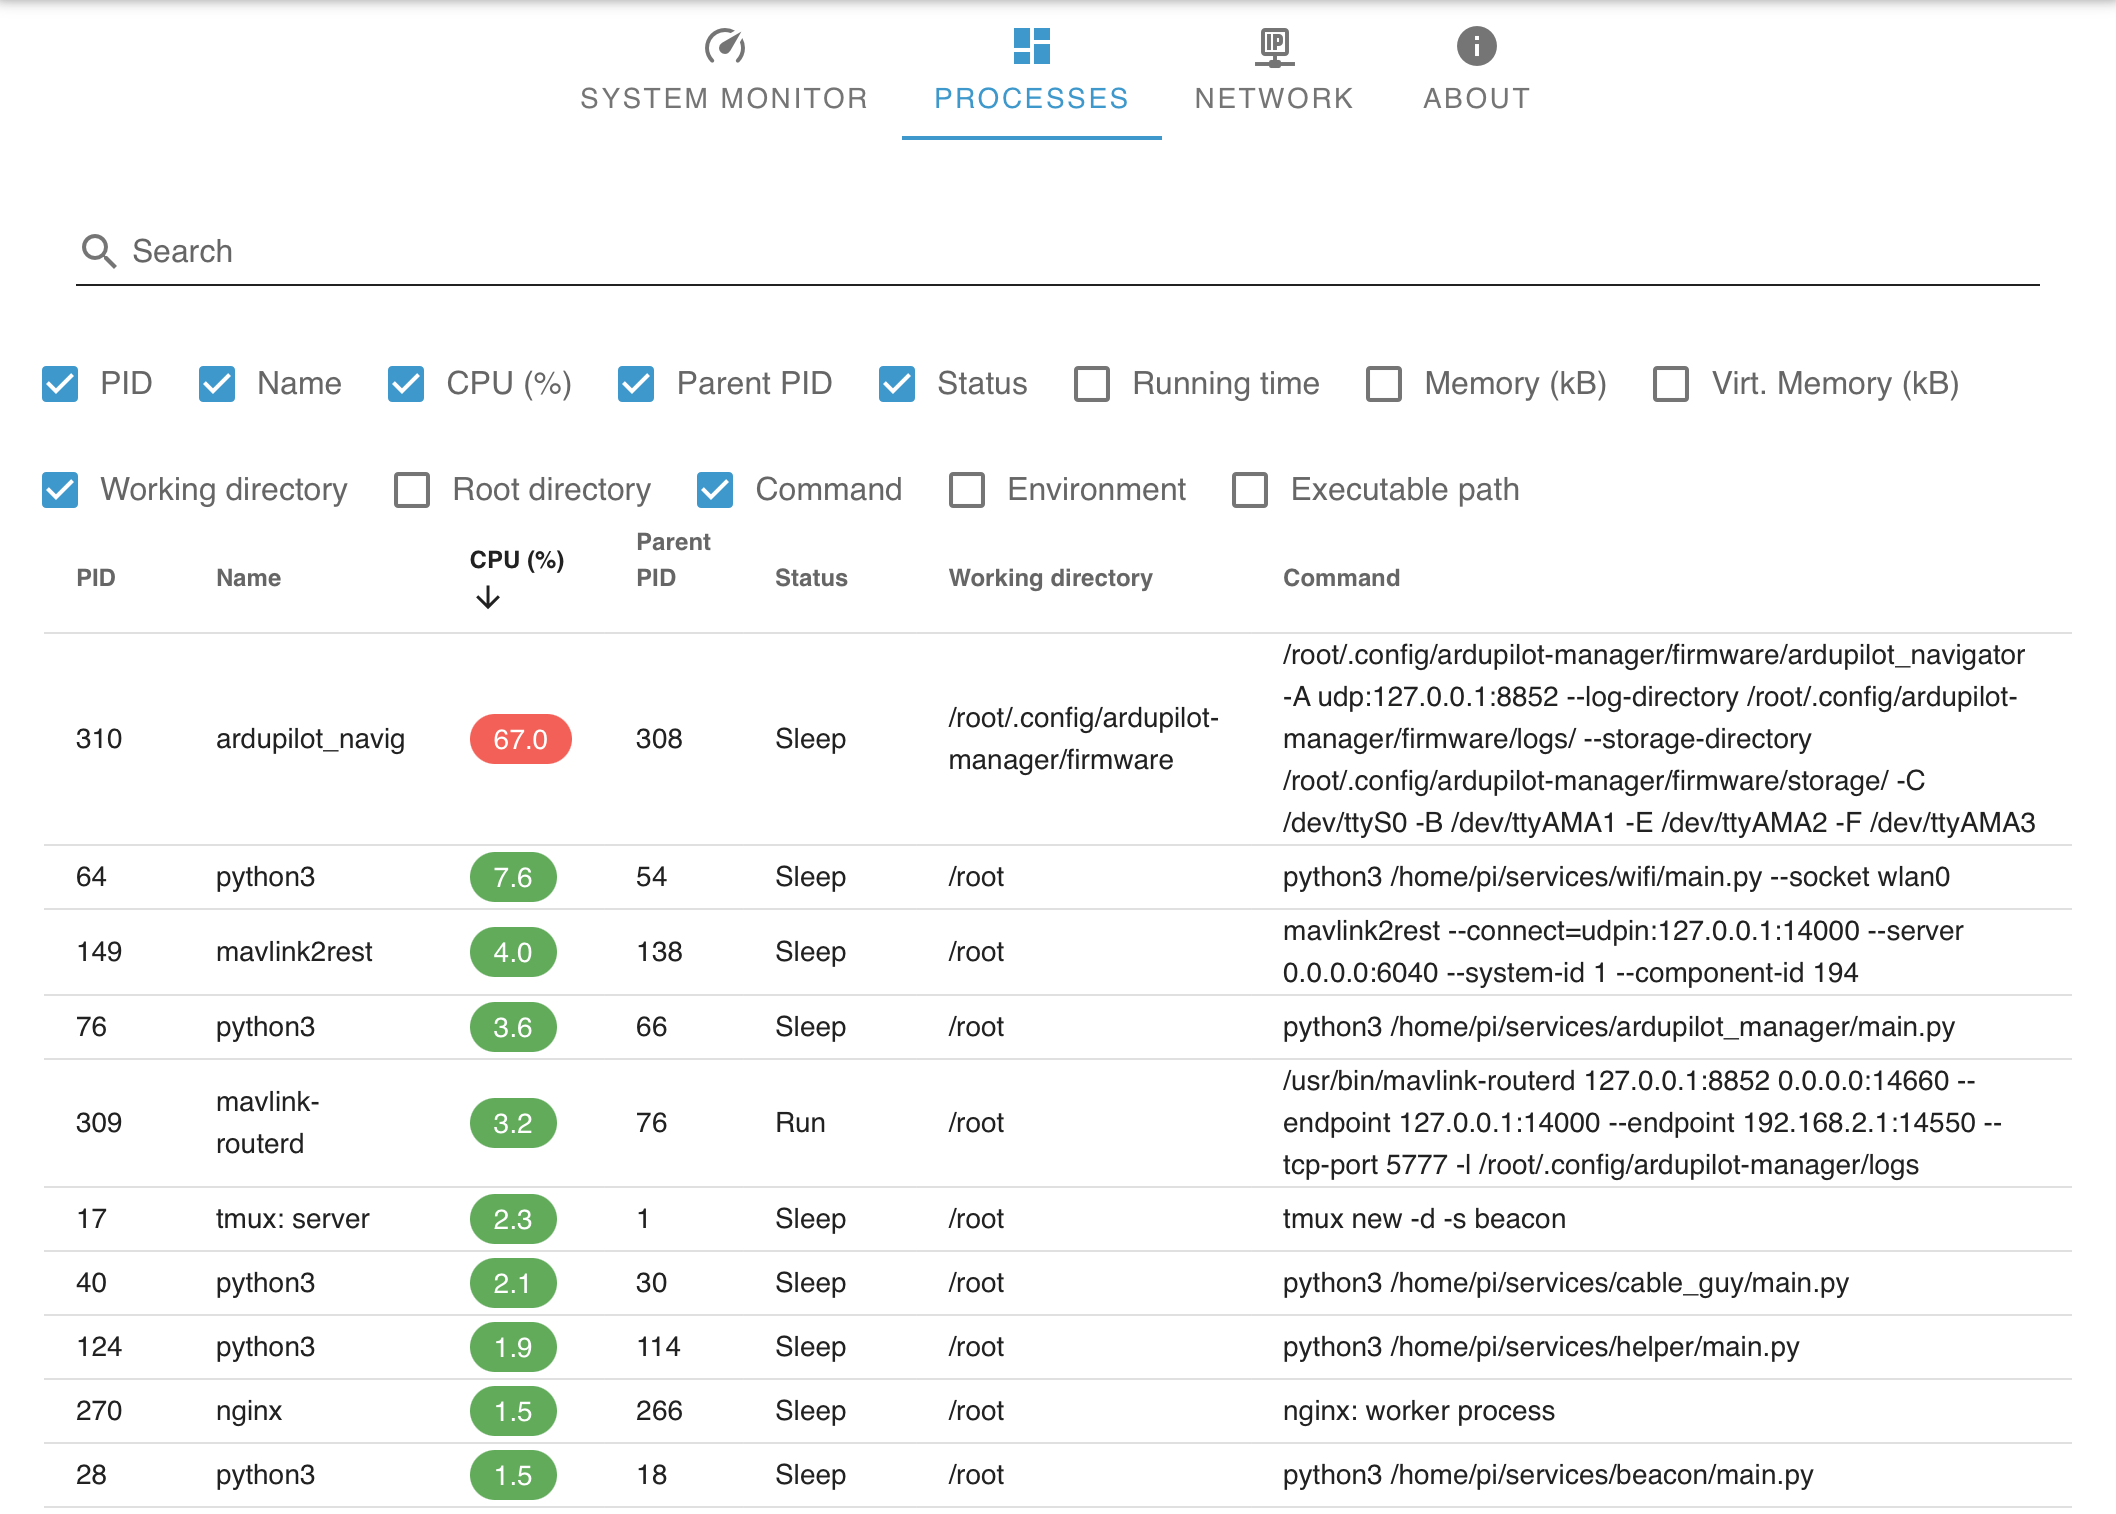
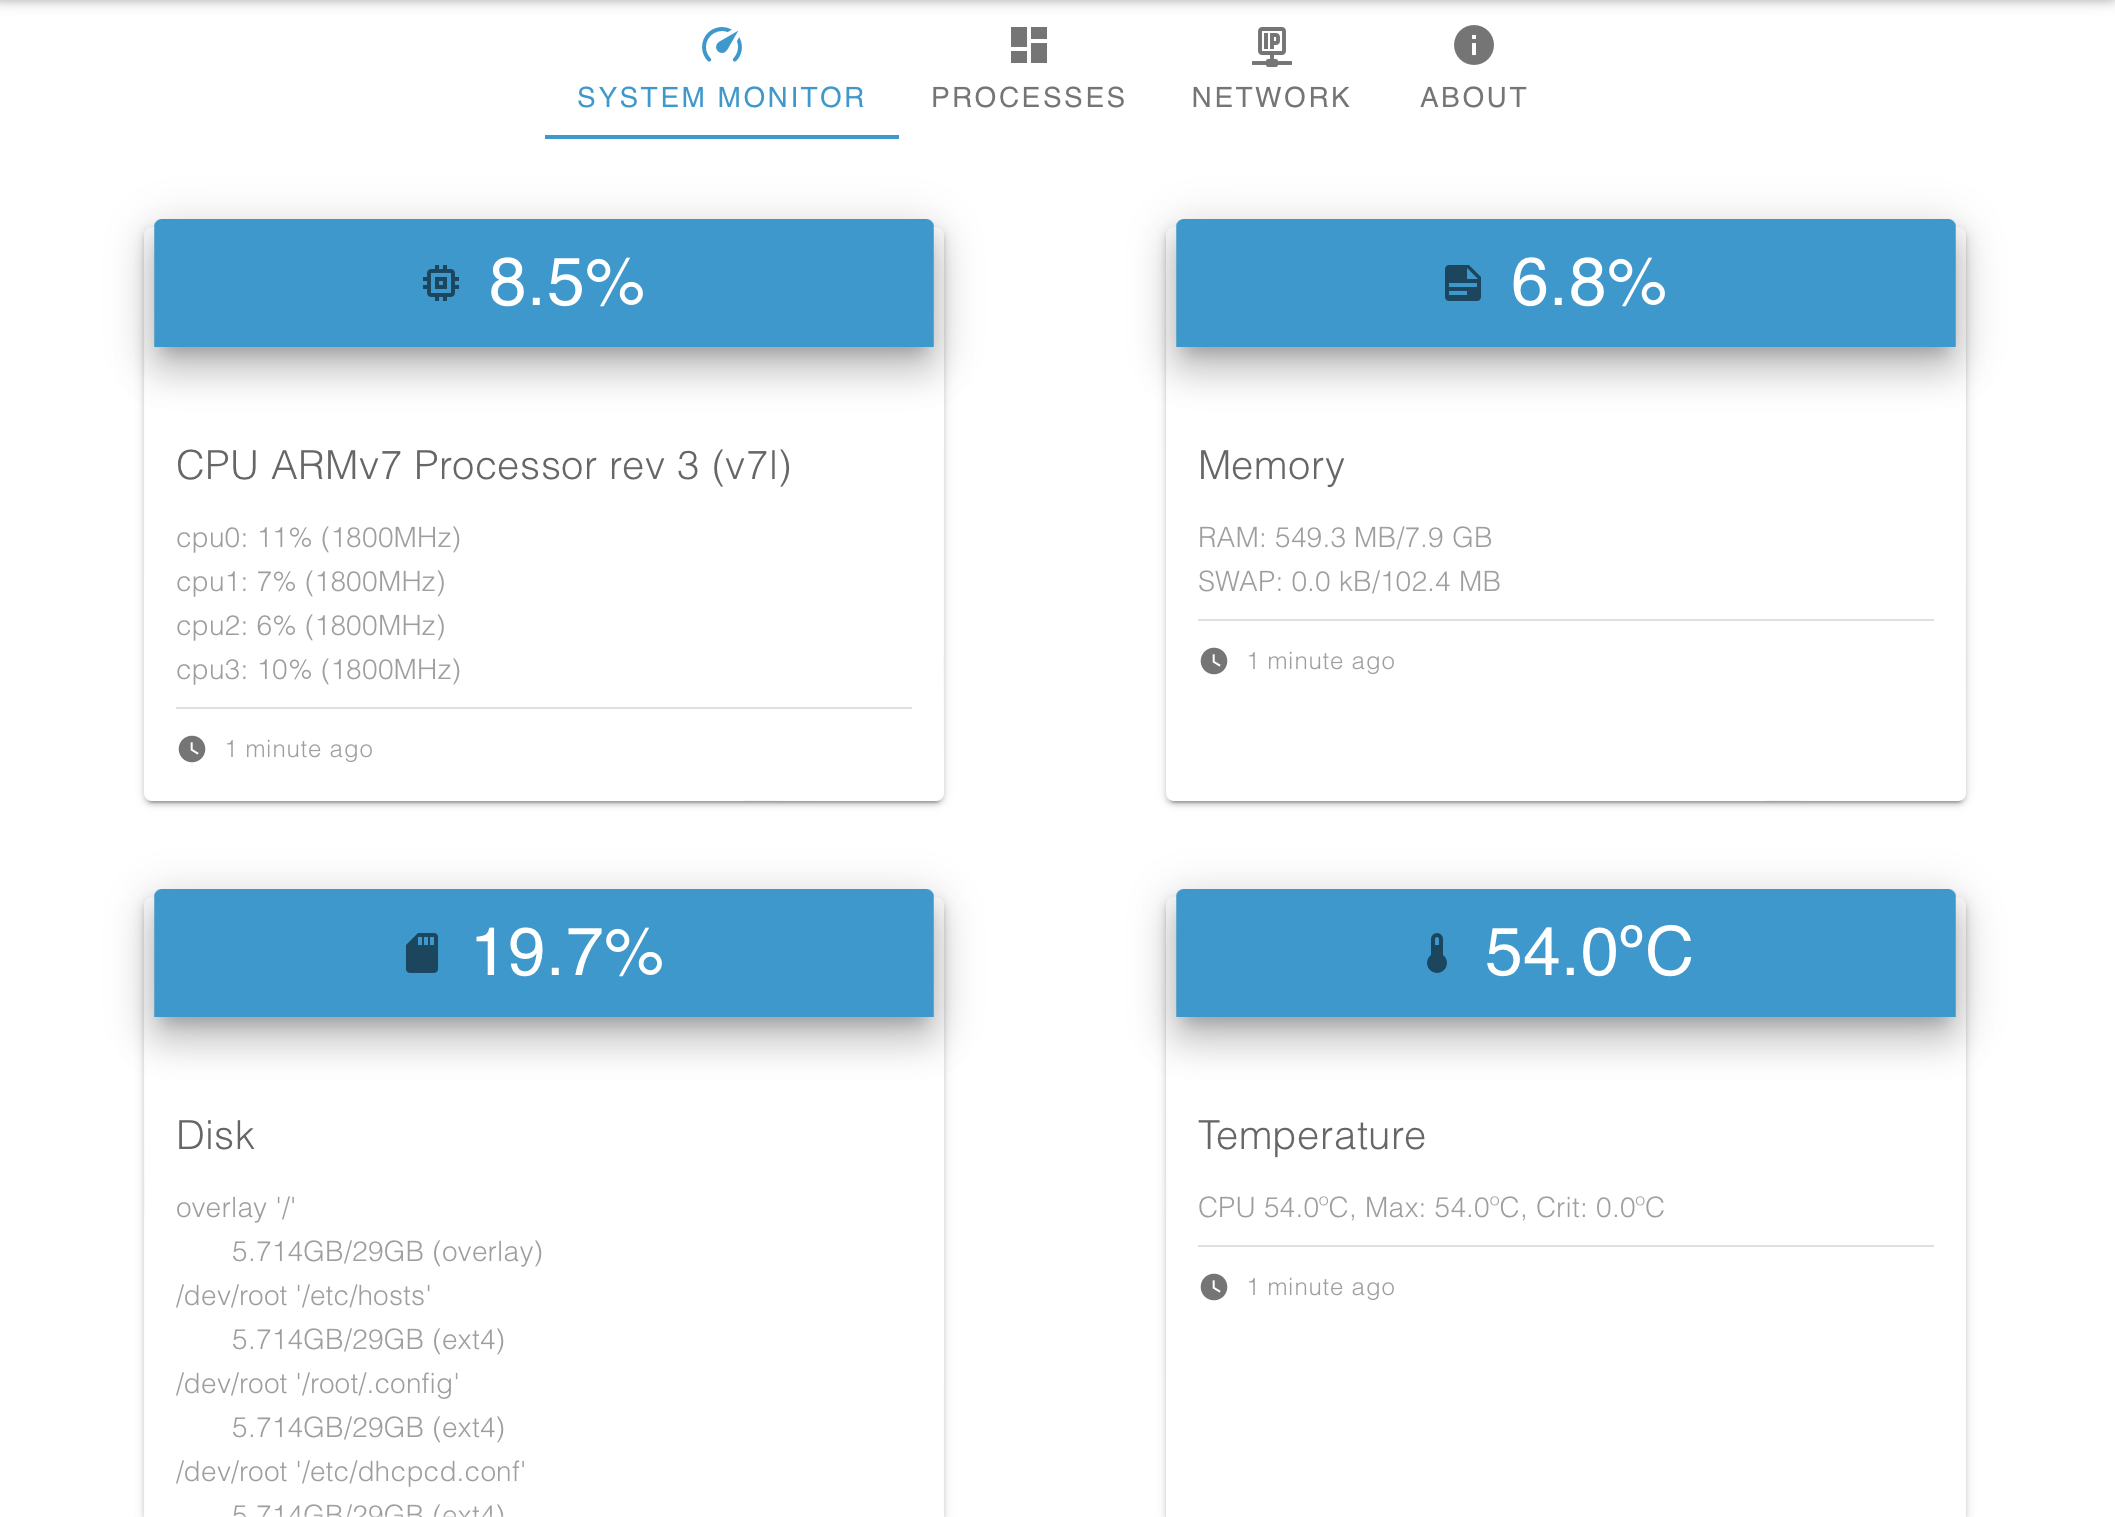


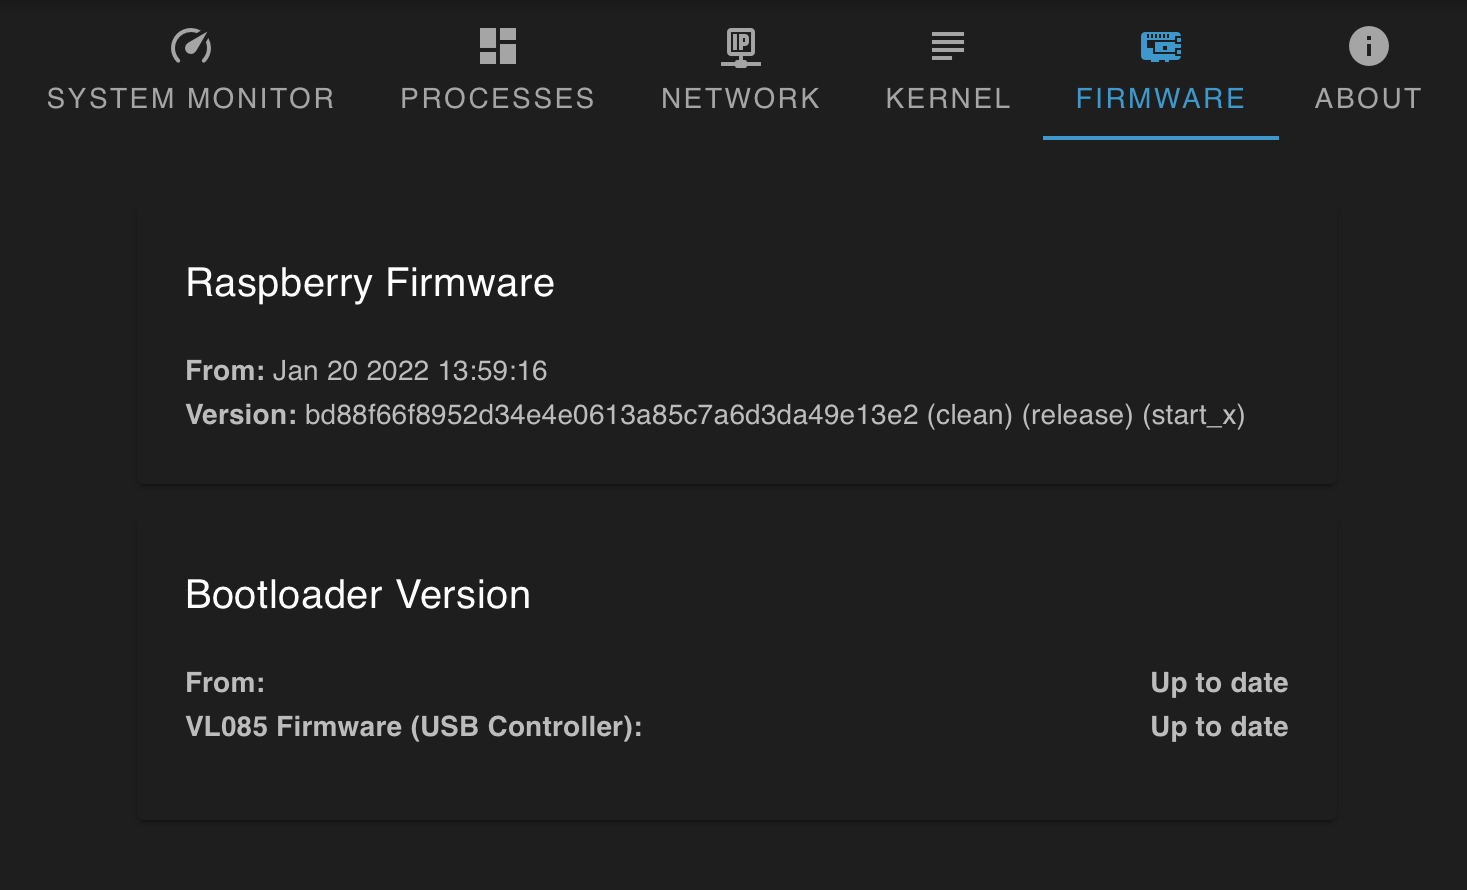
Update buttons are provided if the device is not running the latest stable versions of the Raspberry Pi firmware or USB controller.
#Terminal
Based On: ttyd | Port:8088
The Terminal provides
- A tmux session
- Can split horizontally (
CTRL+b ") and vertically (CTRL+b %), and use cursor to resize the panels - For more advanced tips, check out the tmux cheat sheet website
- Can split horizontally (
- Direct access into the core BlueOS docker container
- Ready access to the tmux sessions of the core services (
CTRL+b s)- Useful for seeing logs as they update live
- Can kill services if necessary
- Access to the underlying device via the
red-pillutility- Can return to the core container using the
exitcommand, or pressingCTRL+d - Can list available docker images (including extensions) with
docker image list - Can list active docker containers (including extensions) with
docker ps -a
- Can return to the core container using the

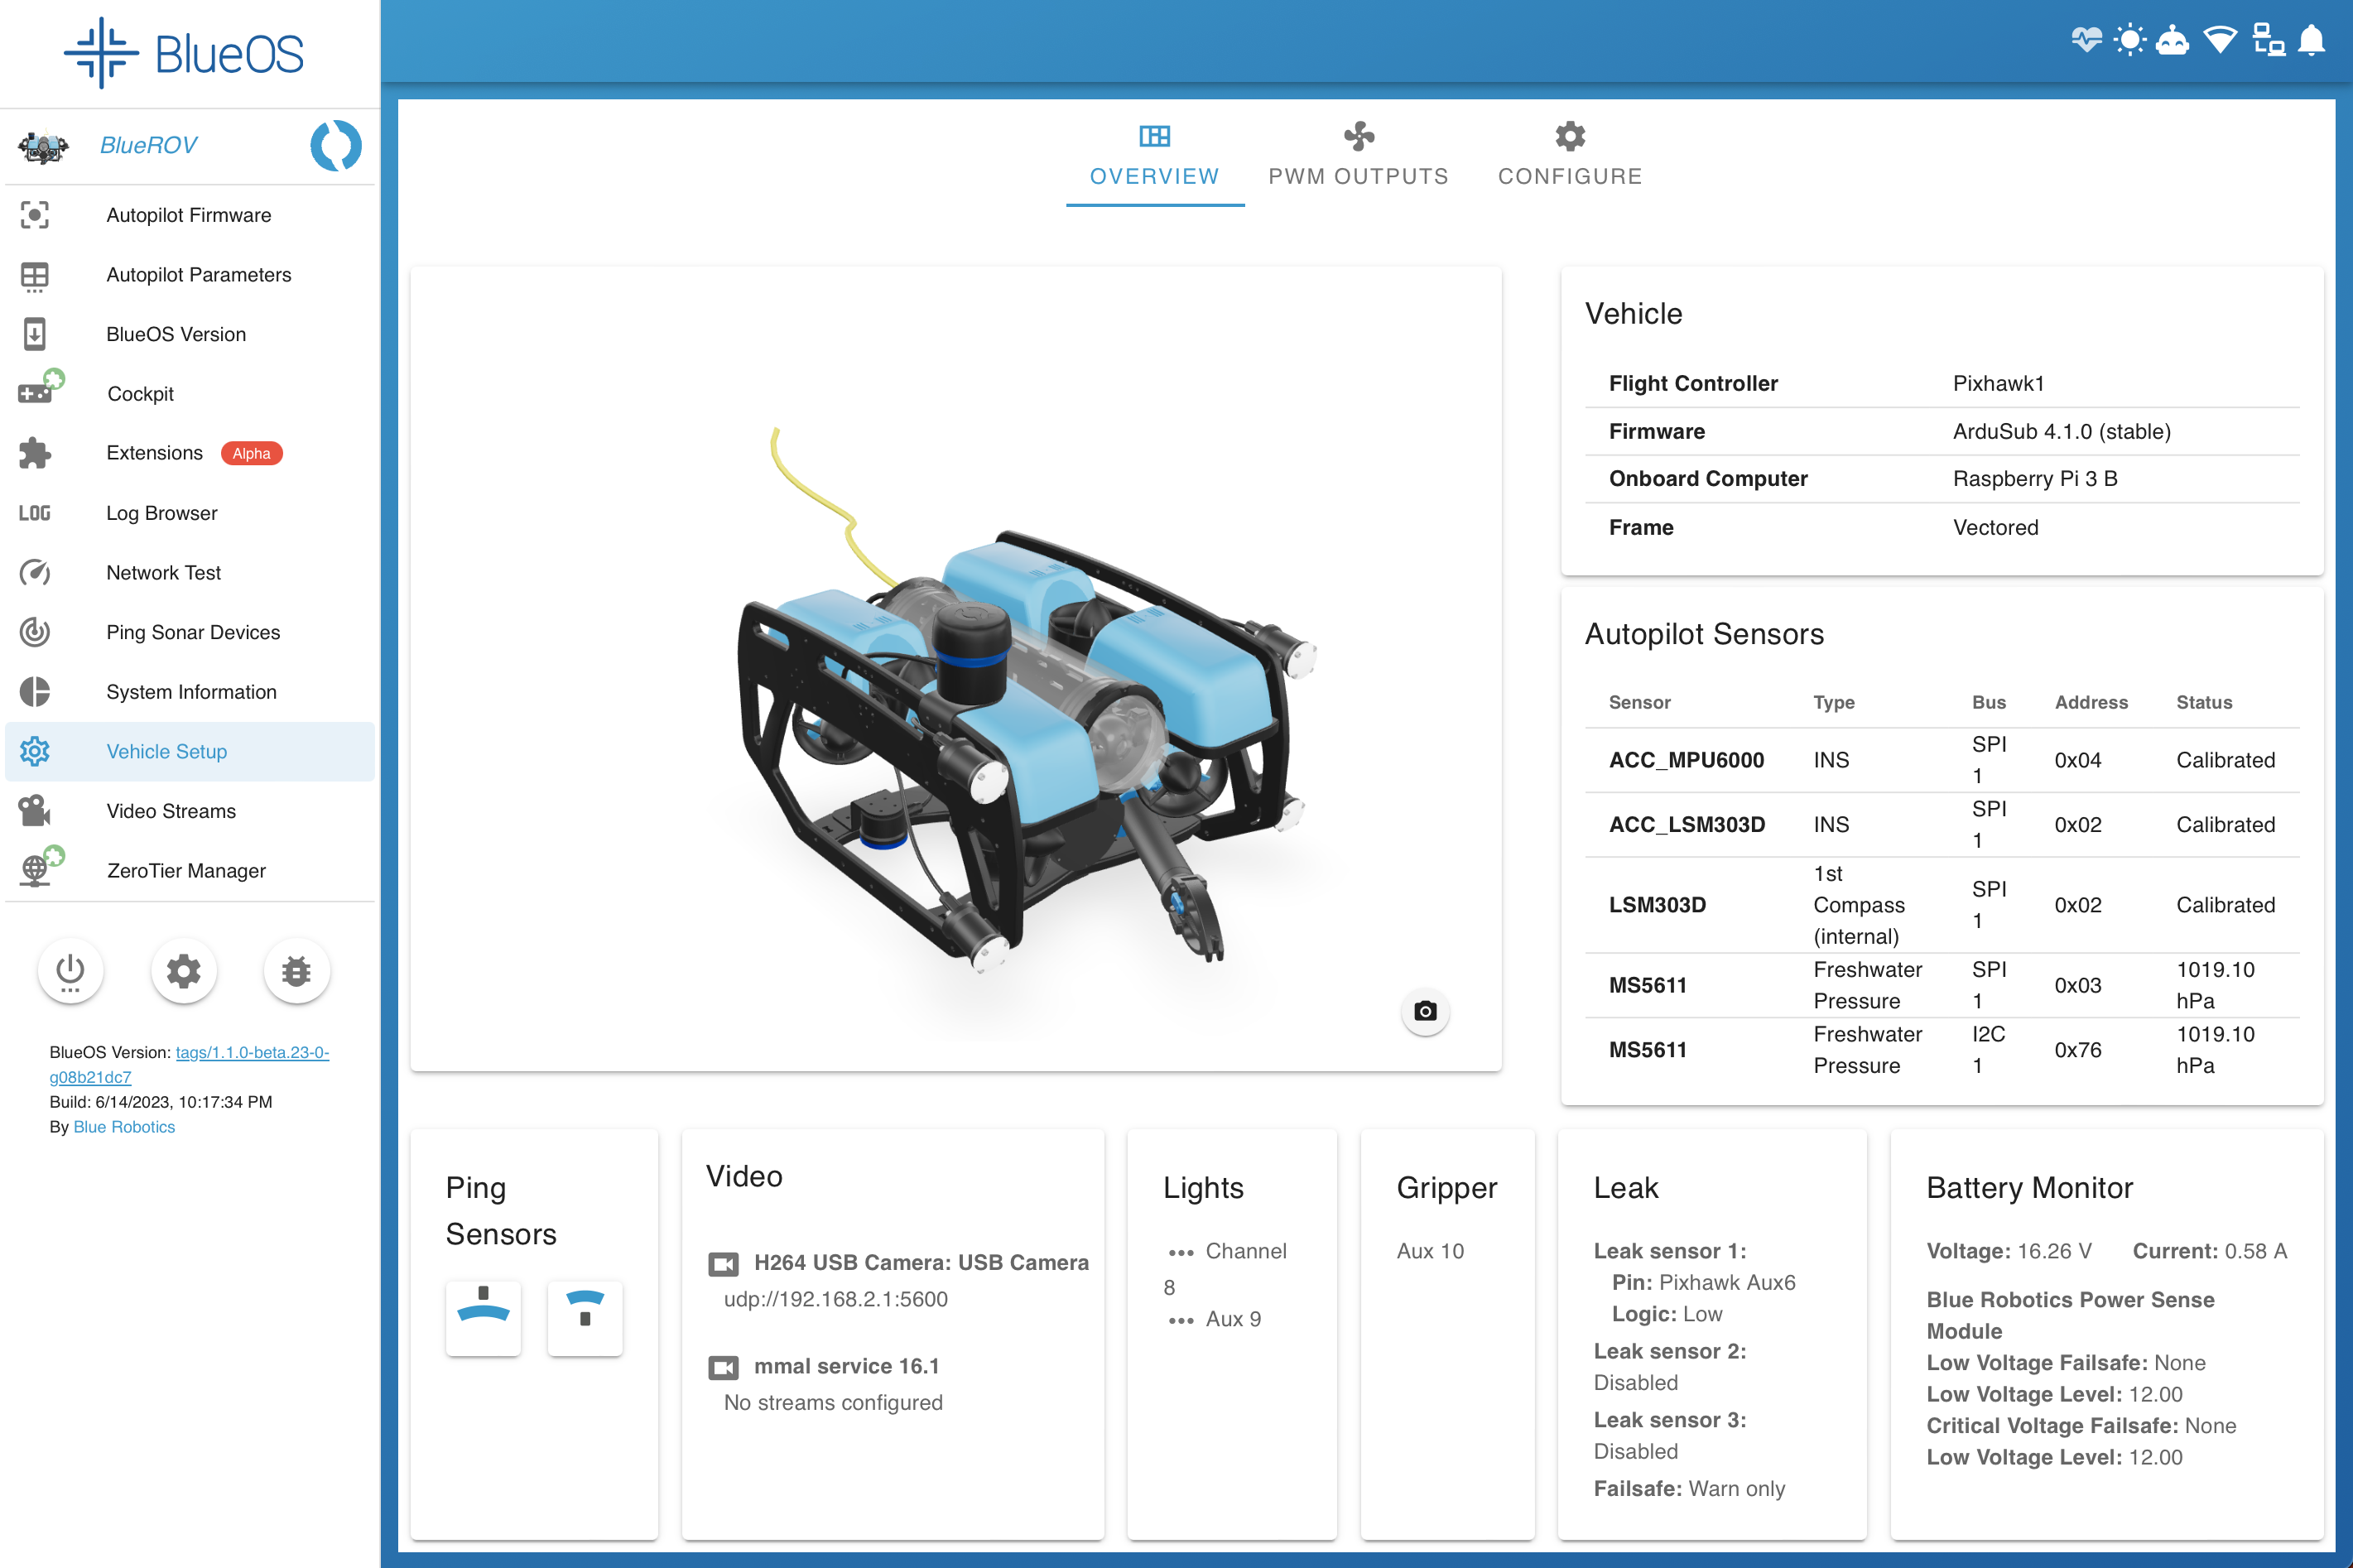
#Vehicle Setup
New in 1.1
The Vehicle Setup page provides an overview of the vehicle, including its sensors and peripherals. The 3D model can be rotated, and can be panned by clicking and dragging while holding SHIFT. The camera icon can be used to capture a screenshot of the current view of the model, with a transparent background.
It is possible to override the displayed 3D model by placing an appropriate .glb
file at userdata/modeloverrides/<vehicle_type>/<vehicle_frame>.glb (e.g.
userdata/modeloverrides/sub/VECTORED_6DOF.glb), or userdata/modeloverrides/ALL.glb.
Documentation for the recommended process for creating a .glb file from a vehicle
model is coming soon.
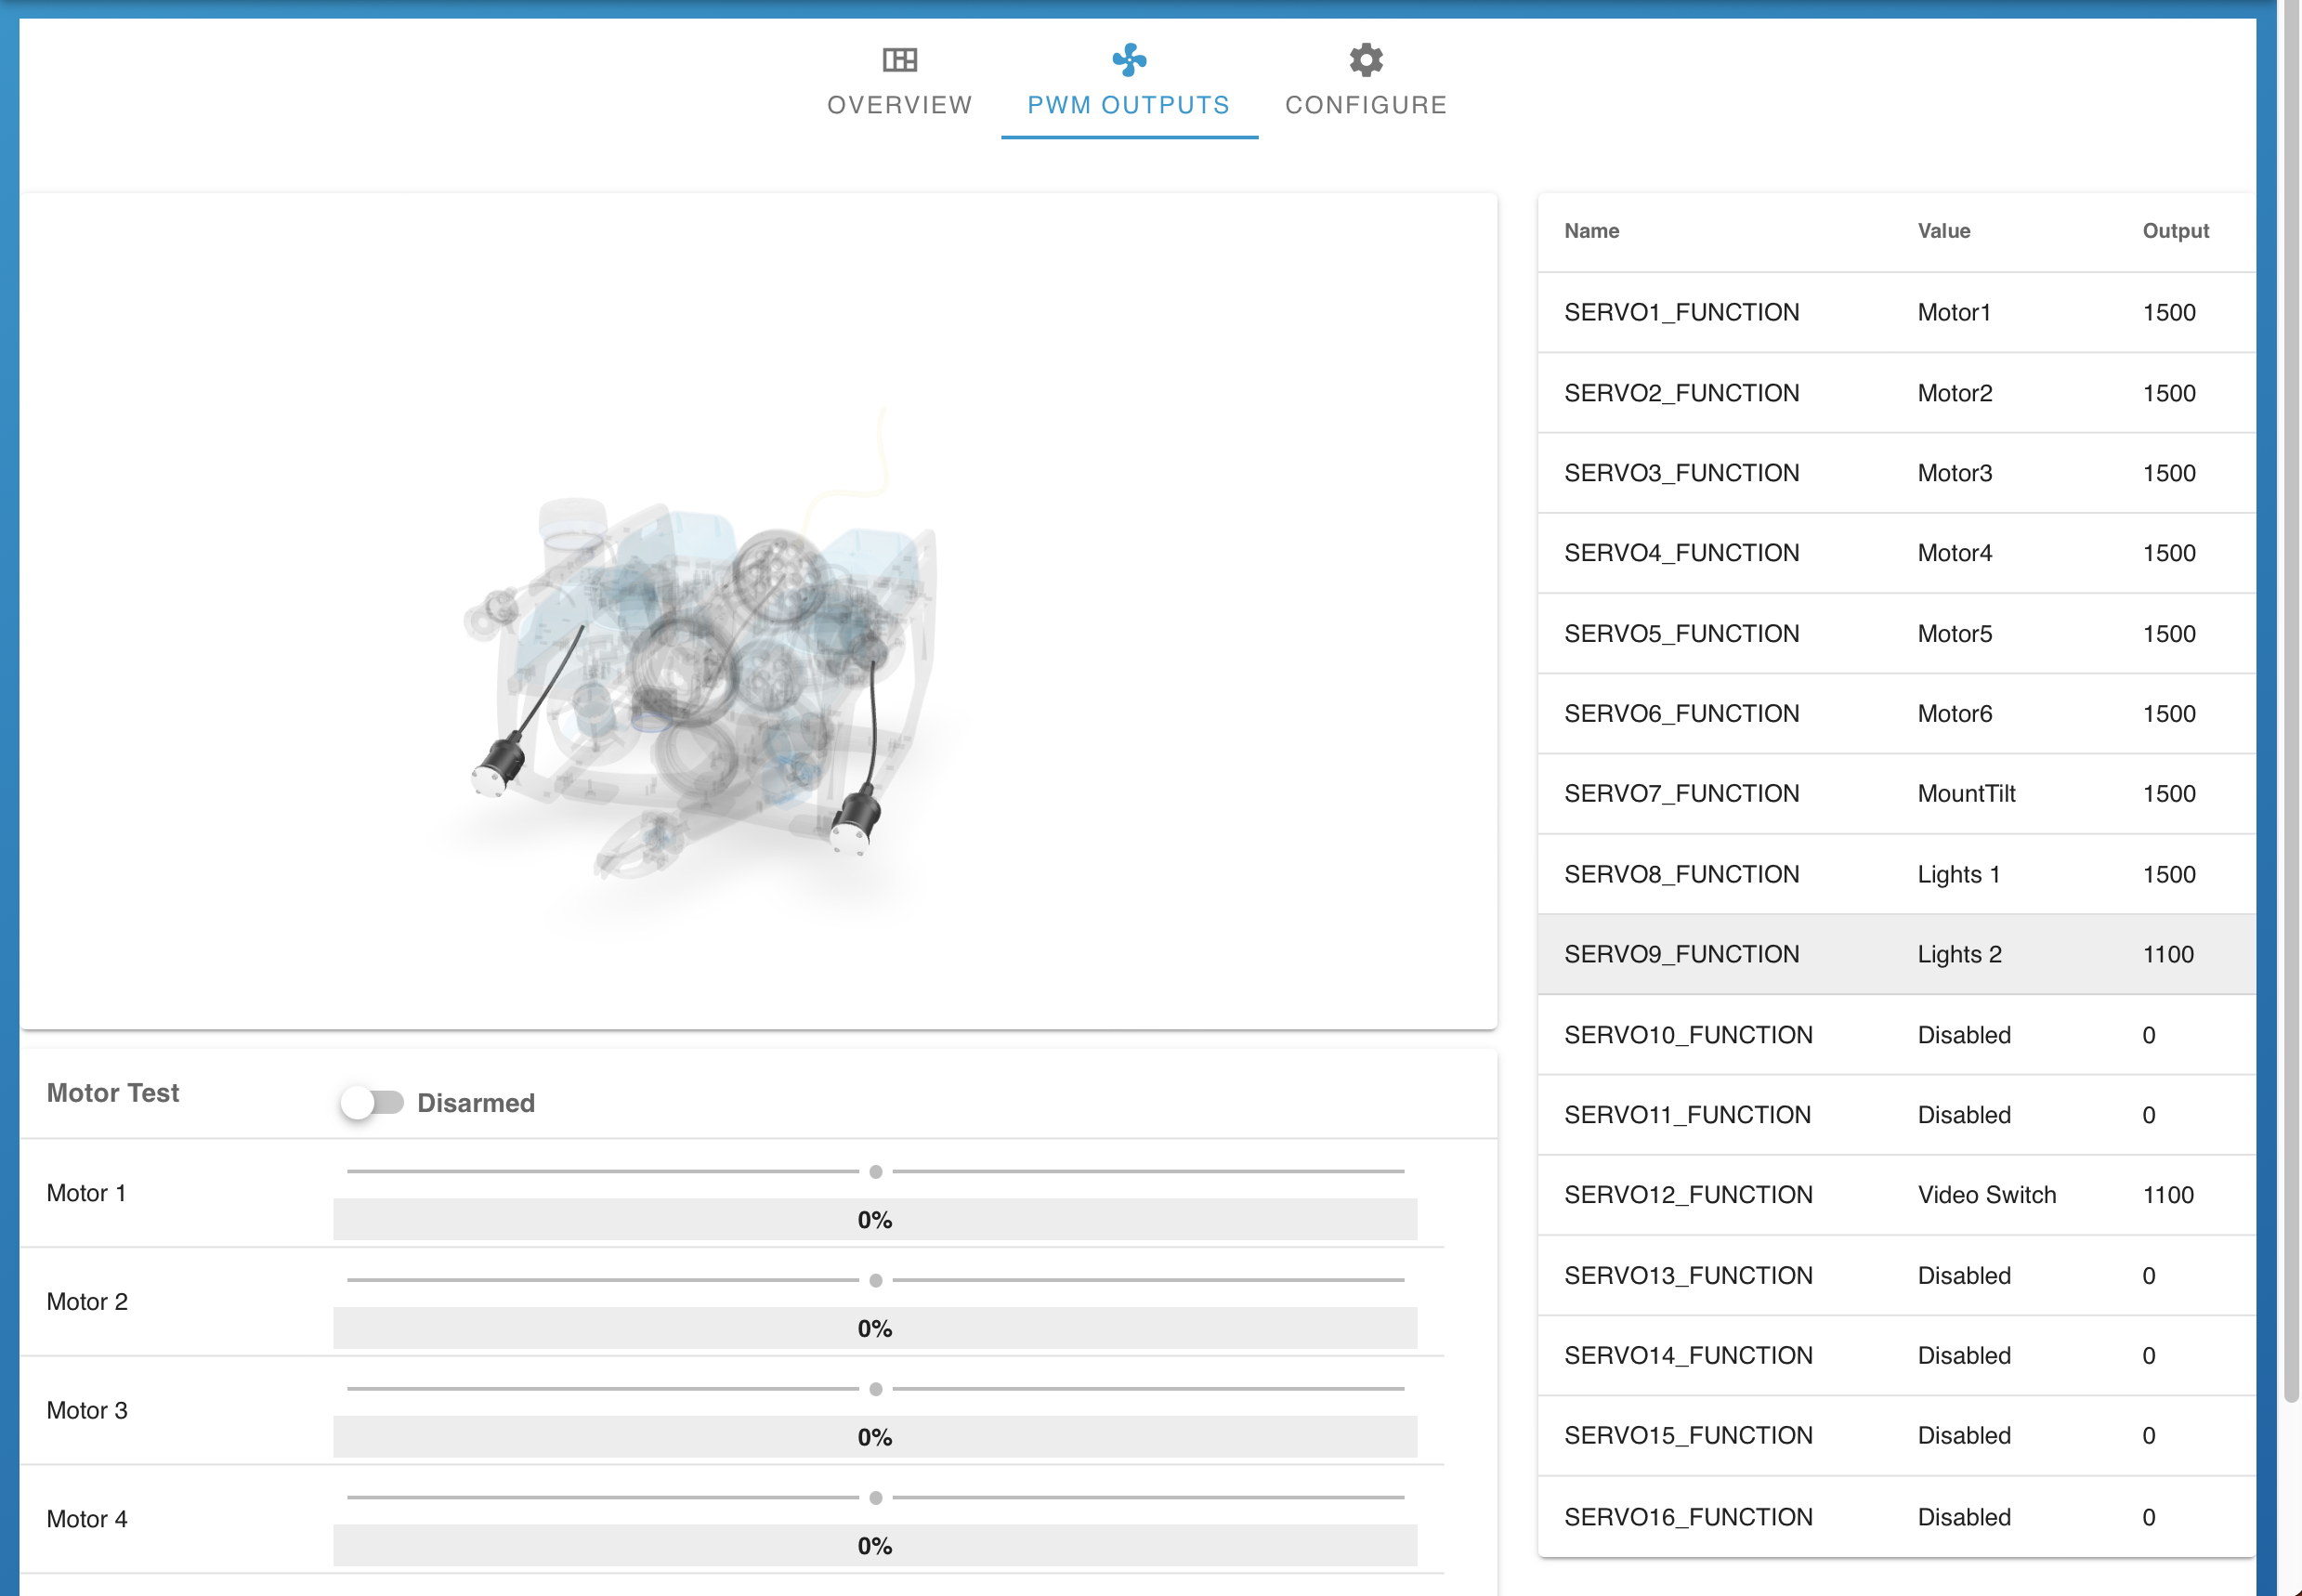
The PWM Outputs tab allows configuring the servo function mappings (for motors, lights, camera tilt, etc), as well as manually testing the motors.
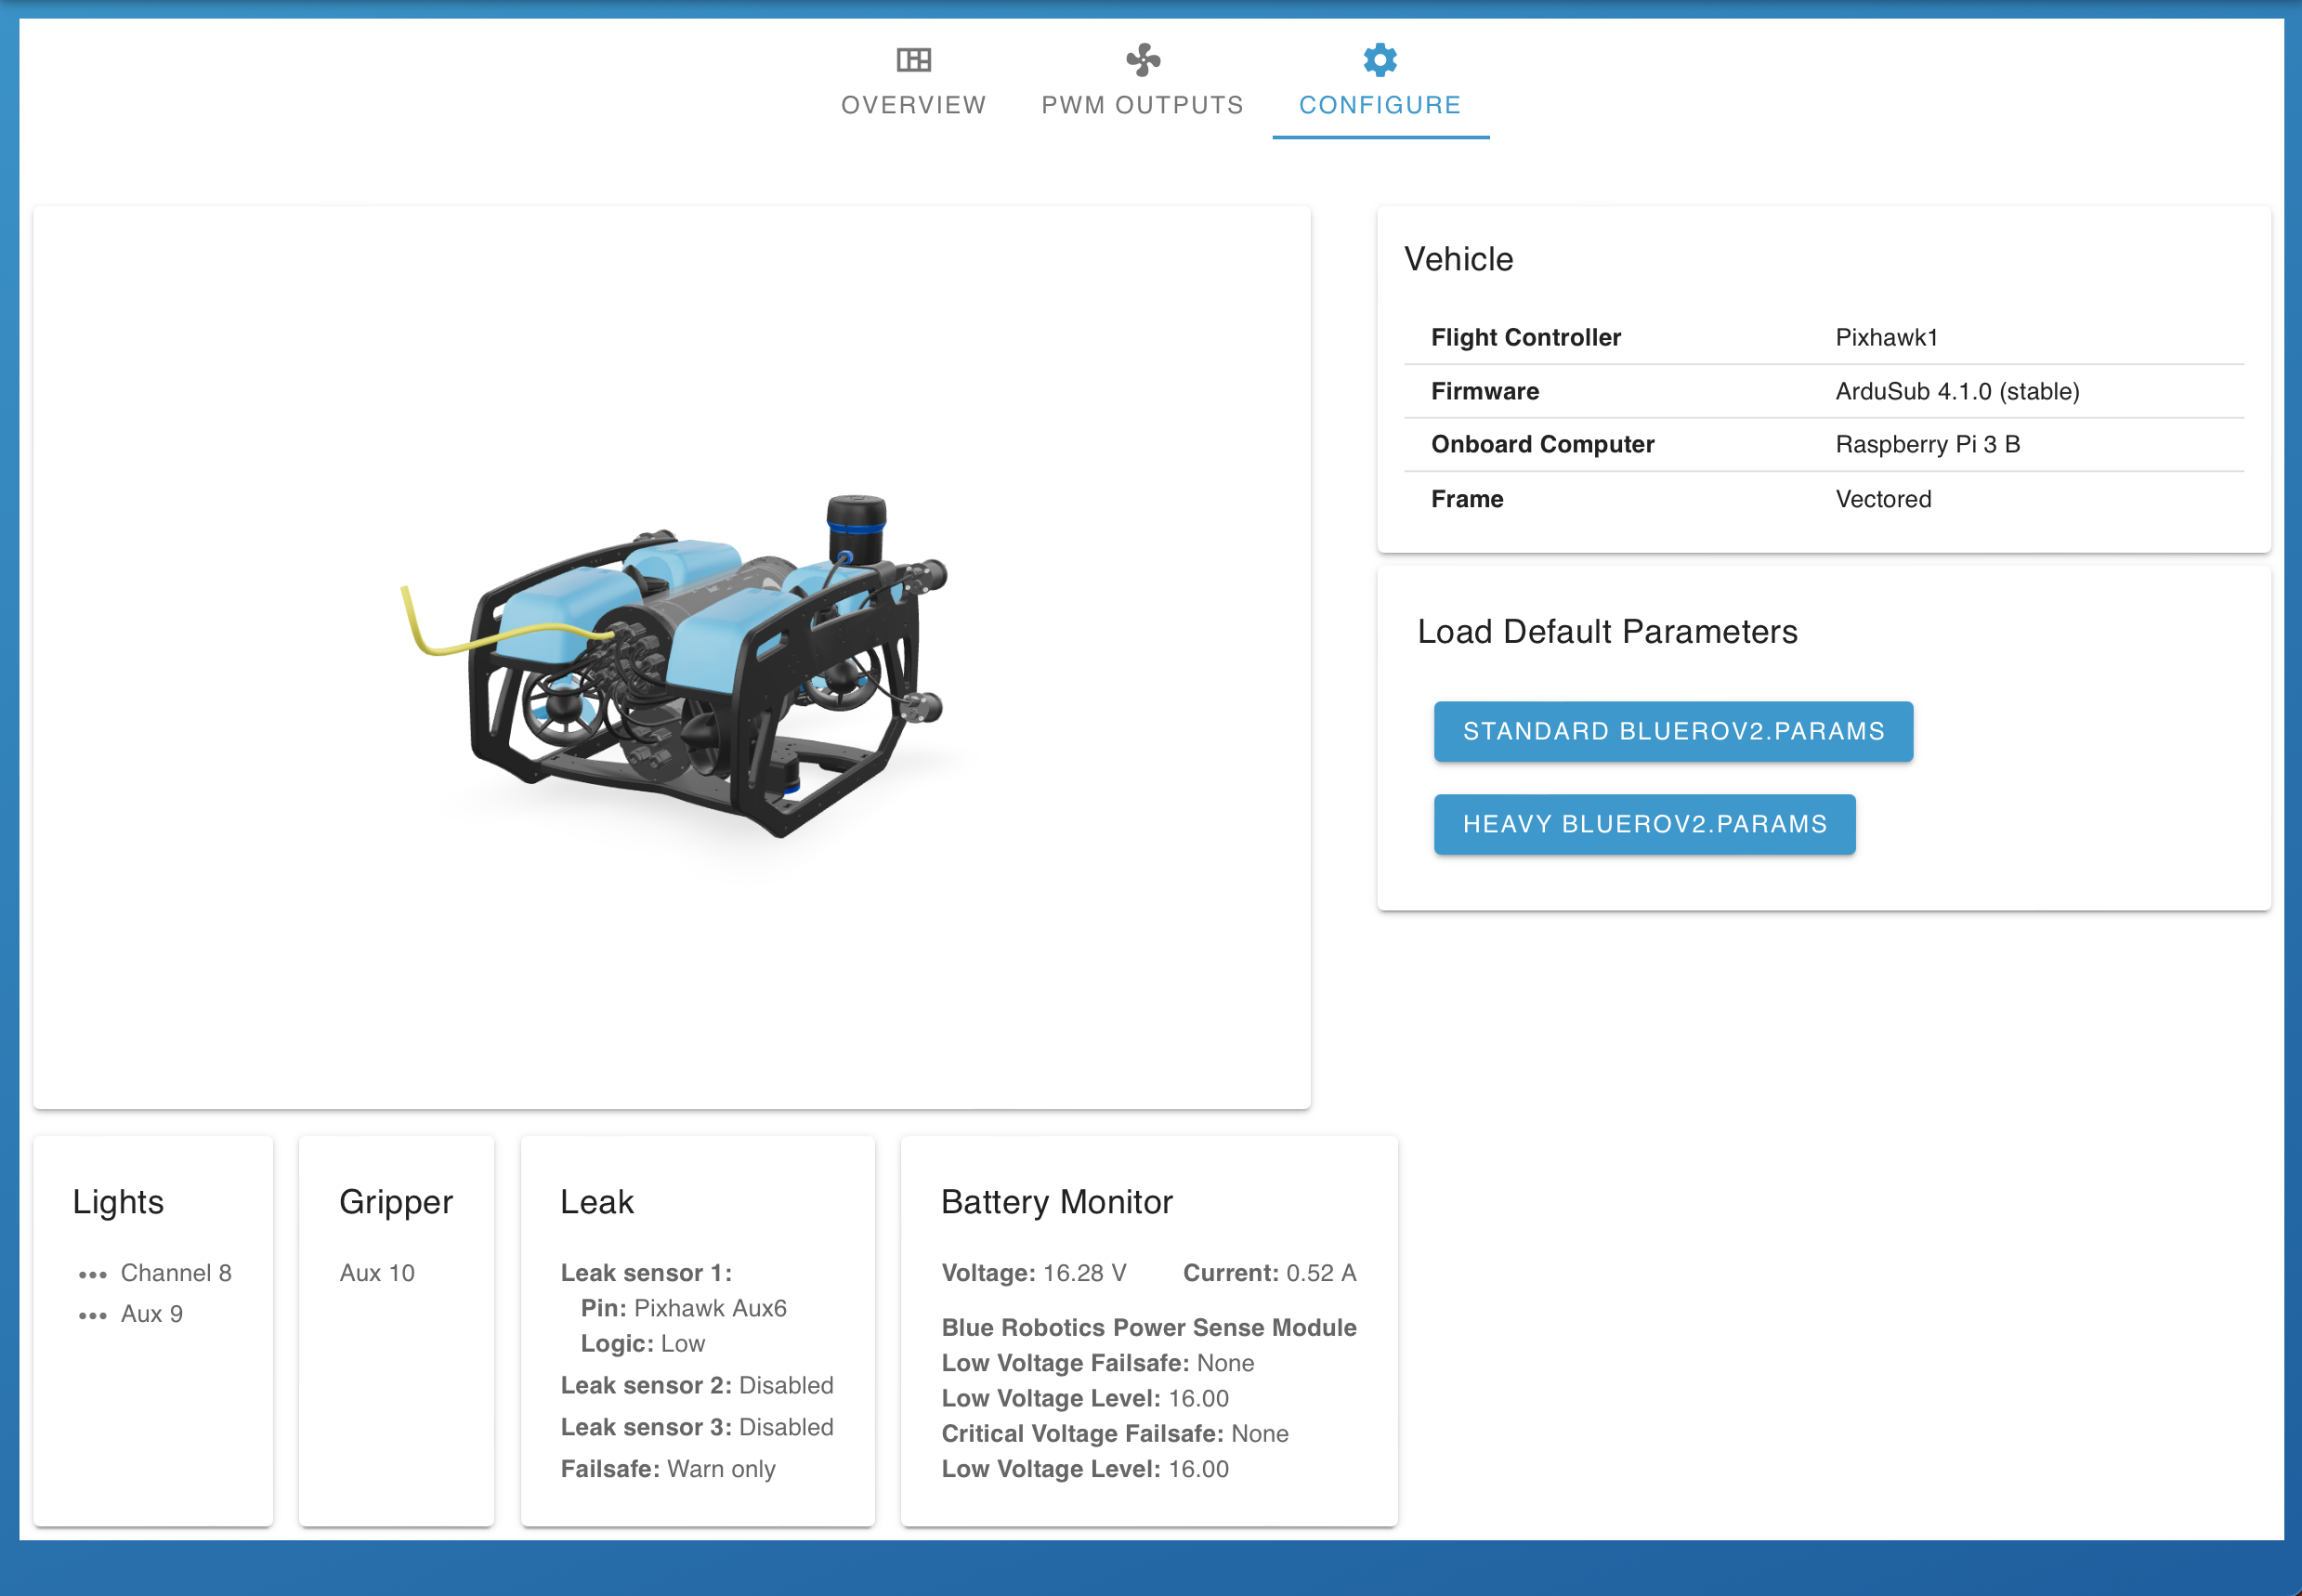
The Configure tab allows loading default parameter sets for a particular vehicle type.
In future this page will also allow
- running ArduSub's automatic motor direction detection
- calibrating the autopilot sensors
- using custom highlighting logic for model components
- displaying device statuses from extensions
#Video Streams
Based On: MAVLink Camera Manager | Port:6020
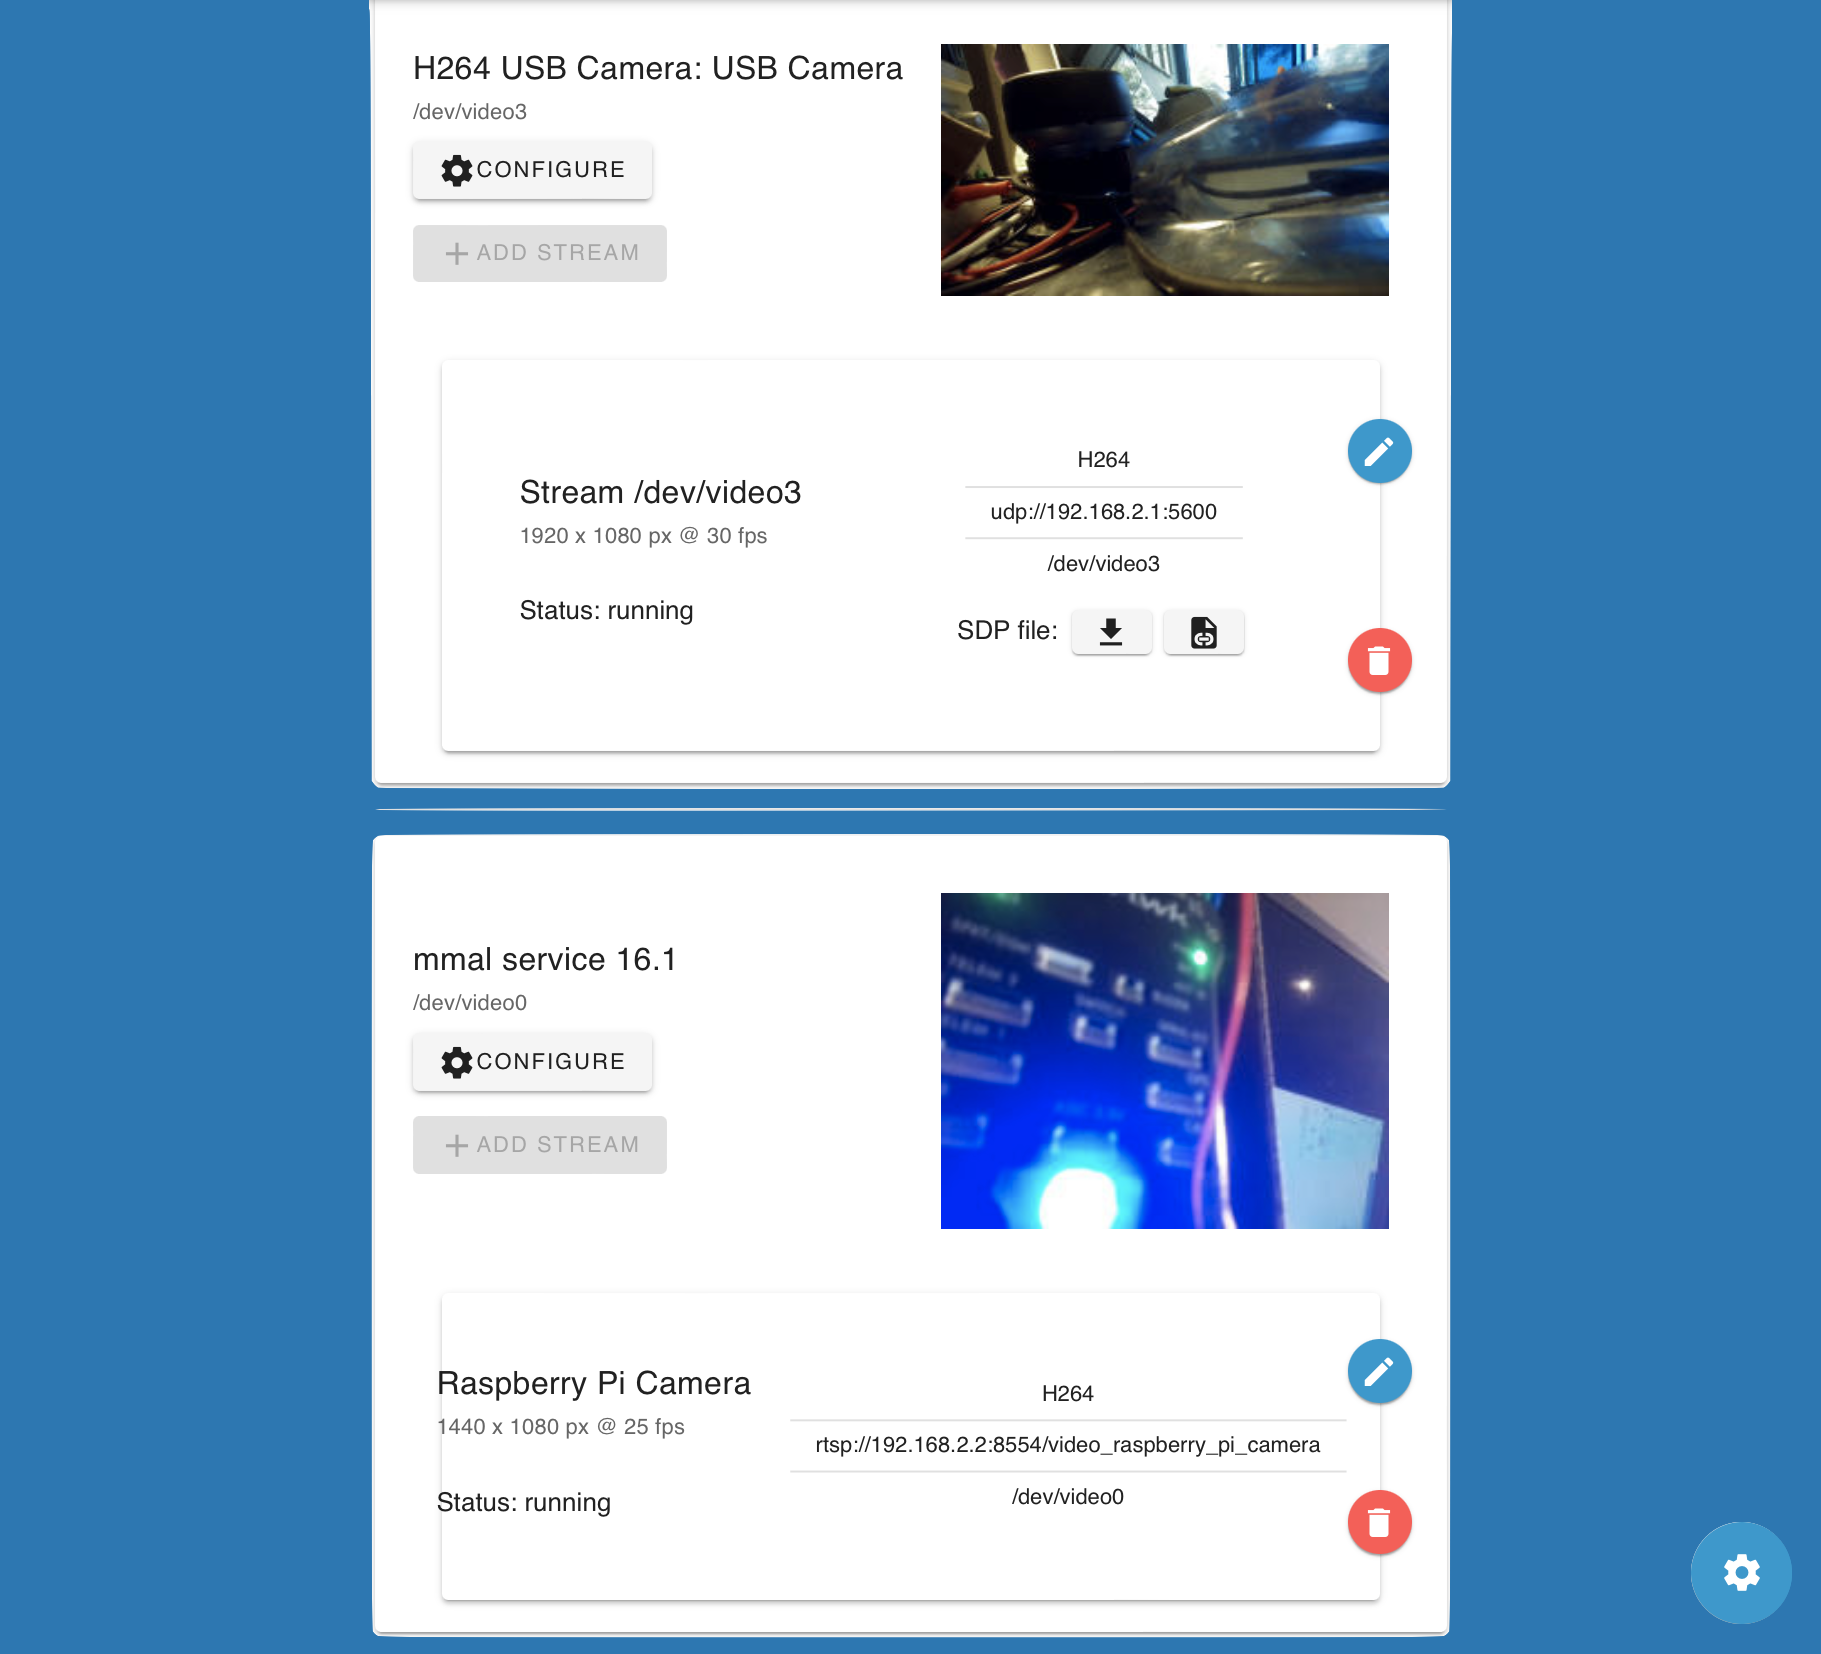
- BlueOS automatically detects H264-encoded video streams
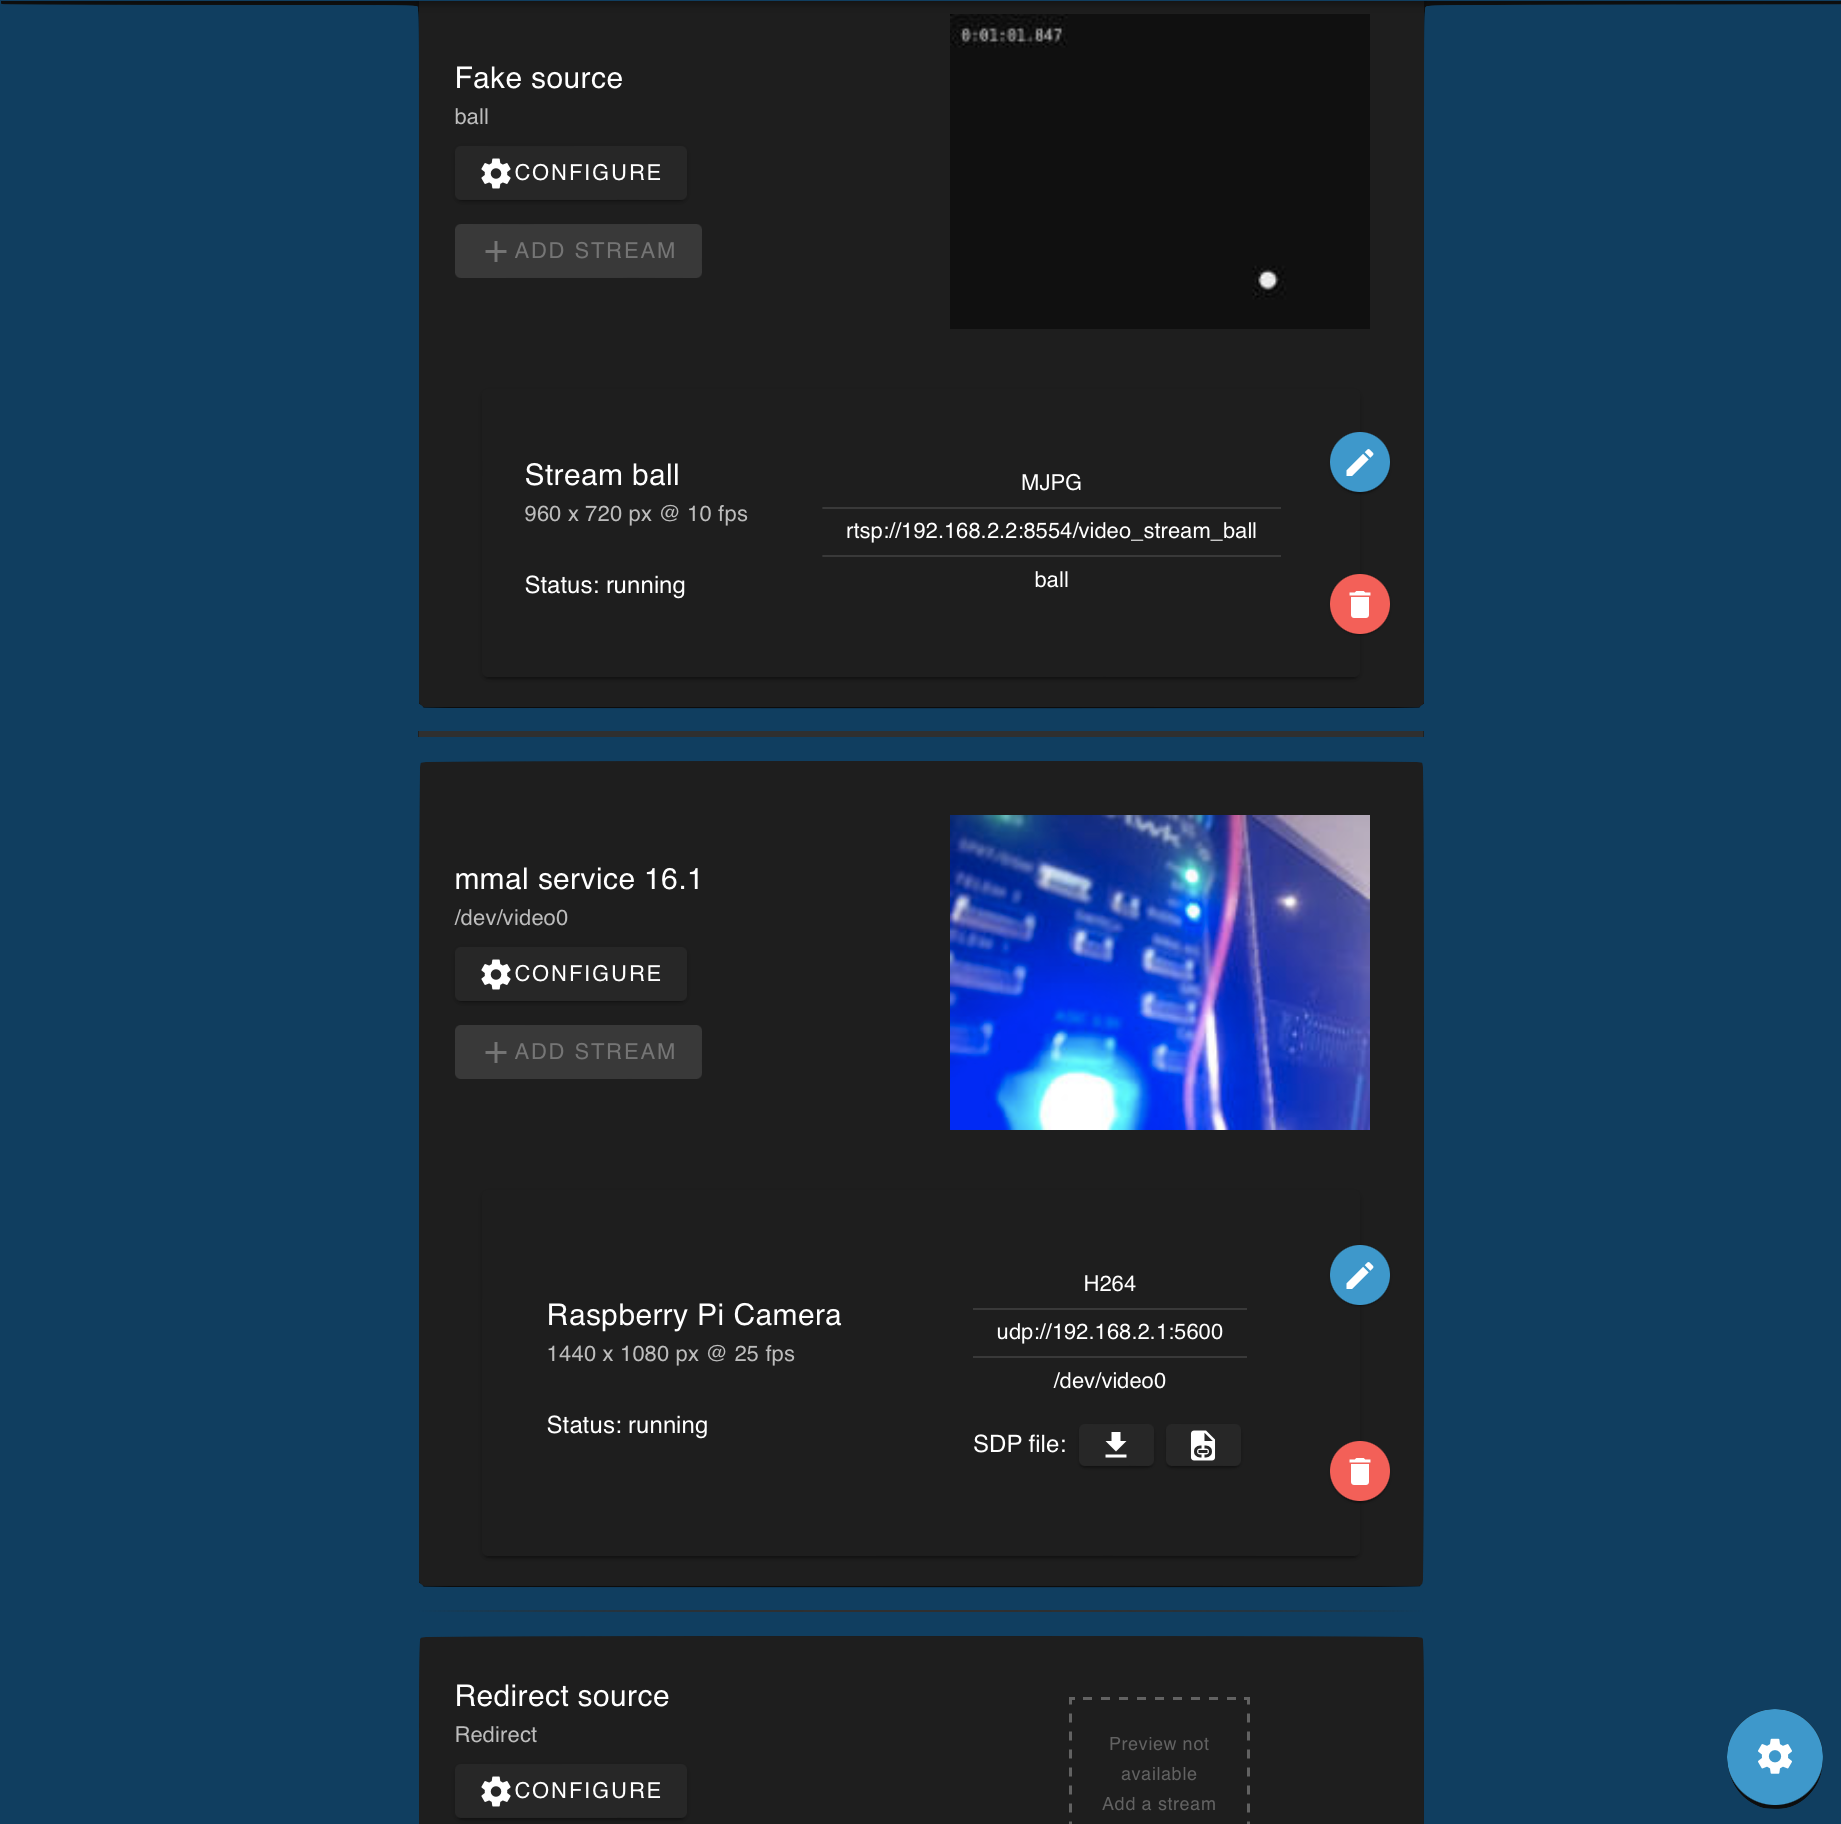
- MJPG and YUYV encoded streams are also detected in pirate mode, but currently only work when configured as RTSP streams
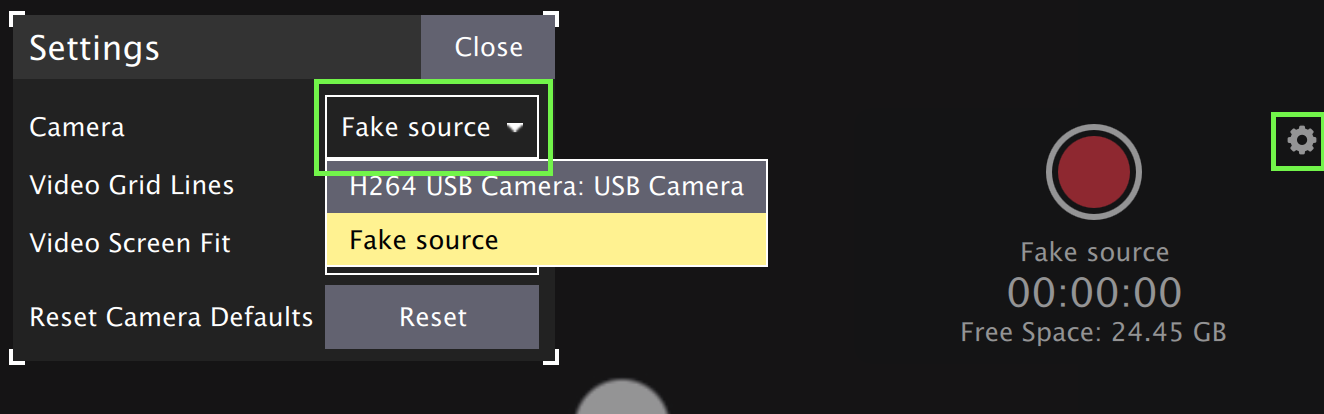
- The first time BlueOS starts up it will auto-configure any cameras that are
connected at that time, with UDP streams counting up from port
5600- e.g. a second camera at first startup would be streamed to port
5601 - Auto-configuration also occurs if the settings are reset
- applies to both global settings resets (via the sidebar) and
- camera manager settings resets (via the settings icon in the bottom right)
- e.g. a second camera at first startup would be streamed to port
- After the initial startup, settings are saved and persistent across reboots
- Further changes require manually re-configuring streams
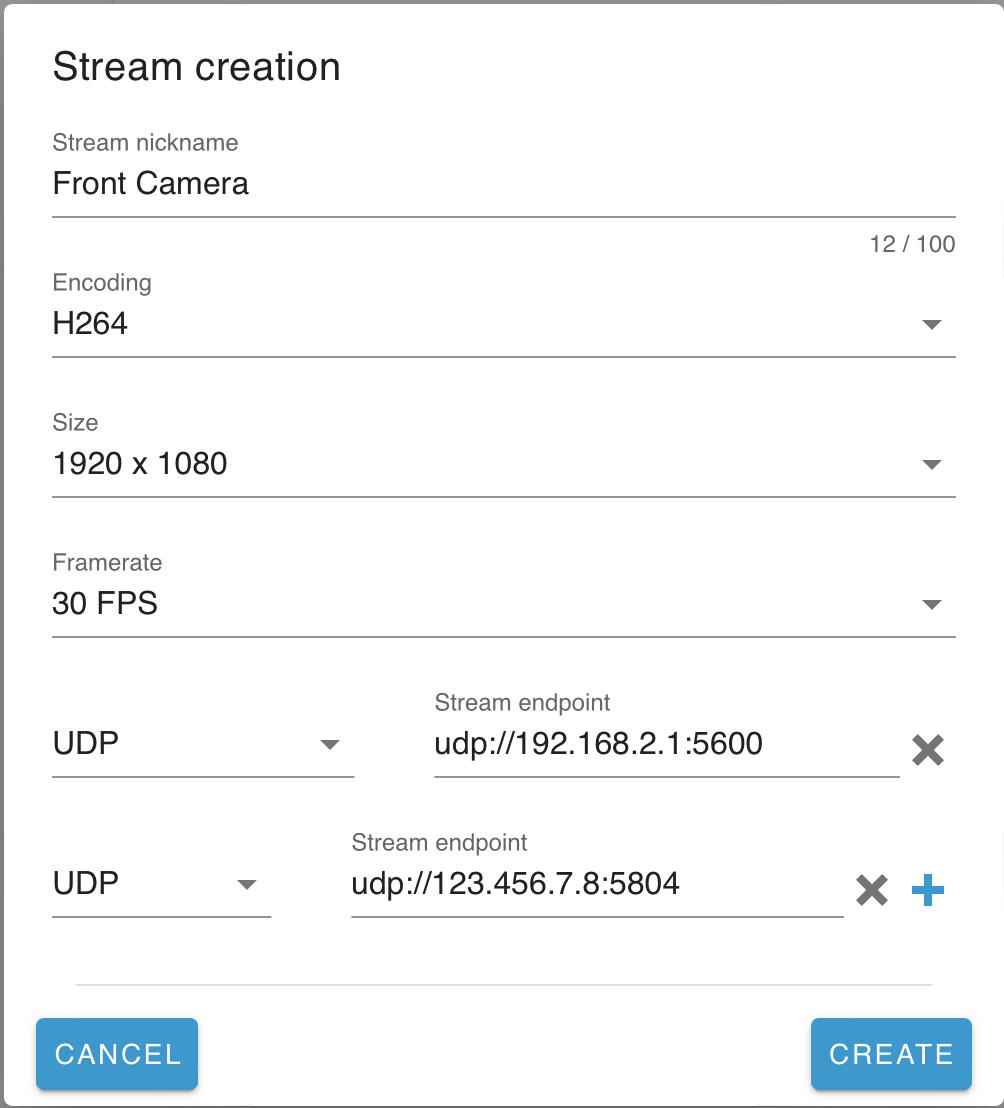
- New streams need to be manually added
- UDP stream endpoints should be set to
udp://<surface-IP>:<port>- e.g.
udp://192.168.2.1:5602
- e.g.
- RTSP stream endpoints are auto-configured with appropriate values
- UDP stream endpoints should be set to
- One video input can have multiple output streams by clicking the blue
+symbol during stream configuration- This only works for streams of the same endpoint type (e.g. it is not currently possible to mix UDP and RTSP output streams for the same input)
- By default the streams are also presented via MAVLink, so QGroundControl (>=v4.1.7) can toggle between them without needing to know specific ports
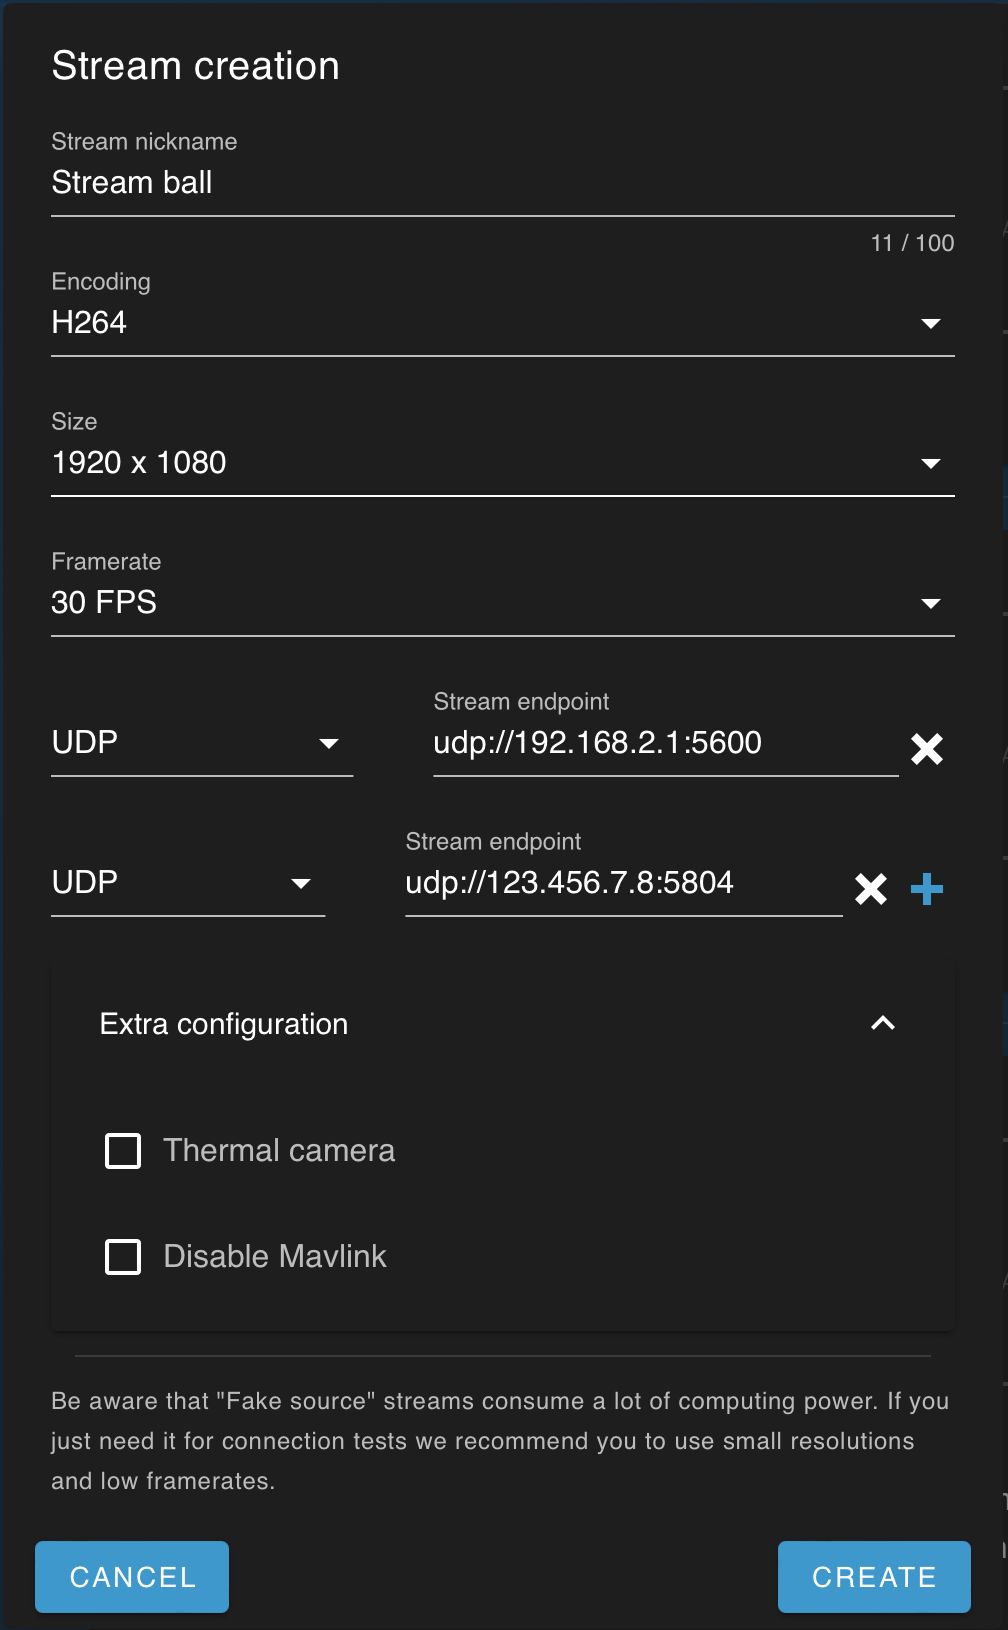
- It is possible to specify a stream as "thermal", which allows it to be overlaid on another stream in some viewing applications
- Camera settings (brightness, exposure, etc) that are exposed via UVC can be configured with the "Configure" button
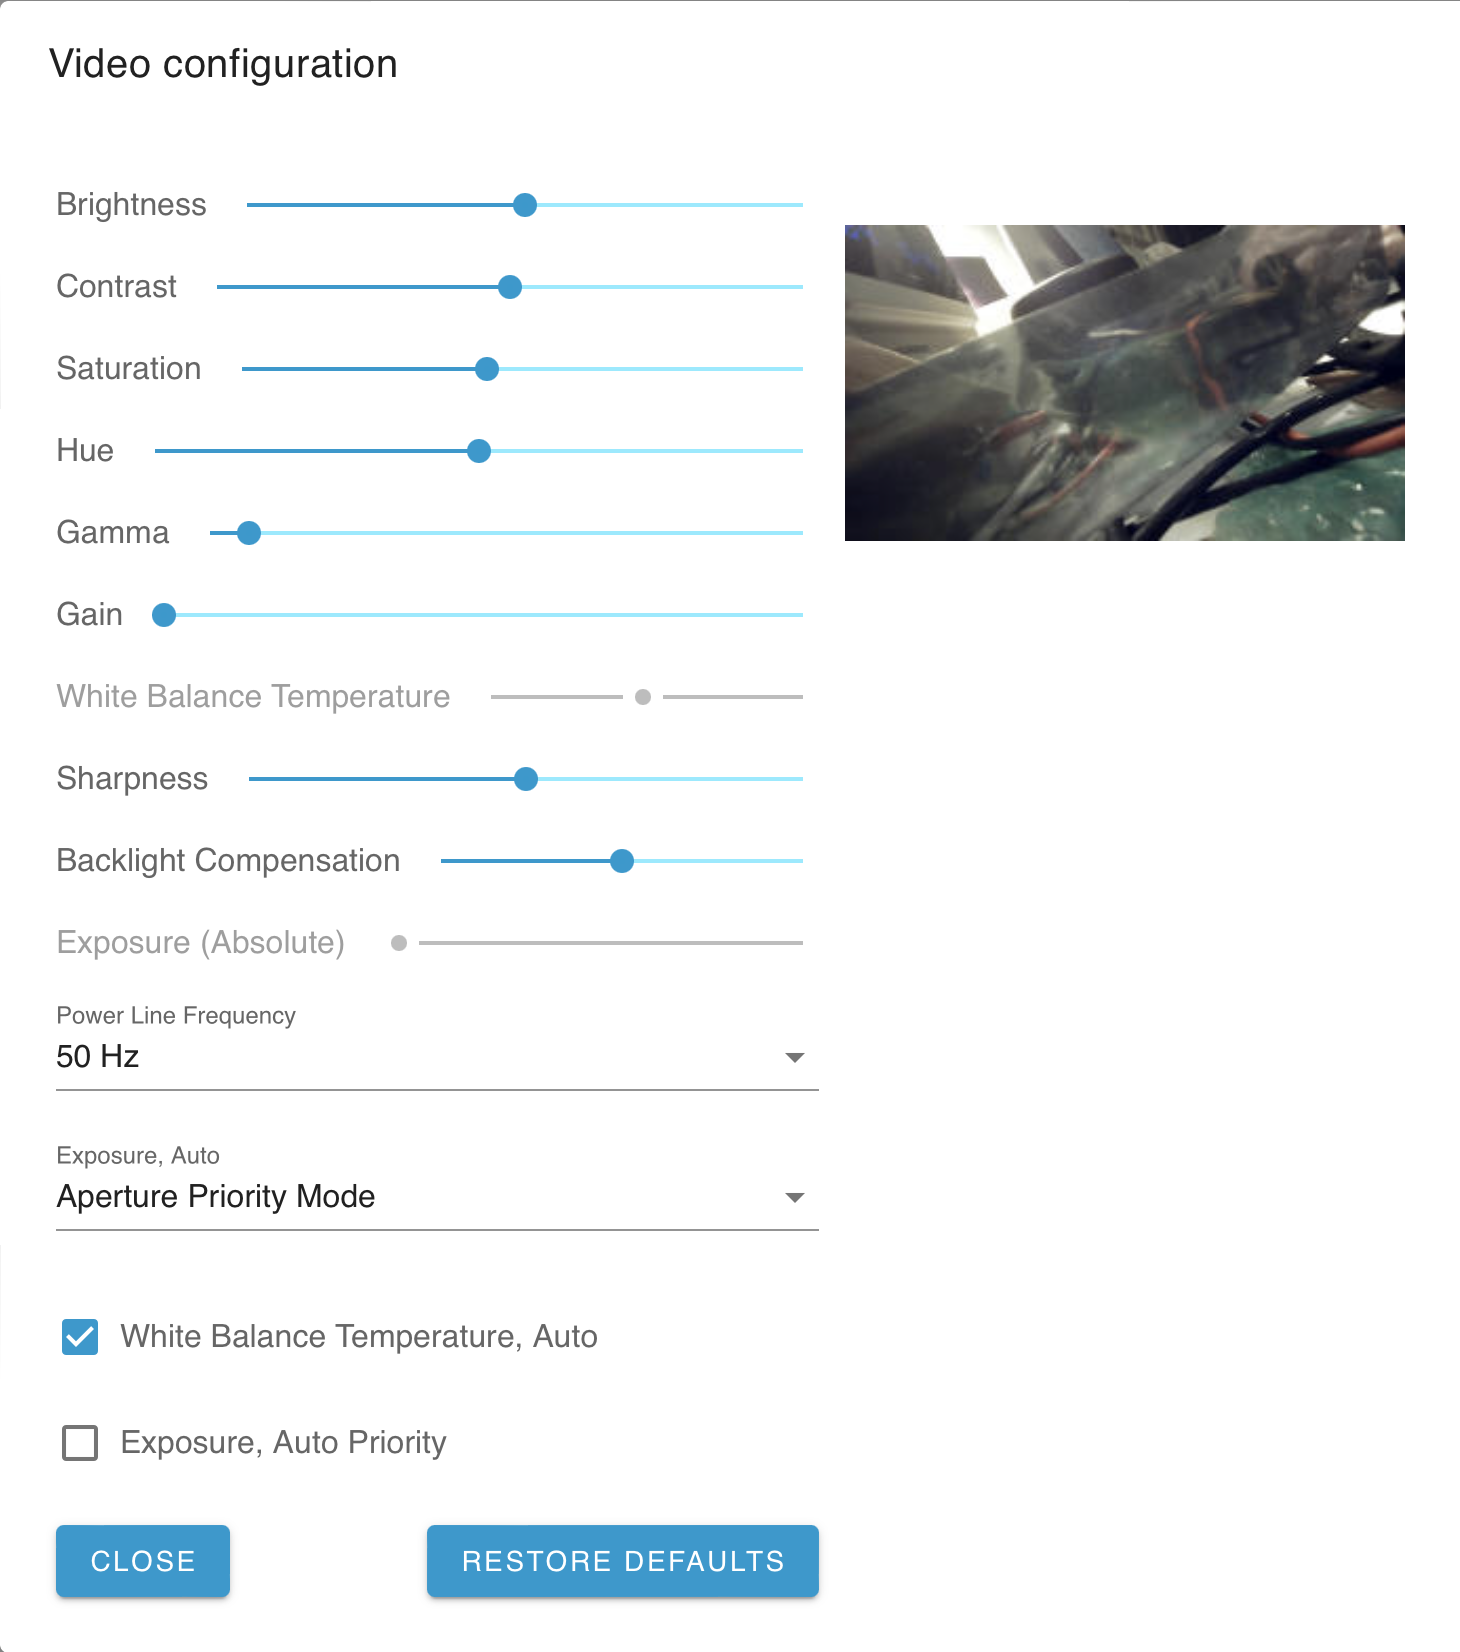
- Camera settings are also exposed via the MAVLink camera protocol, so are controllable in QGroundControl
- Switching streams in QGroundControl while recording stops the current recording
- If you are regularly switching streams it may be worth doing a screen recording either instead of or as well as recording the base video
- QGroundControl does not yet support displaying multiple streams simultaneously
- Additional streams can be processed/viewed/recorded by the options discussed
here
- Note that some playback applications (e.g. VLC) treat odd-numbered ports as audio channels, so relevant video streams should only use even-numbered ports
- UDP streams have the option to download an SDP file (or copy a URL to it),
for easier video playback in applications like VLC
(New in 1.1)
- Additional streams can be processed/viewed/recorded by the options discussed
here
- Raspberry Pi cameras are supported
(New in 1.1)- Detection requires turning on legacy camera support:
- turn on via the settings button in the buttom right corner
- reboot the onboard computer to enable
- Detection requires turning on legacy camera support:
- It is possible to use the "Redirect source" element to make an ethernet camera available via the BlueOS camera manager, which allows QGroundControl to detect it automatically (via MAVLink)
#Extensions
#Extensions Manager
New in 1.1
Based On: Kraken | Port:9134
The Extensions Manager is in charge of fetching, installing, updating, and managing Extensions.
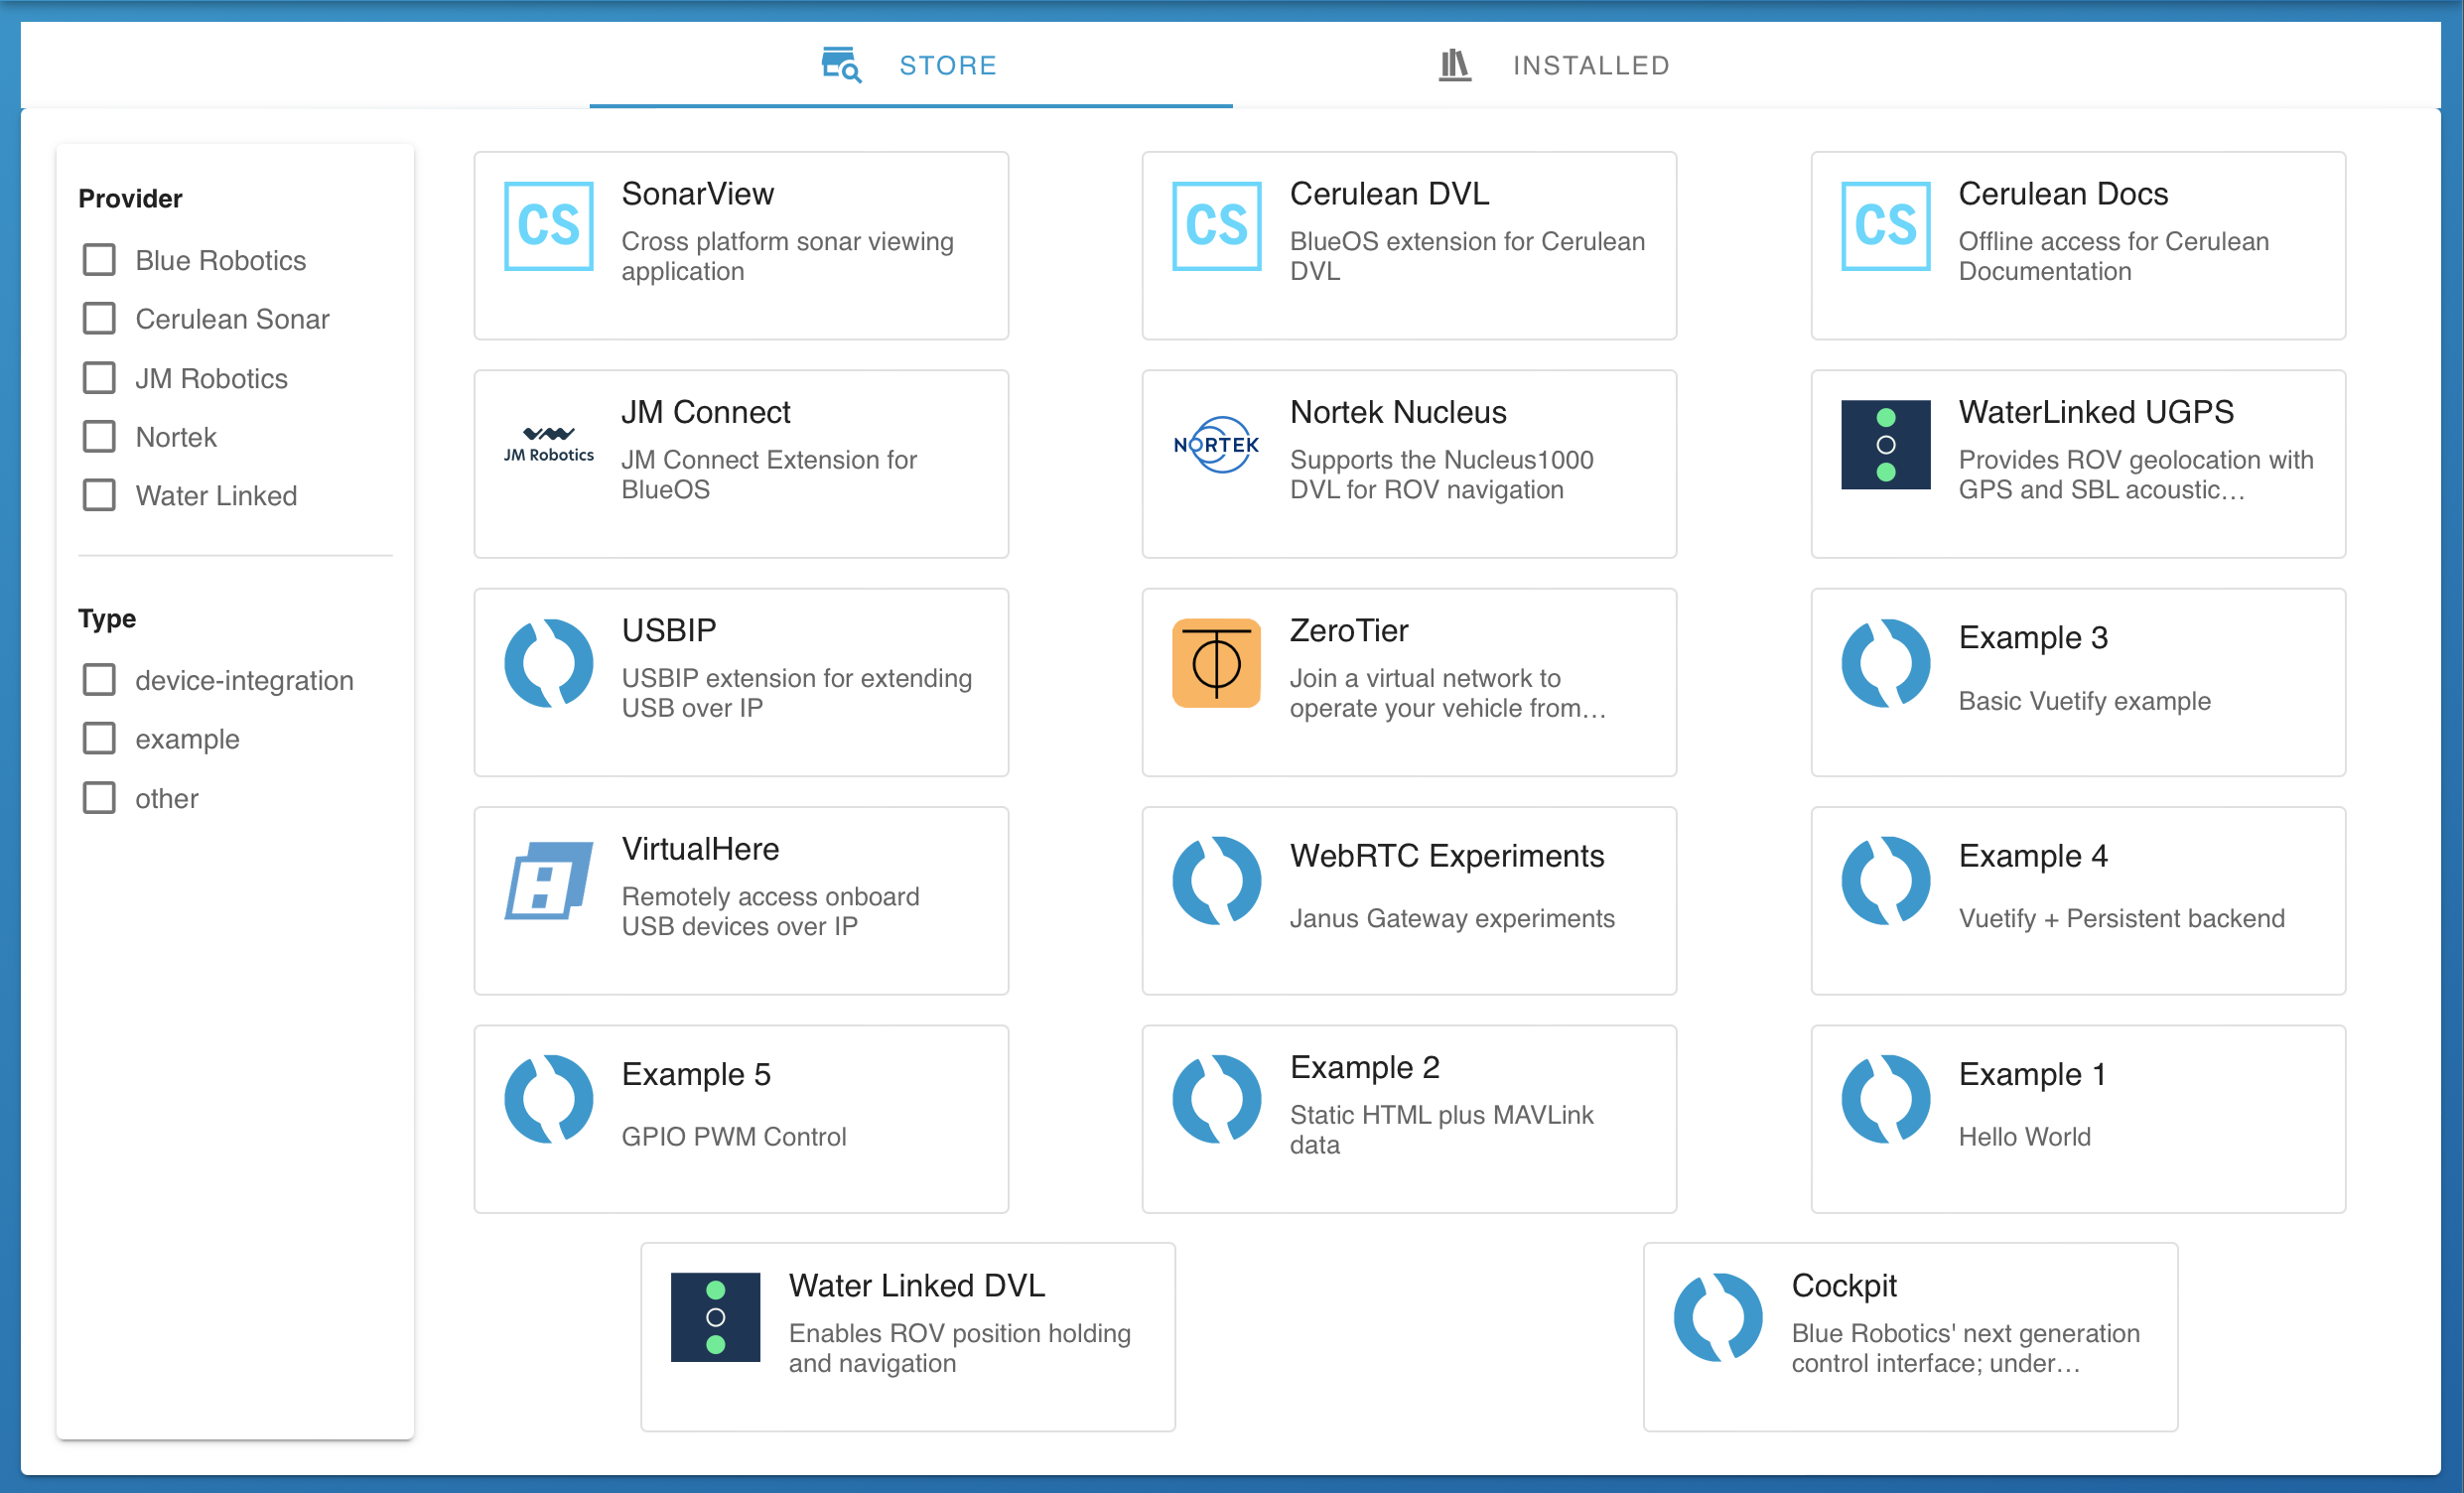
The Store tab shows the available extensions, which can be clicked to see information about the extension (including the settings, permissions requirements, and developer information), and allows selecting the version to install:

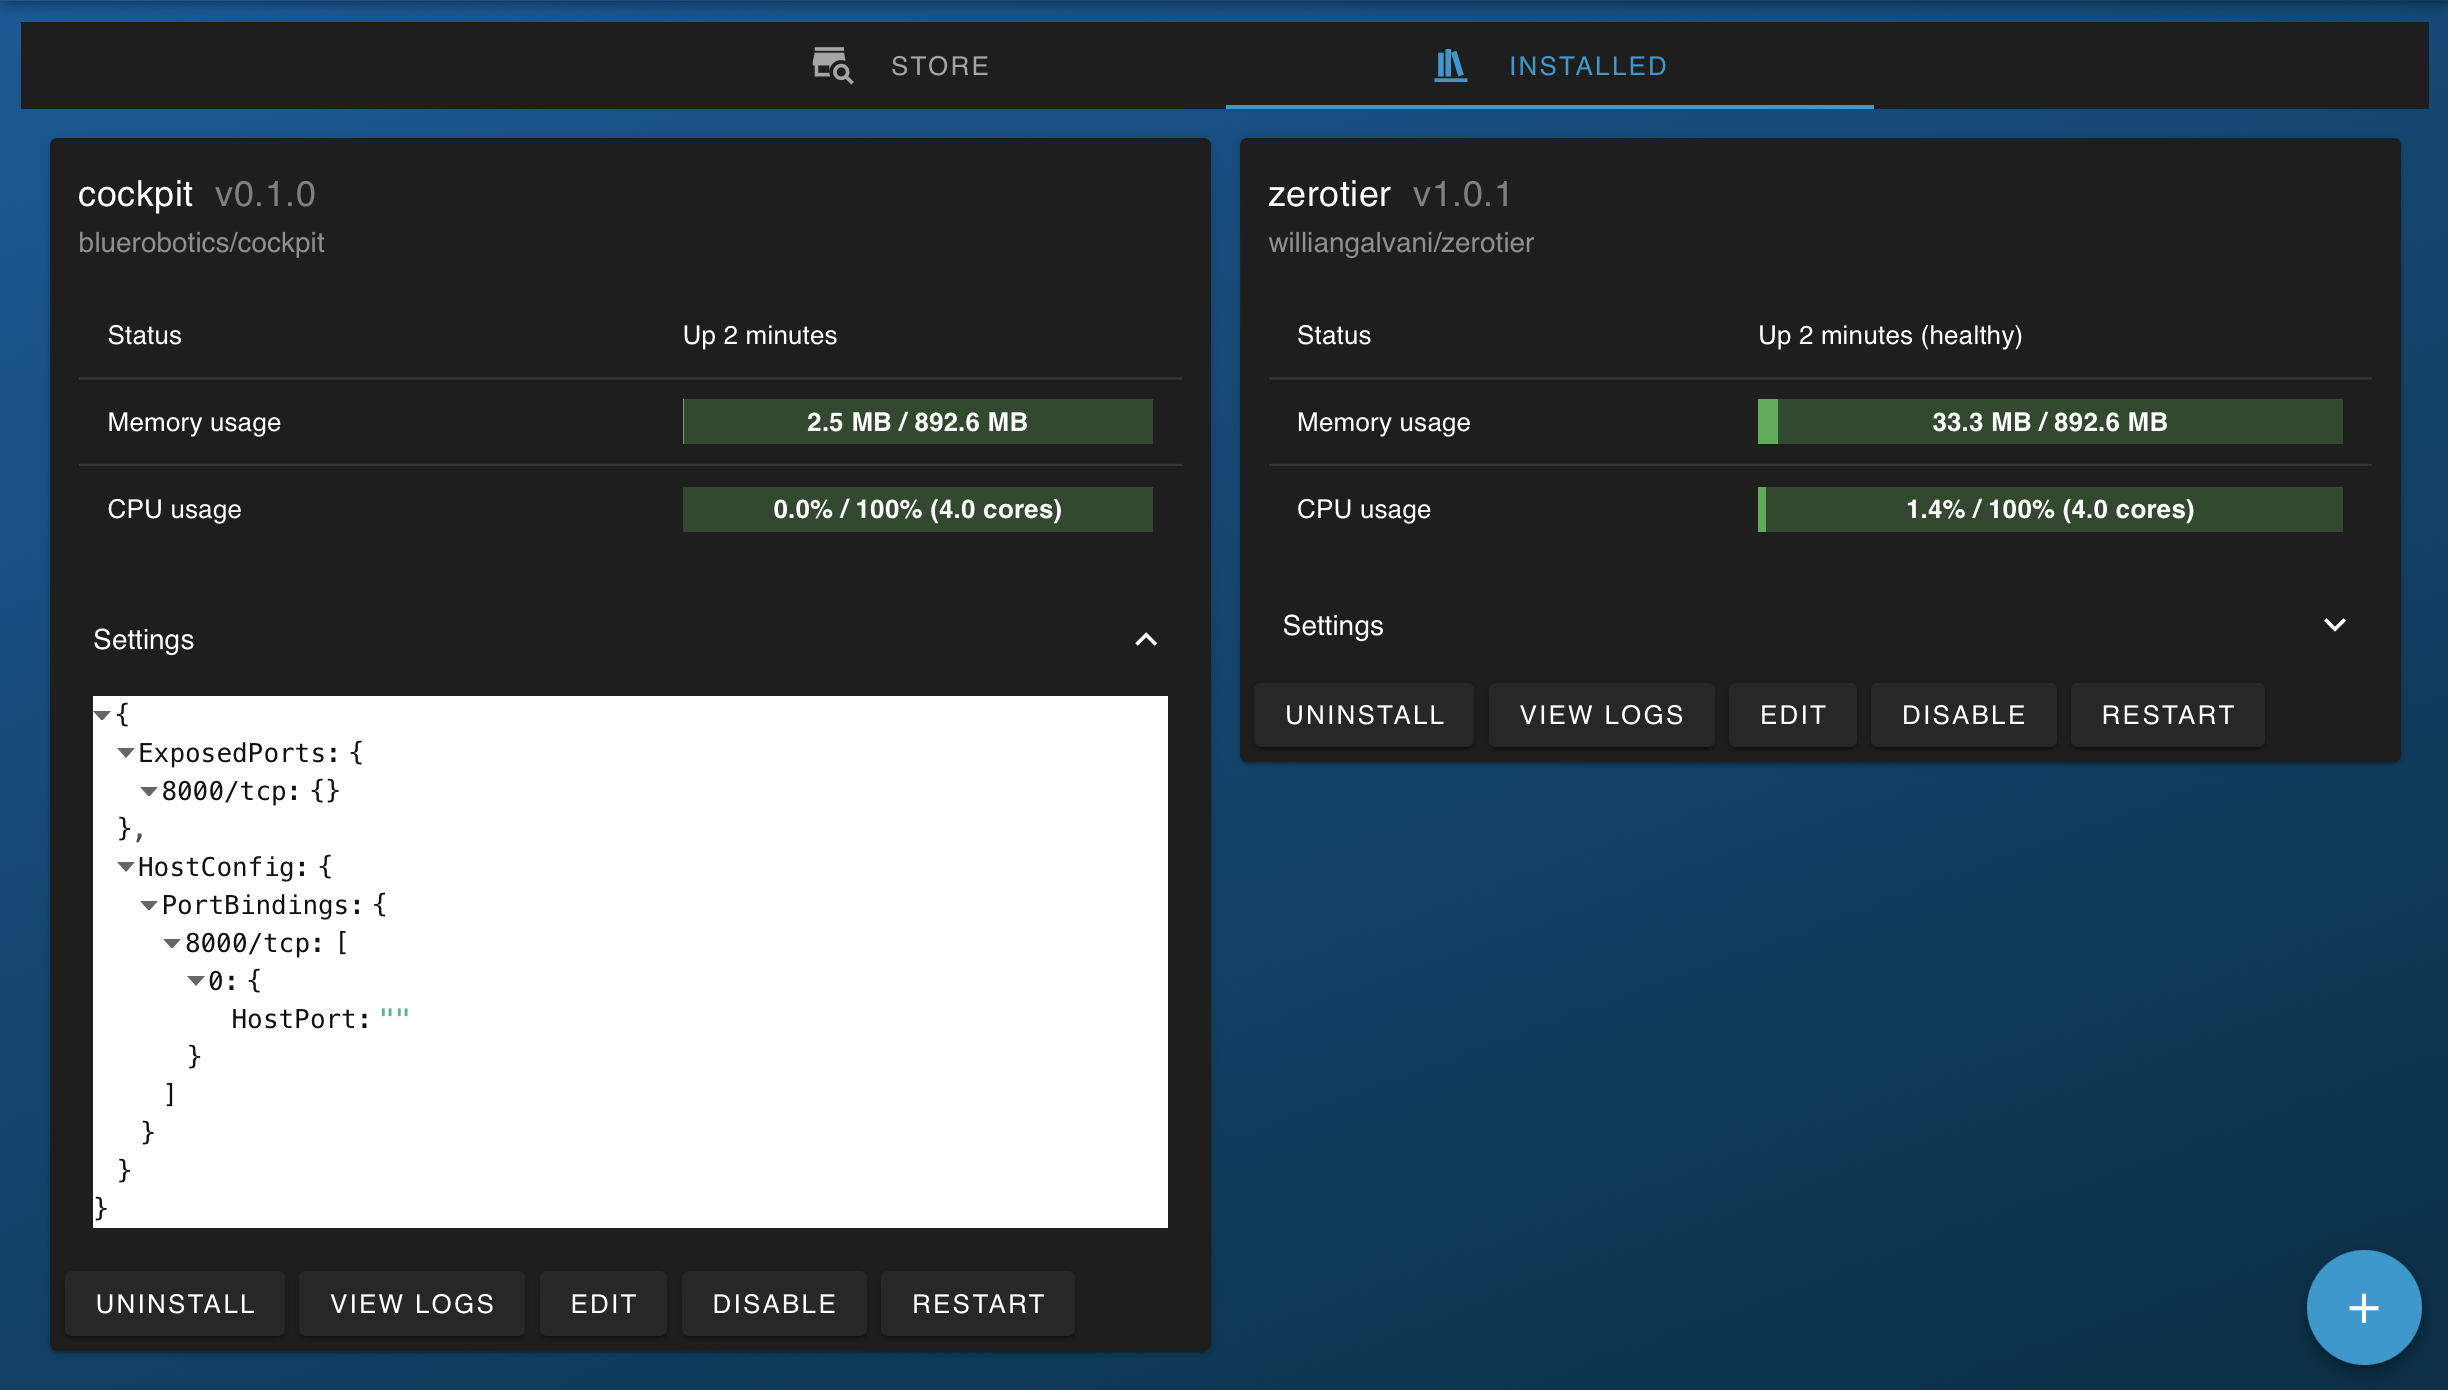
The Installed tab shows the resource usage of the installed extensions, and allows configuring them, checking their logs, and restarting or disabling them:

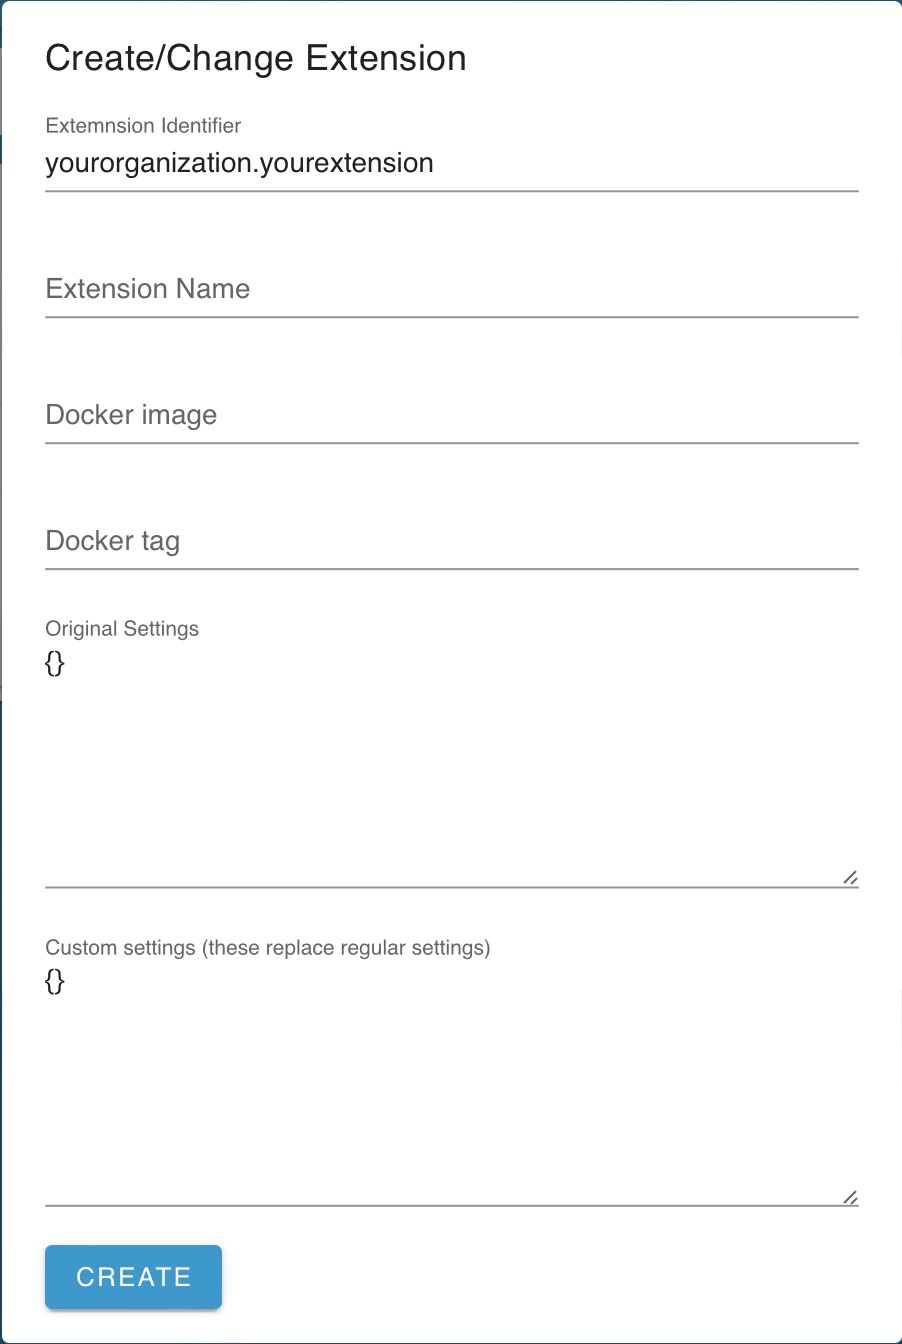
Developers can install custom extensions as relevant.
#Interface Theme
#Theme Content
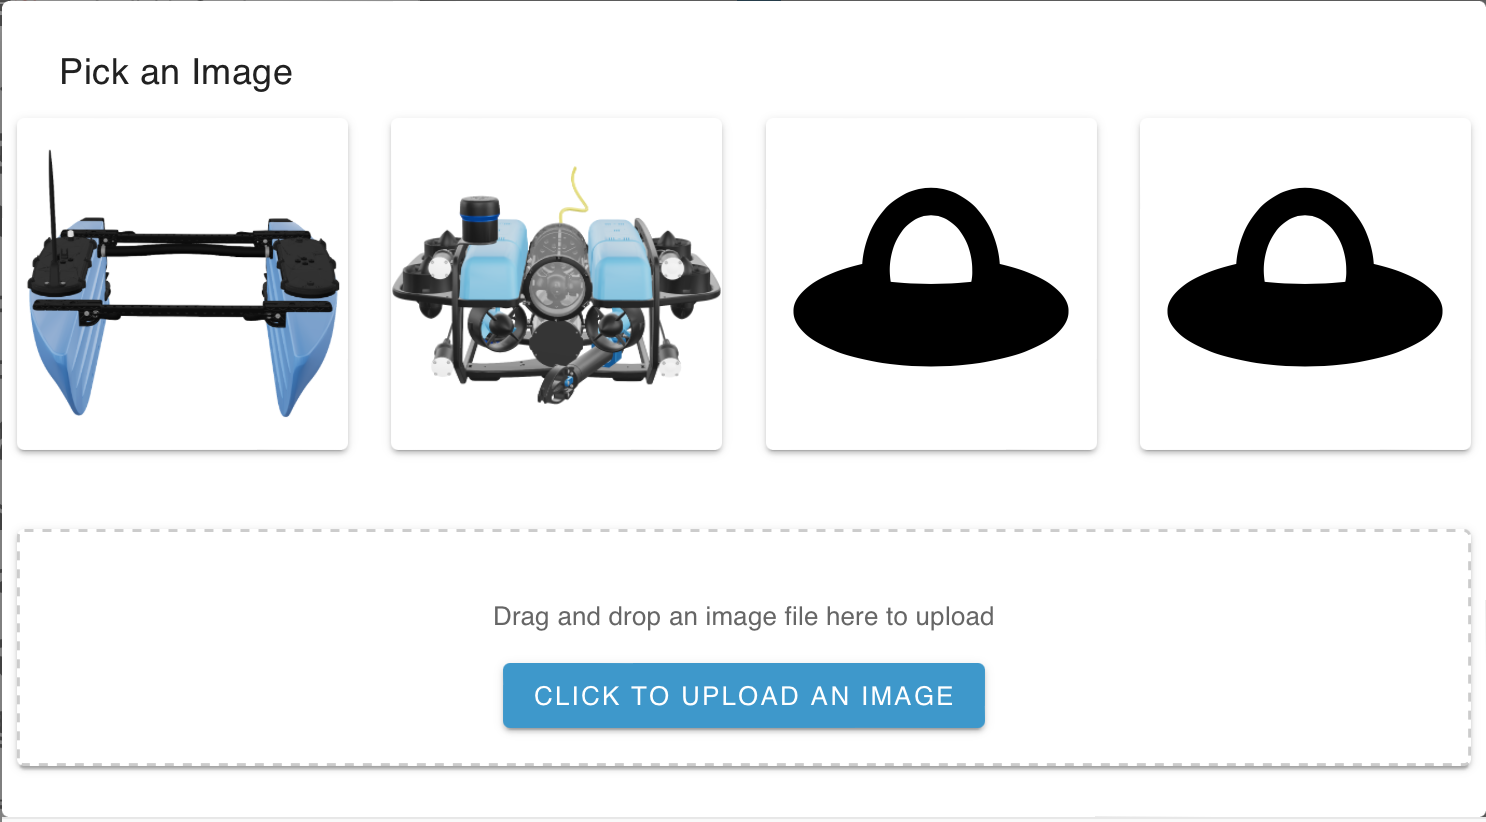
#Vehicle Icon
- square images work best
- consider getting an image of your 3D model from the Vehicle Setup page
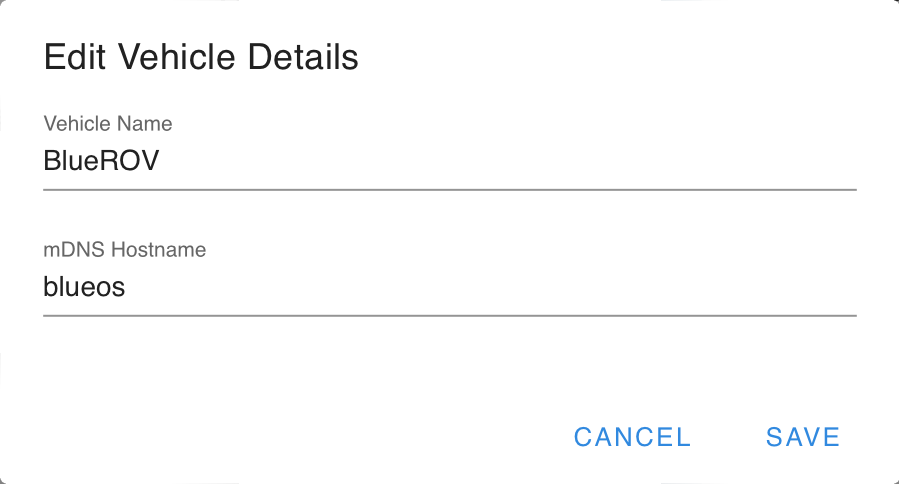
#Vehicle Name and mDNS Hostname
- the vehicle name makes it easier to determine which vehicle you are connected to
- changing the mDNS hostname changes the address you connect to for the browser interface
- wired connection (ethernet tether / USB-OTG) -> http://custom.local
- wifi connection -> http://custom-wifi.local
- BlueOS hotspot -> http://custom-hotspot.local
- http://blueos.local will still be available for wired connections, as a fallback in case the custom name is forgotten
- http://blueos-avahi.local is broadcast to all interfaces, for connecting when you're not sure which interface(s) are available
- IP addresses are always available for the interfaces they're configured for, but they're less intuitive to remember than mDNS names
- NOTE: mDNS is available on most modern operating systems, but
- for Windows older than Windows 10, install Bonjour
- for Linux run
avahi-discoveron the terminal to see if the avahi service is running
#Company Logo
- square images work best
#Theme Styling
It is possible to customise the styling of the BlueOS interface by adding a
theme_style.css file at userdata/styles/ in the File Browser.
The File Browser can also be used to modify the file, in which case the styles
are updated at the next page refresh after the file is saved. The save button is
in the top right corner.
CSS is commonly used for styling HTML webpages, and has an extensive set of features available. For the purposes of adjusting the BlueOS theme, the most important thing to understand is how to specify colors. It can be helpful to use tools like colorhexa when choosing a palette of colors, including for checking accessibility for various color vision deficiencies.
For reference, here is an example with most of the main BlueOS colors changed, together with the theme file that created it:
:root {
  --v-primary-base: #CAB1E5 !important;  /* sidebar highlights, submit buttons */
  --v-info-base: #BA55E5 !important;     /* info boxes (often same as primary base) */
  --v-warning-base: #EDD1E5 !important;  /* warnings and skip buttons */
  --v-error-base: #AC1D1C !important;    /* notifications, pirate icons, cancel/delete buttons */
  --v-anchor-base: #5A11ED !important;   /* hyperlinks */
}

/* light theme background, light to dark */
div.light-background {
  background-color: #BAFF1E !important;
  background-image: linear-gradient(160deg, #BAFF1E 0%, #5CA1E5 100%) !important;
}

/* dark theme background, light to dark */
div.dark-background {
  background-color: #5EABED !important;
  background-image: linear-gradient(160deg, #5EABED 0%, #BA55E5 100%) !important;
}

/* light theme header bar background, light to dark, translucent */
header.light-background-glass {
  background-color: #DEADBA55 !important; /* fallback if gradient not available */
  background-image: linear-gradient(160deg, #DEADBA88 0%, #5111CA88 100%) !important;
  backdrop-filter: blur(4.5px) !important;
  -webkit-backdrop-filter: blur(10px) !important;
}

/* dark theme header bar background, light to dark, translucent */
header.dark-background-glass {
  background-color: #5111CA55 !important; /* fallback if gradient not available */
  background-image: linear-gradient(160deg, #5111CA88 0%, #0B5E5588 100%) !important;
  backdrop-filter: blur(4.5px) !important;
  -webkit-backdrop-filter: blur(10px) !important;
}
Powered by Zola and Bluetheme Documentation under CC BY-NC-SA 4.0