Cockpit Documentation
Usage DevelopmentAdvanced Usage
#Quick Links
#Display Breakdown
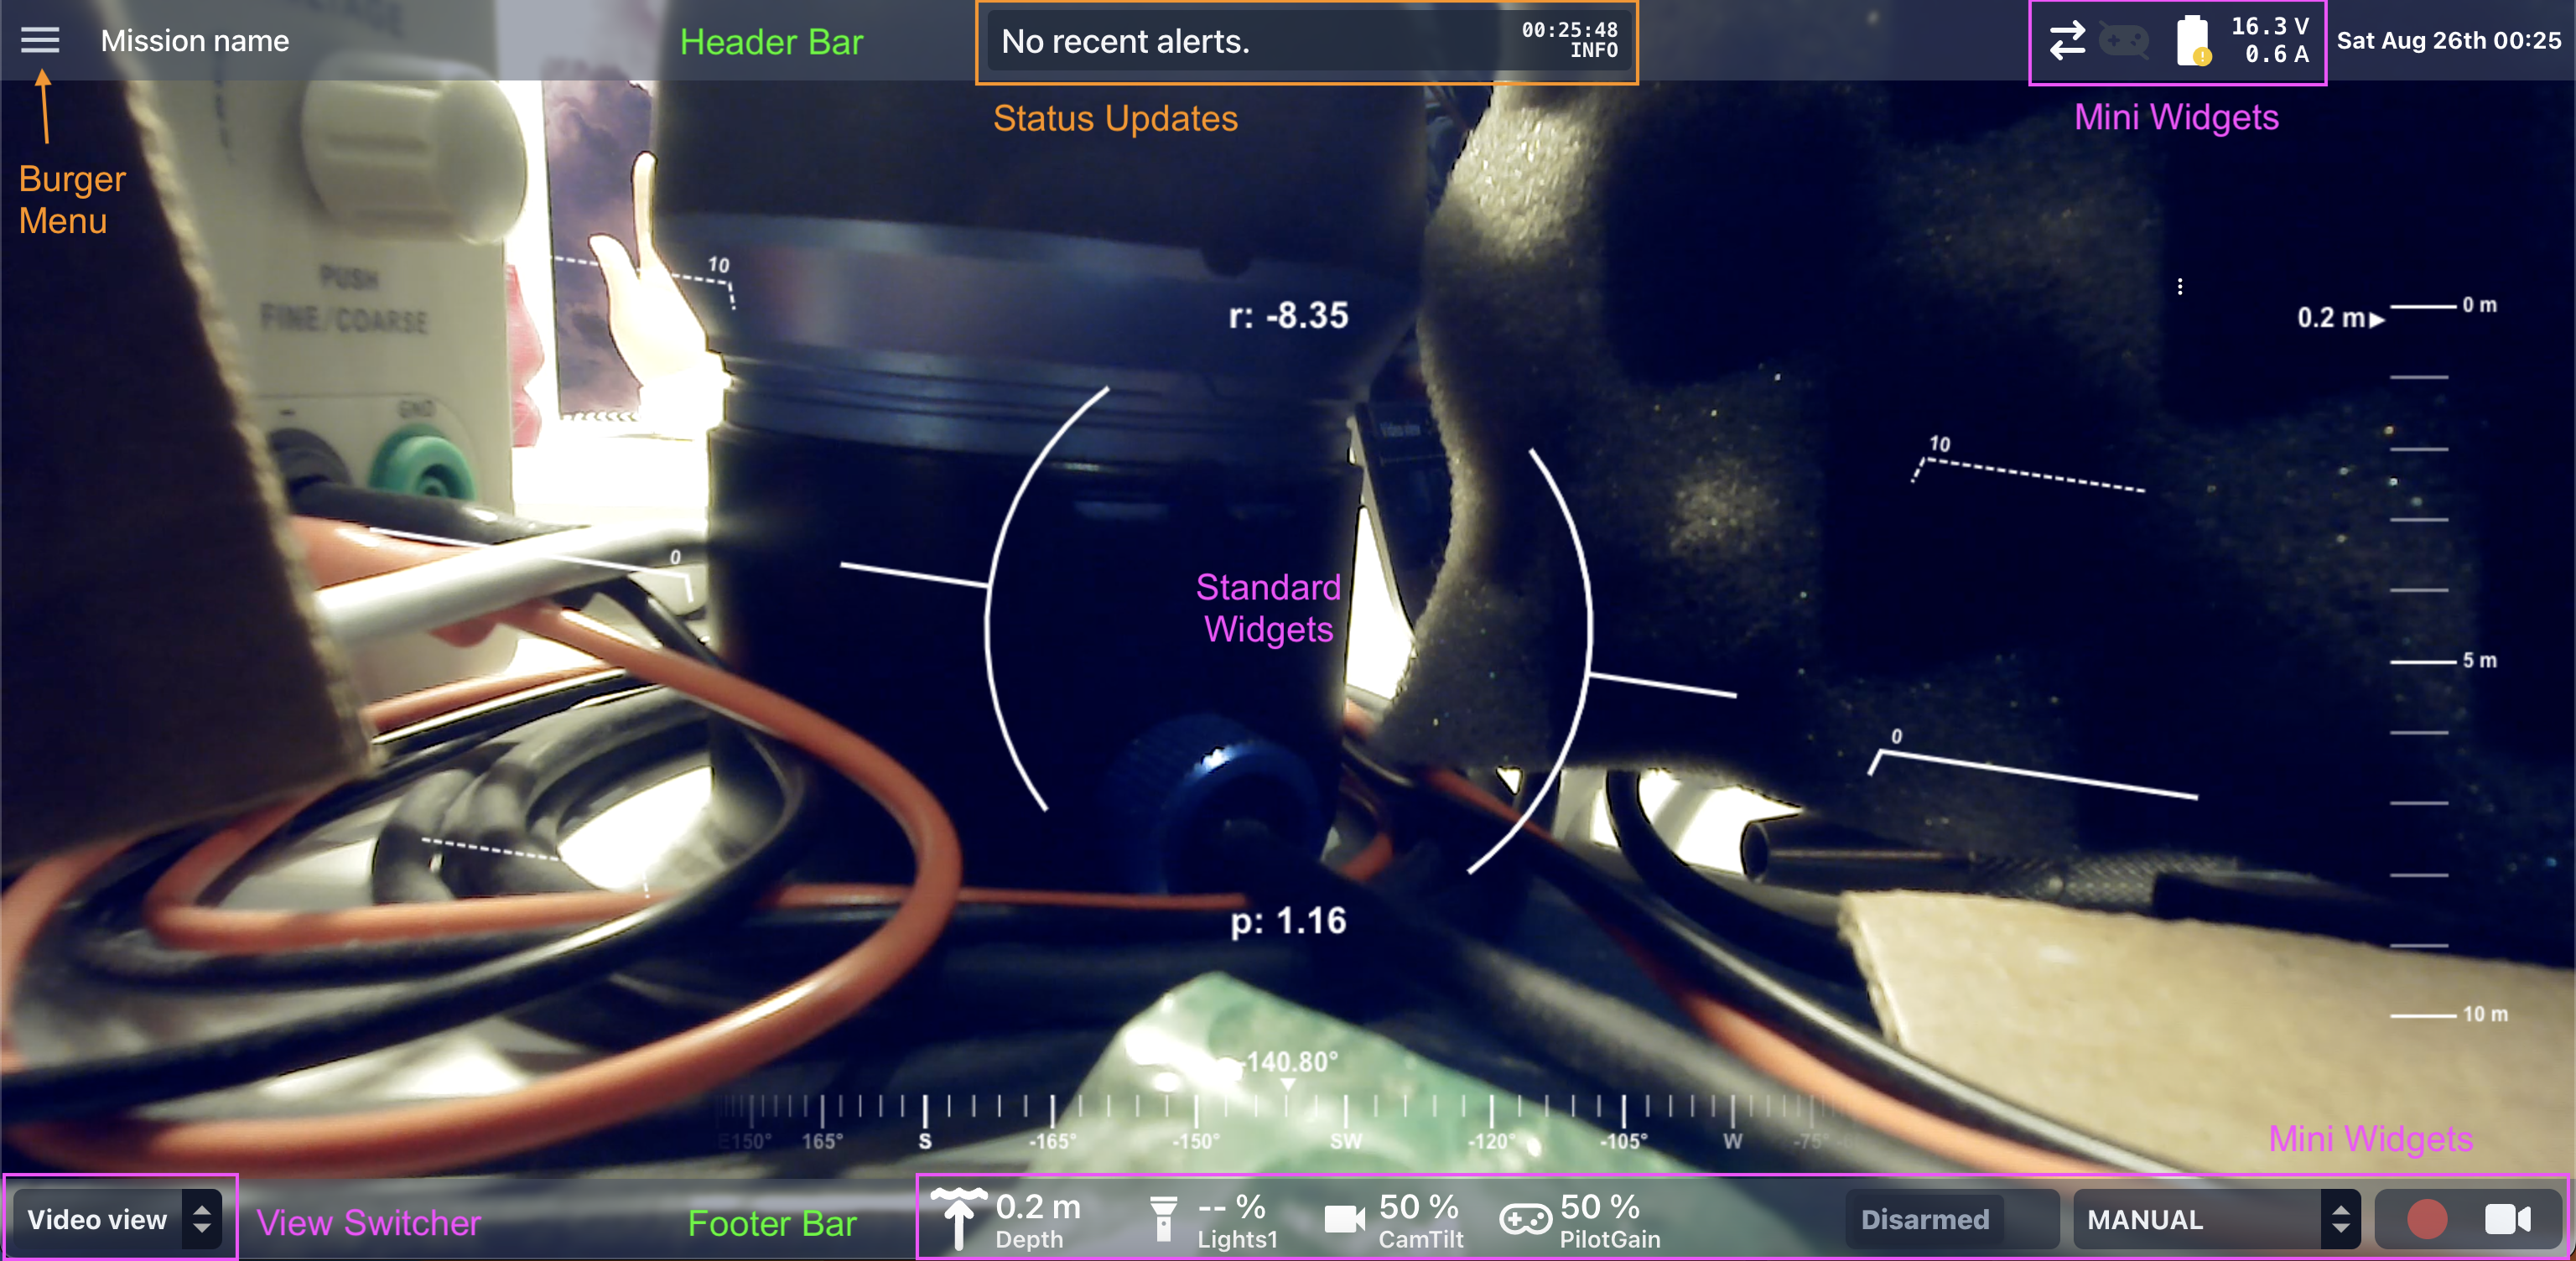
Cockpit's main interface consists of three main components:
- A central region, for regular widgets
- Mini-widget containers, including the top and bottom bars
- A sidebar menu icon
- Normally a sidebar tab arrow on the left
- Can be configured as a burger menu in the top left corner
#Top Bar
The top bar is consistent across Views, and is usually used for displaying mission information mini-widgets and connection statuses.
During operation, it can be toggled between hidden and shown using a Cockpit Action.
#Bottom Bar
The bottom bar is unique to each View, and is generally used to display indicators of various kinds, along with vehicle status controllers and interface controls.
During operation, it can be toggled between hidden and shown using a Cockpit Action.
#Sidebar Menu
Clicking on the sidebar tab (on the left of the screen) provides access to various configuration options, along with information about the application:

#About
The "About" window displays a brief description of Cockpit itself, along with key information about the version being run, and links to relevant resources and help/discussion/contribution channels:

#Fullscreen Display
Cockpit can be run within the window it opens in, or as a full-screen application.
Full-screening a browser window usually includes the tabs and search bar at the top, so there's a button in the sidebar menu to make Cockpit itself full-screened instead, and to easily exit from full-screen to resume access to the underlying browser / operating system interface.

#Tools Menu
Cockpit's tools provide access to and control over communication messages with the vehicle, and Cockpit's internal data management system:

The available tools are covered in a dedicated section below.
#Settings Menu
Cockpit's settings control how the application behaves and communicates, including, what data sources it's connected to, and how and where it processes and outputs commands and data (including recordings and logs):

The available settings interfaces and options are covered in a dedicated section below.
#Edit Mode
Cockpit is built around a configurable widget system, so you can design and modify custom interfaces for different applications.

#Organisation

Cockpit's interface consists of a configurable widget system, with
- Users
- for supporting different operators
- can be added and switched between in general configuration
- store application settings
- Profiles
- for supporting different vehicle types and/or operating modes
- can be added/removed/duplicated, saved and loaded (to/from both the vehicle and the display device), and switched between in edit mode
- Views (within each profile)
- for handling different operation modes / targets within a mission
- can be added/hidden/removed/duplicated, saved and loaded to/from the display device, and dynamically switched between during operation
- Widgets (within each view)
- for information display and vehicle control
- can be added/removed, moved around, and resized
Some information is stored at the top level in the application, although this is planned to be moved into and synchronised with individual Users in future.
#Users
Users are more abstract than the interface, and each user contains an independent set of Profiles and joystick mappings, along with the connection configuration values and application settings.
Users are mostly helpful for the following situations:
- Multiple vehicle operators who share a single control station computer (e.g. within an
organisation), and don't want to use the same configurations or custom functions
- This can alternatively be achieved with Profiles, but having separate users provides a cleaner separation, and easier options to reset everything
- Multiple operators who share a single BlueOS-based vehicle, and each want to synchronise their own configuration with it
For individuals with their own vehicles and control computers, it is generally fine to set a username once and then ignore that the "user" level exists.
Switching users is done through Settings / General > Manage Users:

Turning on admin mode, in the bottom left corner, it is possible to add new users or delete existing ones:

Users must have unique names, and creating a new user copies the Profiles of the currently selected user (if one exists - otherwise it uses Cockpit's default profiles).
#Profiles
A "profile" is a collection of views that are relevant to a particular use-case or vehicle, together with any configured custom widgets, custom Actions, and persistent data-lake variables.
If one control station computer is used for multiple complex use-cases (which each require multiple separate Views), then they can be separated into Profiles and the most relevant one can be switched to at the start of each mission.
Alternatively, if the same control station computer is used to control different types of vehicles (e.g. a boat, an underwater ROV, and a drone) then the operator can load the appropriate vehicle control interface when they connect to a different vehicle type. Profiles are registered with the vehicle types they're expected to be used for, so if there is only one profile that matches the connected vehicle then Cockpit will load that automatically.
For BlueOS-based vehicles, Cockpit can automatically store and load Users and their Profiles on/from the vehicle, which can then be synchronised when Cockpit connects (including on separate control station devices, or on a different network), which makes it convenient to quickly and easily load familiar profiles.
#Default Profiles
Cockpit includes default profiles for submarine, boat, and generic MAVLink aerial vehicle use-cases. It is possible to restore to these (as a known reasonable interface) in case something goes wrong with your custom profiles, but be aware that the defaults may change between different Cockpit versions, so may end up "restoring" to an interface you haven't seen before.

#Profile Configuration
Profiles are managed via the top left corner region of edit mode, which can be accessed through the sidebar menu. Clicking the three dots (⋮) to the right of the current profile allows renaming and configuring it:

It is also possible to duplicate, export, or delete it, as well as import or create a new profile, reset this User's profiles to the default ones, and enable or disable the alignment grid for widget placement and sizing:

#Views
A "view" is like a page that widgets can be displayed in. It is possible to configure multiple separate views and switch between them during operation (including with a joystick), which is useful if you have different interface preferences for when you're performing different operations.

As an example, you may have one view tailored to general navigation, and another that's designed around inspections. The first view could then be used while getting the vehicle to the inspection site, and then the second view can be switched to once it's time to actually perform the inspection.
It is possible for different devices or browser instances to connect Cockpit to a vehicle (or load Cockpit from a vehicle) at the same time (e.g. using separate browser profiles, or one display in incognito mode, but currently not multiple tabs of the same browser instance), with their views configured independently. To use the same component layouts across instances you can sync them through the vehicle, or manually export the desired view(s) from one and import them into the other(s).
#Views Configuration
- Open edit mode via
Settings / Edit Interfacein the sidebar menu - Expand or hide the views manager via the arrow in the top left corner

- Select a view to edit, and/or create, hide/show, or remove views as desired
- Views can be imported from an external file, or exported to a file for sharing
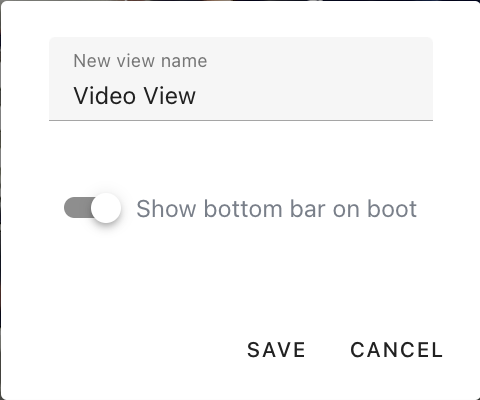
- Clicking on the cog settings icon allows renaming a view, and determining whether the bottom bar is
shown or hidden/docked when Cockpit boots
- It is always possible to toggle the current bottom bar visibility using Cockpit Actions (e.g. via a joystick button)
- The "Widgets in View" list allows
- hovering over a widget name to highlight its display in the interface
- dragging the widgets in the main view area to reorder which widget is on top
- This helps for use-cases like overlaying a HUD element on a video display
- removing an existing widget from the current view
- resizing a widget to fill the entire view

- New widgets can be added via the bottom section
- Dragging a regular widget card into the main display area adds it to the View, after which it can be positioned and resized as desired
- Mini widgets have fixed sizes, but can be dragged and dropped into the desired location in the top/bottom
bars or in a custom container widget
- The top bar is shared between Views, and the bottom bar is unique to each View
- The selector in the bottom left can be used to choose between editing regular, mini, or input widgets
- Some widgets can be configured, by clicking the cog settings icon in the "Widgets in View" list
- There are currently cog icons for all widgets, so if you click a cog icon and nothing happens it means that widget is not configurable
- For quick access, widget configuration is also accessible by right clicking (long-pressing on touch devices)
them in the normal view, outside of edit mode
- Includes a slider for opacity control

#Widgets
There are several types of widgets available, including different displays of the same information for use in different contexts:
- Regular Widgets include detailed displays like videos, maps, instrument gauges, and overlays
- They can only be located in the main display area
- Their positions and sizes snap to the Profile alignment grid, if it is enabled
- Mini Widgets are small (usually text-based) indicators and buttons
- They can be in the shared top bar, or in the View-specific bottom bar or a container widget
- Input Widgets are like mini-widgets dedicated for custom user inputs / commands
- They can be in the shared top bar, or in the View-specific bottom bar or a container widget

#Mission Information
#Mission Name
By default, a name is randomly generated for the current mission/operation each time Cockpit is opened/restarted, and displayed in the mission name indicator:

Clicking on the widget allows setting a custom name, which is then used for saving files and video recordings:
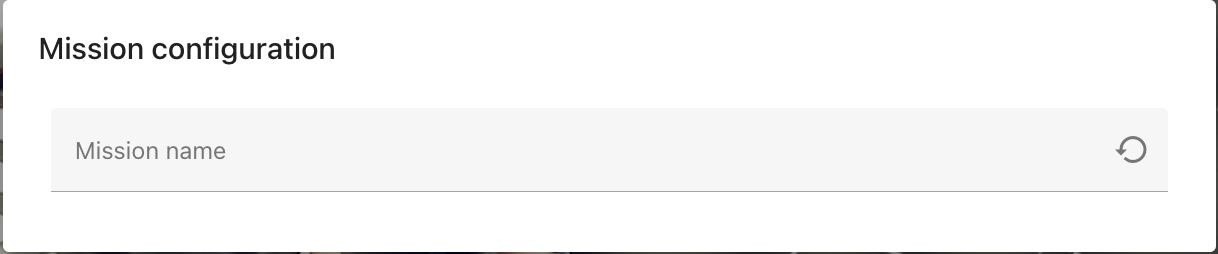
While modifying the mission name it is possible to restore the previous name, in case you change you mind or make a mistake.
#Alerter
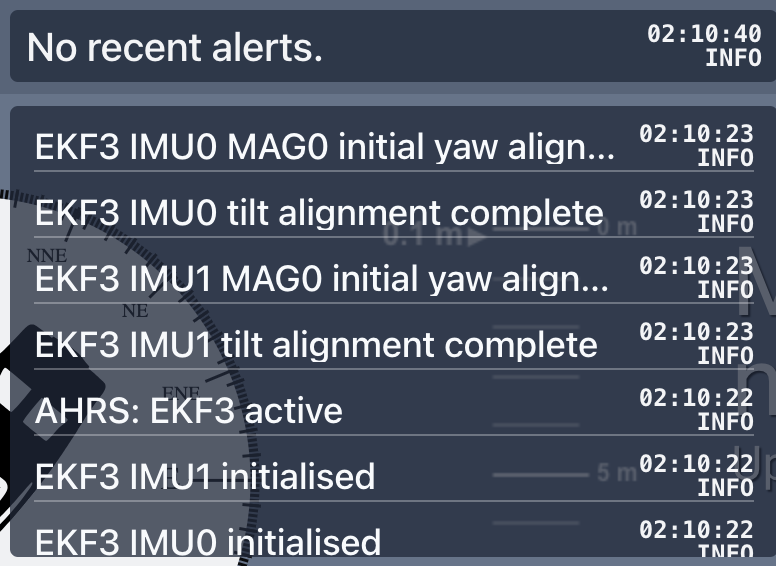
The alerter mini-widget allows displaying Cockpit's alerts, along with their severity:

Hovering over the widget displays a scrollable history:
#Power/Battery Indicator

Configuration allows choosing to display current or instantaneous power draw, or alternating between both

#Date and Time
The current date and time can be displayed in a mini-widget:

💡 If the time is needed in seconds, see the Alerter.
#Connection Statuses
#Vehicle Connection Indicator
When Cockpit gains or loses connection with the vehicle it displays a green/red border around the screen. The vehicle connection mini-widget provides a continuous indication:

#Joystick Connection Indicator
The joystick connection mini-widget indicates whether a joystick is disconnected, disabled, or connected:

Clicking on the widget allows manually disabling the joystick pipeline:

which can be useful if multiple users are switching control of the vehicle between separate devices with Cockpit open, or to prevent a faulty joystick from sending errant commands without needing to physically disconnect or unpair it.
The joystick pipeline is disabled by default if Cockpit detects another control station software sending joystick commands to the vehicle when it starts up.
#GPS Connection Indicator
For vehicles that use satellite positioning, the GPS connection mini-widget indicates the number of connected satellites, and the status of the position lock:

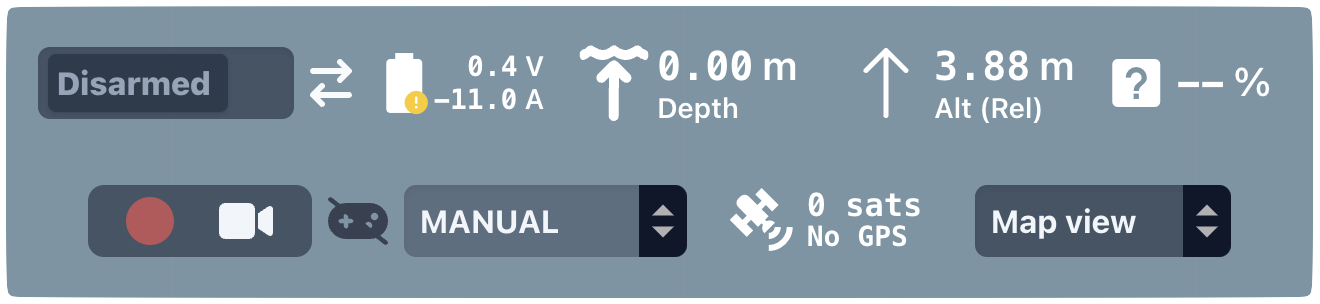
#Vehicle Status Controllers
Vehicle status and modes are controllable using Cockpit Actions assigned to joystick button functions, but these mini-widgets provide an on-screen interface for doing so, while also presenting the current state.
#Arm / Disarm

#Flight Mode

#EKF Status
For help with understanding and debugging the autopilot's state estimates, the EKF status can be checked to see which estimates are undefined or uncertain:

#Interface Controls
While some interface controls (like changing Views) are available as Cockpit Actions assigned to joystick button functions, it is sometimes convenient to modify the interface using on-screen components.
#Edit-Mode Quick Toggle
Edit Mode is normally accessed through the sidebar, but is also available using a mini-widget:
#Fullscreen Quick Toggle
Fullscreen display mode is normally accessed through the sidebar, but is also available using a mini-widget:
#View Selector
The actively displayed View is specified and can be switched between using the View selector mini-widget:
#Very Generic Indicators

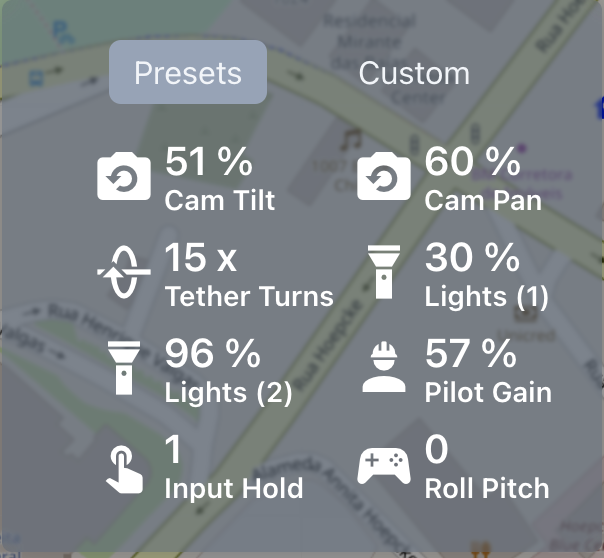
These are versatile mini-widgets that can be configured to track data-lake variables, which covers almost any information Cockpit has access to.
For configuration convenience, several pre-made presets are available for usage with common variables:
For custom setups, it is also possible to specify a display unit, a value multiplier, an icon, the number of digits after the decimal place, and a custom display name:
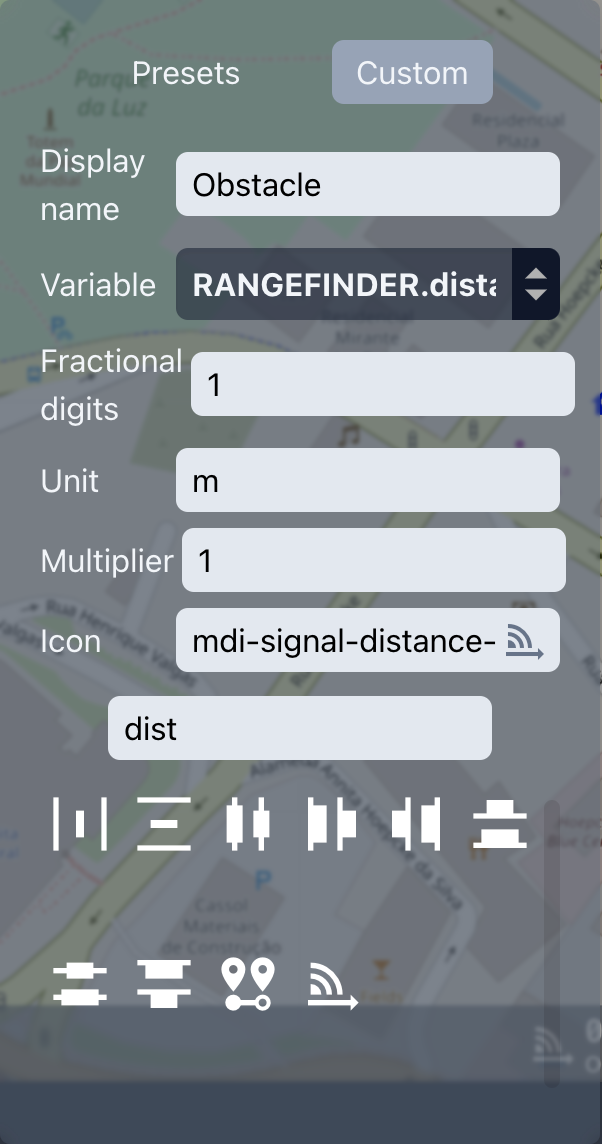
Selecting a variable is done through a dropdown, which can also be typed into to perform a fuzzy search for terms of interest.
#Attitude Indicators
#Attitude HUD
The attitude HUD widget displays the vehicle's pitch and roll as a heads-up display overlay:
It is possible to configure which components get displayed, as well as the line colour:
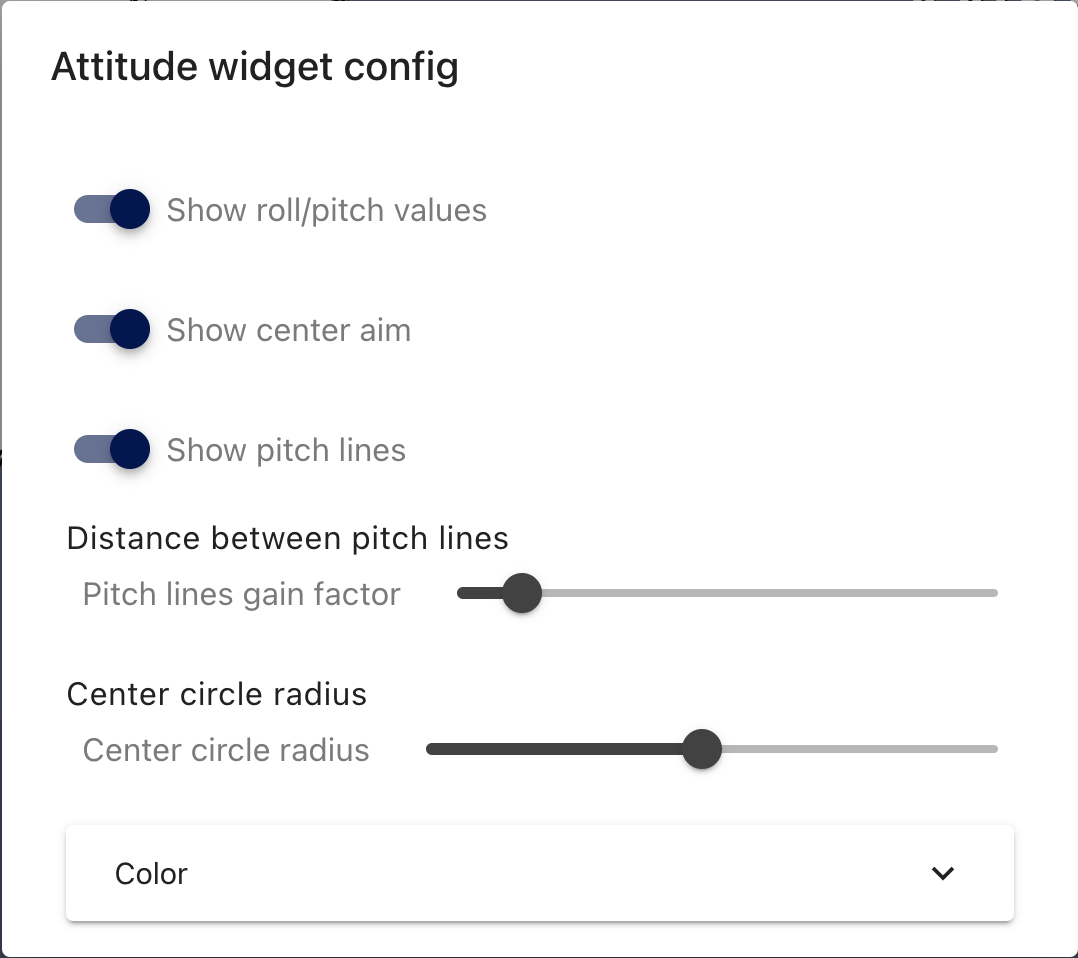
For vehicles with a tilt-controlled camera mount, specifying the camera vertical FOV allows the attitude HUD to account for the camera tilt angle in the displayed pitch lines and center aim indicator.
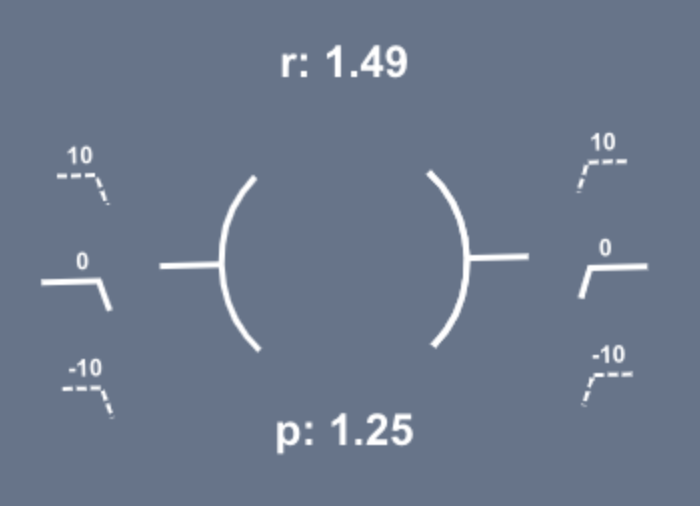
#Virtual Horizon
The virtual horizon widget displays the vehicle's pitch and roll as though on the gauge in a plane:
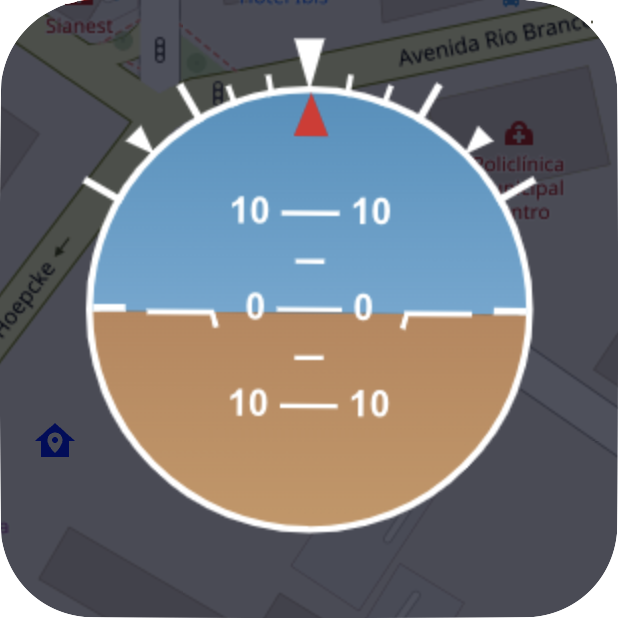
It is most useful for guided and/or autonomous control, where the main display is of the vehicle's position.
#Attitude Values
Roll, pitch, and yaw, and their rotation rates, can be accessed through the
ATTITUDE MAVLink message, which forms the
basis for the main attitude widgets.
When operating in an attitude-stabilised flight mode, the target attitude values are accessible
through the NAV_CONTROLLER_OUTPUT
MAVLink messages, and can be displayed in Very Generic Indicator widgets if desired.
#Heading Indicators
#Compass
The compass widget displays the vehicle's orientation as though looking at a compass in your hand:
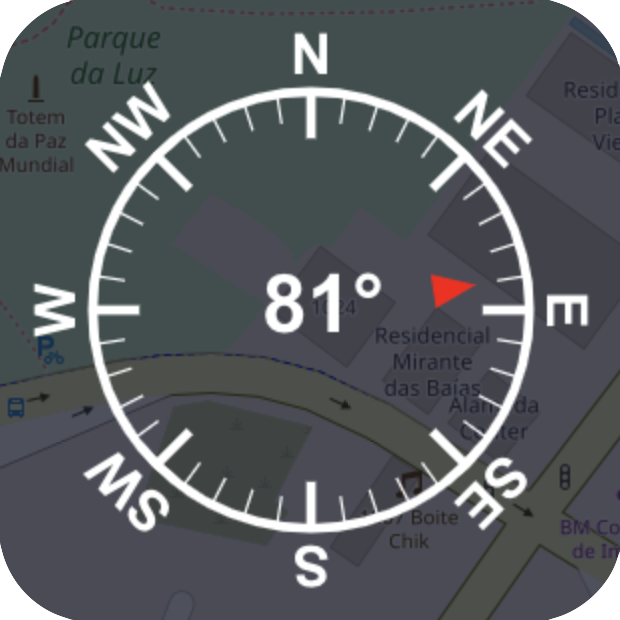
It is most useful for guided and/or autonomous control, where the main display is of the vehicle's position.
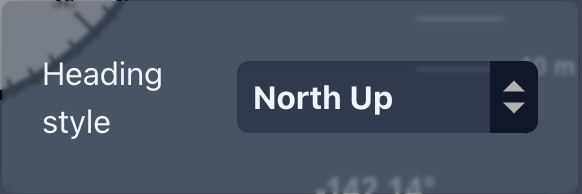
It is possible to configure the vertical direction to be fixed to North ("North-up") or to the vehicle's forwards direction ("head-up").
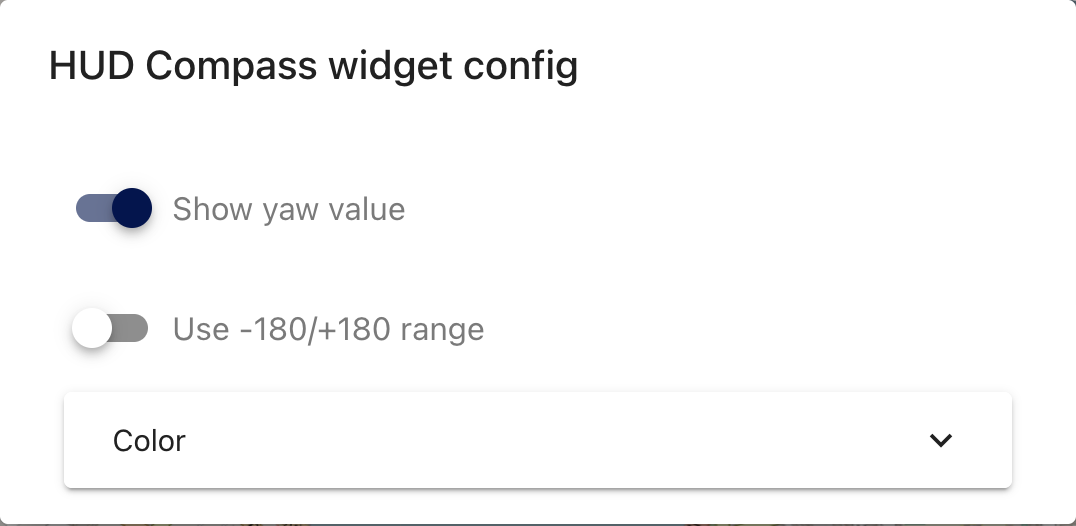
#Compass HUD
The compass HUD is a first-person compass view, as though inside a compass and looking in the direction the vehicle is pointing (its heading):

It is possible to configure whether the exact heading angle is shown, whether to use a -180 to +180° range (default is 0 to 360°), and the colour of the lines:
#Heading Values
Heading indicators typically use the yaw from the attitude values, but for vehicles
with relevant sensors and configuration, the raw heading form a GPS unit can be accessed through
GPS_RAW_INT messages.
#Depth Indicators
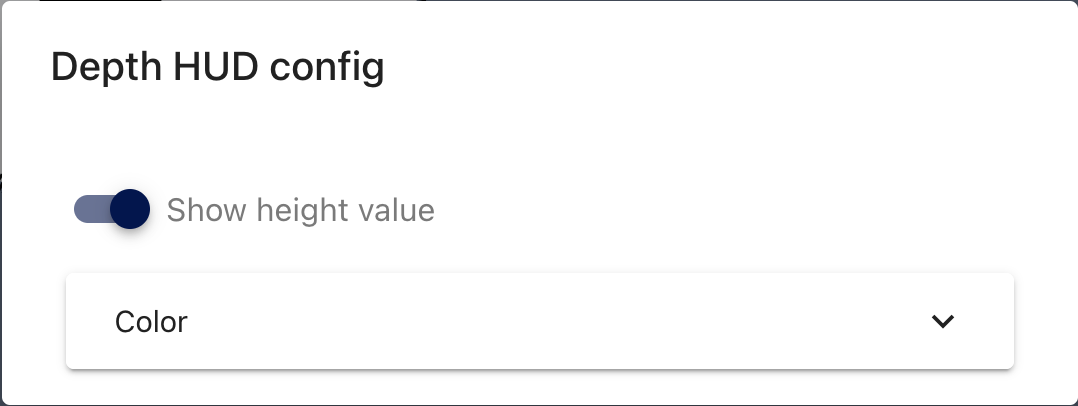
#Depth HUD
The depth HUD indicates the vehicle's current depth as determined by its external pressure sensor:
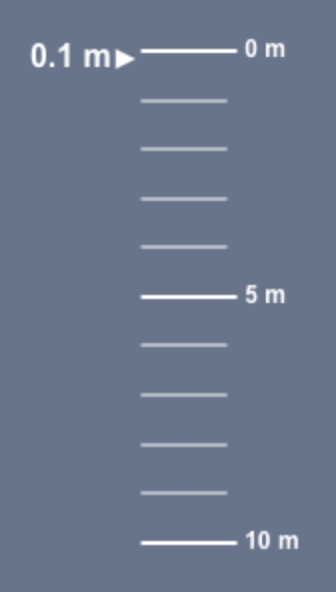
This is primarily useful for underwater vehicles.
Configuration determines whether the exact depth value is shown, and the colour of the lines:
#Depth Mini-Widget

#Altitude Indicators
#Altitude Indicator Mini-Widget
The Altitude mini-widget displays the vehicle's altitude estimate, relative to its barometer calibration point.

It is intended for aerial vehicles, so positive is upwards.
#Altitude Modifiers
When using a Takeoff/Land or Change Altitude Commander mini-widget,


a slider is created to specify the desired altitude to fly to:

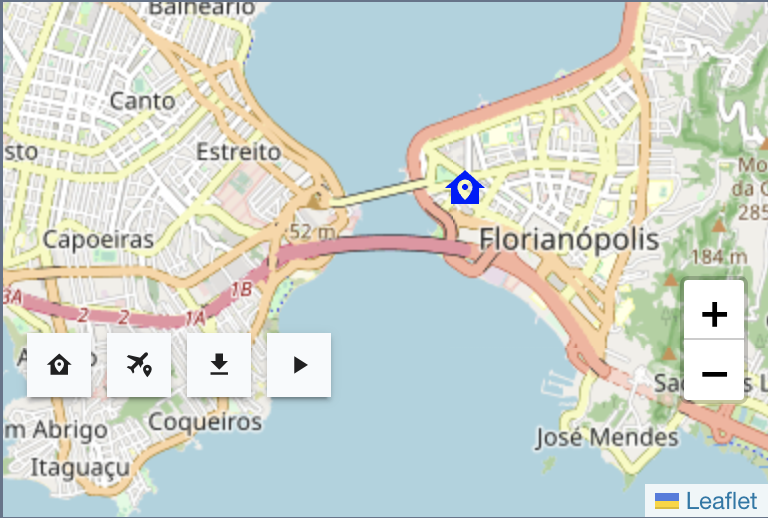
#Map
For vehicles with a positioning system, the map widget displays the registered home location and the vehicle's current position, with an option to track the vehicle's path over time.
There are buttons
- in the bottom right to
- move the map to the registered 'home' location
- this may move around if the control station computer is on a boat
- double click to track it
- move the map to follow the vehicle's current position
- double click to track it
- download the current mission from the vehicle, and display it on the map
- run the mission that is on the vehicle
- zoom in and out, and
- move the map to the registered 'home' location
- in the top right to
- Switch between structured and satellite map views
- Include sea marks
- Include water depths
💡 Mission Planning is documented in a dedicated section.
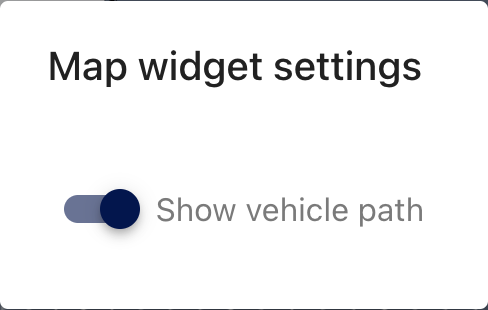
Configuration allows showing or hiding a trail of the vehicle's path over time:
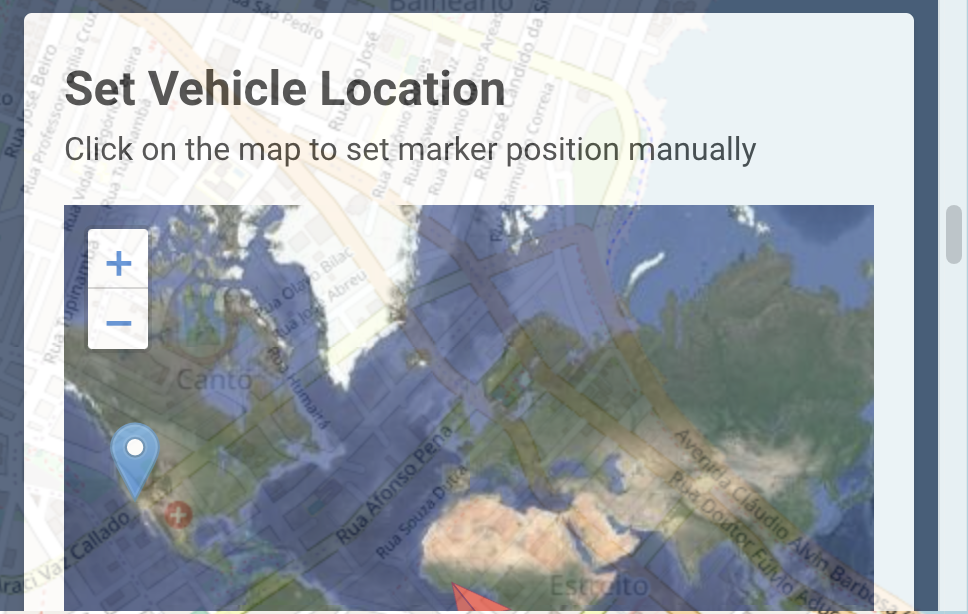
For vehicles with a supporting autopilot firmware and valid position estimate it is also possible to guide the vehicle to a new position via GoTo commands (which can be sent by clicking a target location on the map, and clicking the GoTo option), and setting the default map position:

It is not currently possible to manually specify the vehicle's current position, GPS origin, or home location.
#Video Widgets
Cockpit has a few different widgets for handling videos from different sources.
Multiple video widgets can be added to display different video streams, with options for how the frames should fit within the widget:
- cover: maintains the video aspect ratio, but expands the frames to fully cover the widget, and crops off the sides or top+bottom if they extend beyond the widget boundaries
- fill: stretches the frames so that all sides are against the corresponding widget boundary
- contain: maintains the video aspect ratio, but shrinks the frames to fully fit inside the widget, adding transparent padding at the sides / above+below as necessary
#WebRTC Video Player
WebRTC Video Player widgets can display an available WebRTC video stream, as set up through the Video Configuration menu. BlueOS uses the MAVLink Camera Manager to automatically create a WebRTC stream for applicable video streams.
Configuration allows selecting which video stream to display, flipping and rotating the stream image, and choosing how the frames should fit within the widget (as described above):

If your video stream is having some issues, the available stream performance statistics may help to determine the cause of the problem:

These statistics are also available through the data-lake, and can be plotted for monitoring/analysis outside of the video widget if desired.
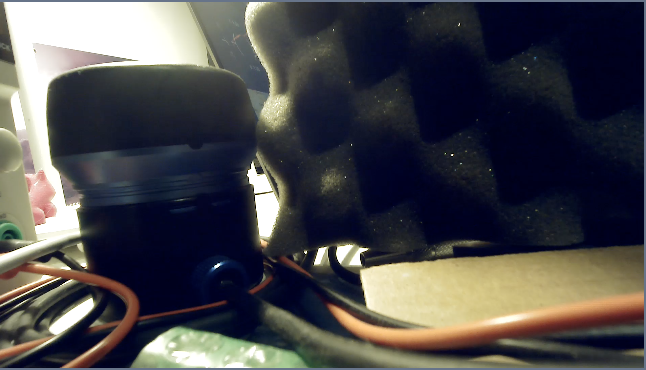
#WebRTC Video Recorder
It is possible to directly record an incoming WebRTC video stream (not the scaled and cropped/flipped/rotated display of the widget):

Clicking the red icon on the left allows quickly starting and stopping recording of the currently specified stream.
Clicking the stream name in the middle of the widget allows choosing which stream to record:
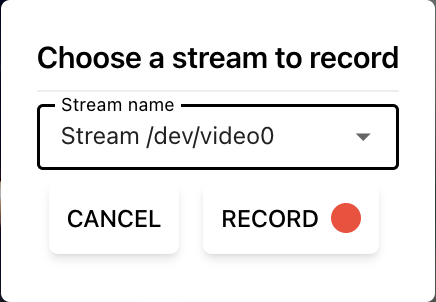
Recordings are saved using the mission name and starting timestamp, and can be found in the Video Library. When videos are available an indicator shows on the right side of the recording widget, which can be clicked to open the library directly.
💡 Recording occurs in the display device (not onboard the vehicle).
💡 When running Cockpit in a browser, downloading recordings currently temporarily stores them in memory, which may limit the maximum duration of individual recordings. The standalone application records videos directly to the filesystem, so does not have this issue.
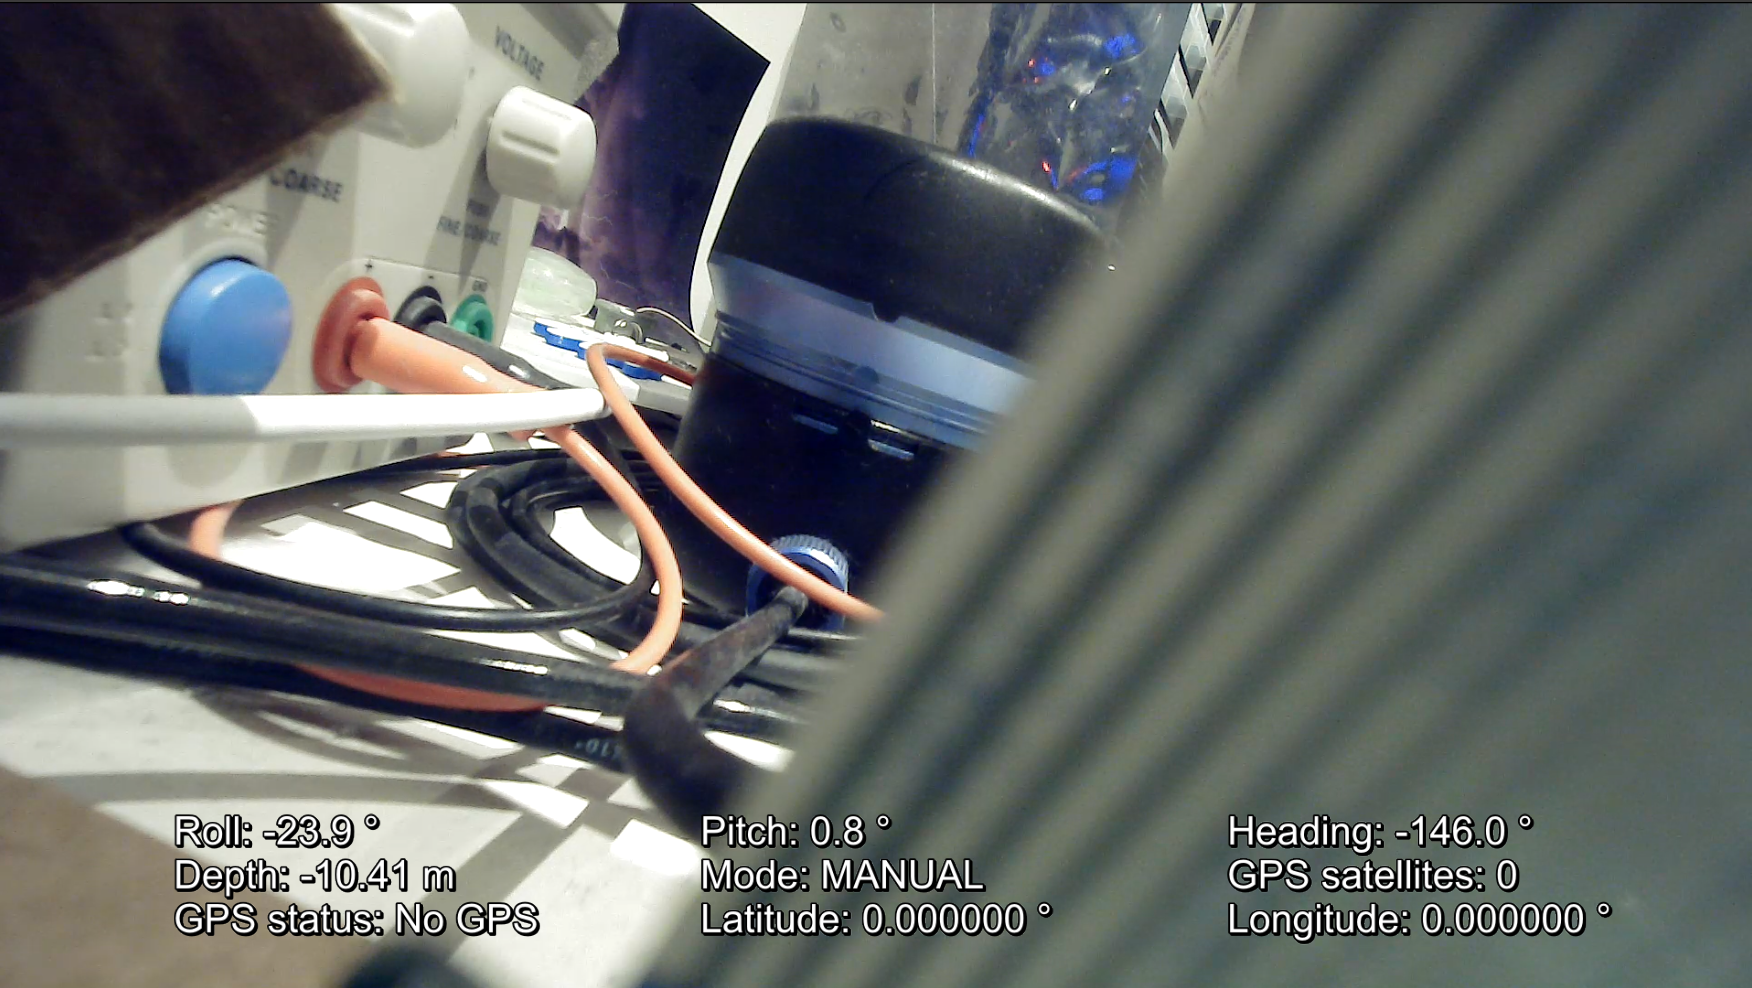
To make the recorded videos easier to analyse, Cockpit can be configured to log telemetry values, and record them as a subtitle file for convenient video playback:
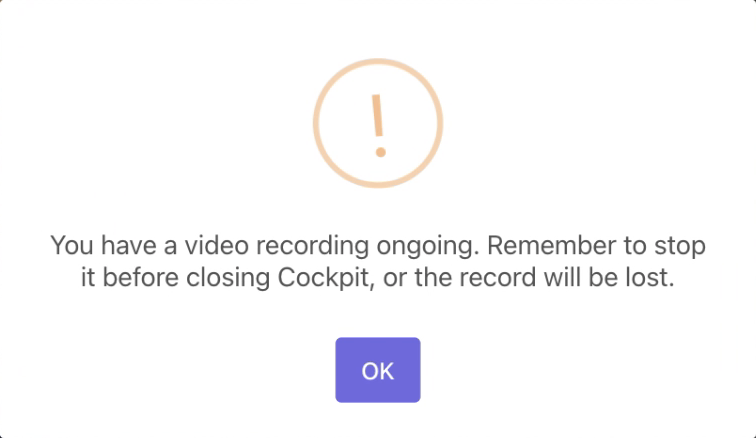
If a recording is ongoing, Cockpit will try to prevent the tab/application from closing, with a warning:
#Snapshot Recorder
The Snapshot mini-widget allows capturing the current frame from one or more WebRTC video streams, or the entire visible View (in the self-contained application) and saving them as timestamped image files with EXIF metadata specified for the vehicle's location and orientation:

Snapshots can be captured by clicking the button, or configured to trigger repeatedly with a timer:

The saved images can be accessed through the Snapshot Library.
#URL Video Player
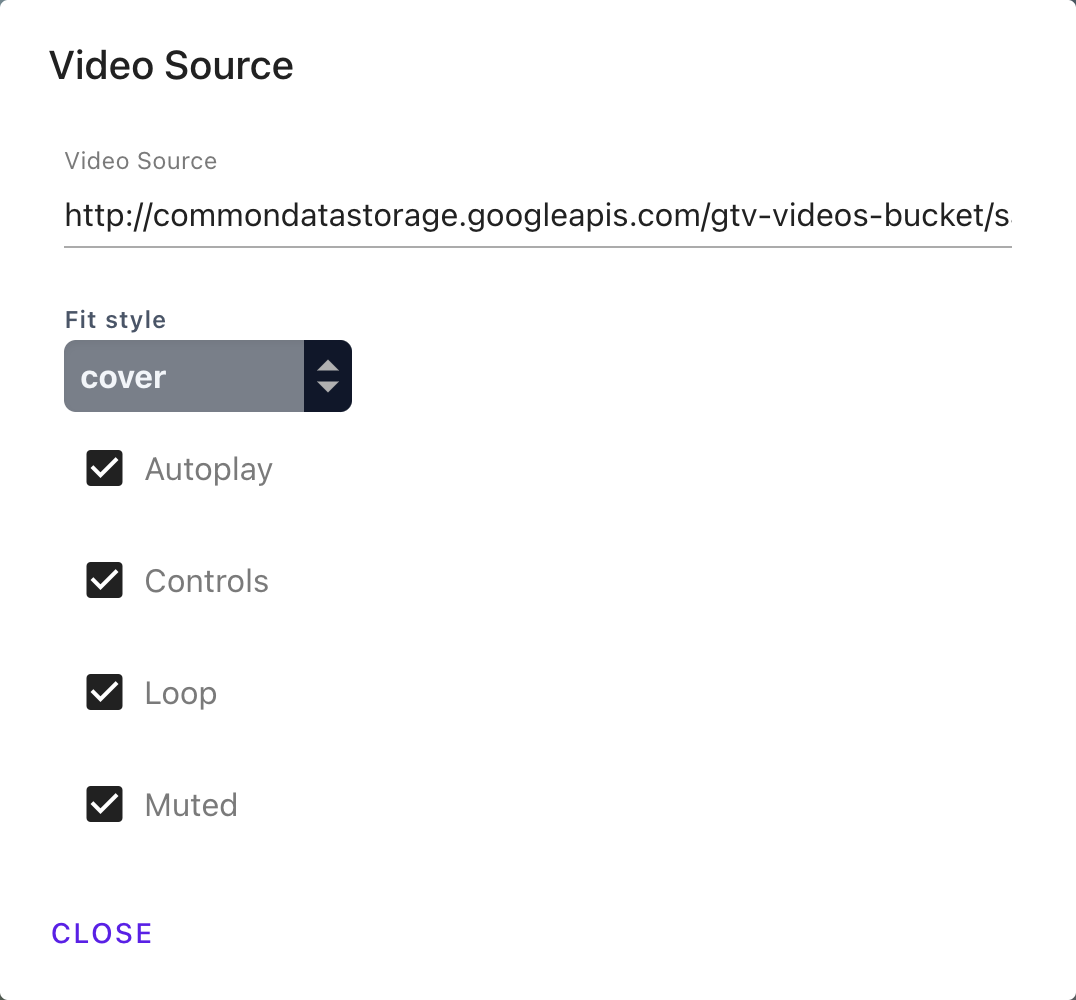
The URL video player widget displays a video from a URL. This is useful for testing IP cameras that are not being redirected via BlueOS, but can also be used to display online videos if that is for some reason relevant.

Configuration allows selecting which URL to stream a video from, as well as options for whether to play the video automatically, whether it should loop when complete, whether it should play sound or be muted, whether playback controls should be exposed, and choosing how the video frames should fit within the widget (as described above).
💡 See also the External Displays section, for some alternatives with related functionality.
#External Displays
#IFrame
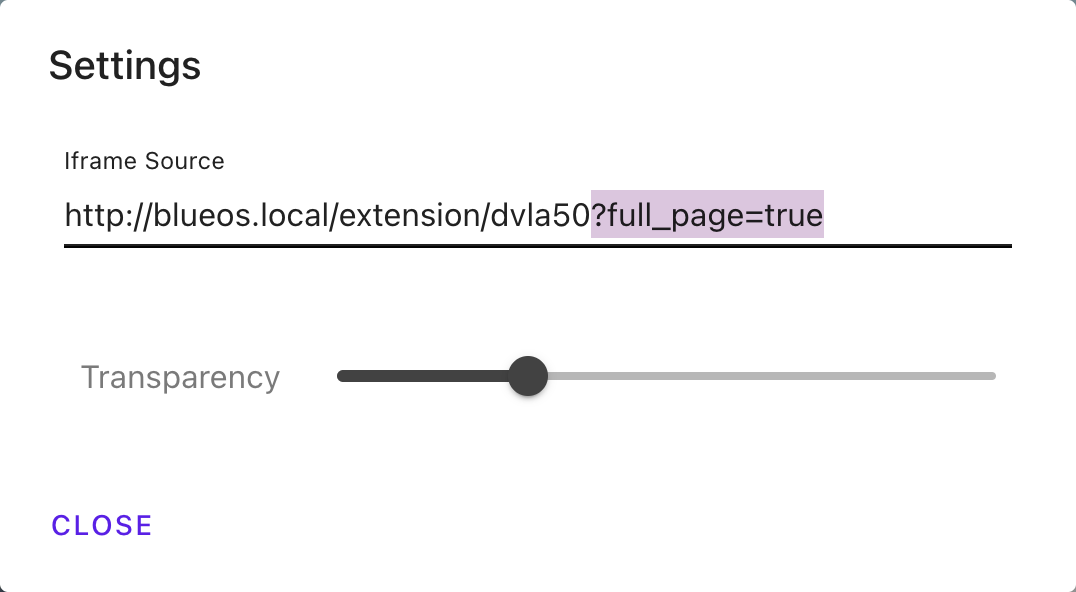
The iframe widget provides an inline frame that can display another HTML page within the Cockpit interface. This is particularly useful for showing the interfaces and displays of IP cameras and BlueOS Extensions:
Configuration determines the URL to fetch the page from, as well as the overall transparency of the iframe:
#Automatic External IFrames
External services can automatically share web interface URLs for Cockpit to turn into IFrame widgets, along with other features.
#Image Viewer
The image viewer widget shows an image that is accessible to the control station computer via its network.

Images from the internet can be included (e.g. a logo for branding) as long as the computer has internet access when Cockpit is started.
💡 This is most useful for images hosted on the local network, and was designed to display the output of a self-replacing mjpeg like from an ESP32-Cam. It could also display images hosted by a BlueOS Extension.
#Data Plotting
#Plotter Widget
The plotter widget allows plotting data on a graph:

Configuration options are provided for selecting the data-lake variable to plot, some common statistics from the plotted data (and their decimal resolution), and basic appearance characteristics:

It is also possible to control the number of plotted samples and the vertical range of the graph, to improve visibility and/or performance.
#Do It Yourself (DIY) Widget
- Completely custom elements, code logic, and styling

- Runs code automatically when Cockpit starts/refreshes
- Can save and apply updates automatically (while editing), or be configured to only apply changes manually
- Auto-save should generally be disabled while editing JavaScript functionality, but can be convenient while modifying a widget's visual interface / styling
- Can inherit styles from the Cockpit interface, or use completely independent styles
- Can listen to, create, and modify data-lake variables, and register and/or execute Actions
using the Cockpit API (
window.cockpit.*) - Can be exported to or imported from a JSON file with
"html","css", and"js"string fields
#Container Widgets
Regular widgets for storing mini widgets and input widgets in the main View area.
#Mini Widget Bar
A generic rectangular container widget, where list order determines internal positions.
#Custom Widget Base
A collapsible, nameable, movable container widget, with a grid of internal position options.


Can be saved to or loaded from a file, or cloned to another View via the dropdown from the top right corner when in Edit Mode:

#Input Widgets
Input widgets should be placed in a container widget, and can be configured by clicking on them when in Edit Mode.
While other widgets generally have predefined behaviour, these are specifically designed to trigger and set variables for use as parameters in Custom Actions.
#Action Buttons
Buttons can trigger a specified Action when pressed.


#Boolean Inputs
For parameters that require True/False or 0/1 values, you can use a Switch or Checkbox Input widget:


#Multi-value Inputs
If a parameter has a set of possible value options, that can be represented using a Dropdown Input widget:


#Range Inputs
Parameters with an integer or decimal range of values can be set using Dial and Slider Input widgets.
Dial Inputs allow configuring a value range, rounded to the nearest integer:


Slider Inputs allow configuring a value range, rounded to the first decimal place (e.g. 0.1):


#Input Labels
If there are separate groups of Input widgets in a Custom Widget Base, it can be useful to give them headings with Label widgets:


#Tools
#MAVLink Inspection
While it is possible to persistently monitor individual MAVLink message fields using Very Generic Indicators or data plotting widgets, the MAVLink inspector tab allows temporarily monitoring a small number of full MAVLink messages:

- Both incoming and outgoing message instances can be monitored
- Pressing "Reset" clears the currently monitored messages
💡 It may be possible to access more detailed MAVLink inspection and tracking interfaces through the software that is routing MAVLink messages to Cockpit. If using MAVLink Server as the router there is a detailed debugging interface provided.
#Data Lake
Cockpit's data lake is an accessible data management and storage system.
It is designed to expose Cockpit's internals to the interface (including displaying and plotting), and for use in user-defined functions (through custom widgets and custom Actions).
The data lake:
- Includes information about Cockpit, the vehicle, video streams, MAVLink telemetry, and widget and Action internals
- Variable IDs can be copied with the icon left of the name, and referenced elsewhere surrounded by double braces
(e.g.
{{ data-lake-variable-id }}) - MAVLink messages are split into variables for easier tracking
- only messages from ArduPilot vehicles are currently known about / supported
- e.g. those from the common or ardupilotmega message sets
NAMED_VALUE_FLOAT/INTmessages are split by name, including showing custom ones (Cockpit does not need to know these names in advance)- messages with an ID field are not currently separated into instances
- only messages from ArduPilot vehicles are currently known about / supported
- Variable IDs can be copied with the icon left of the name, and referenced elsewhere surrounded by double braces
(e.g.

- Supports defining custom variables
- These can be set using joystick buttons

- Allows defining compound variables, which are computations based on and/or combining other variables
- The "Expression" is the body of a JavaScript function, so supports operators for maths, conditionals, and other advanced functionalities

#Behaviour Configuration
Cockpit's behaviour can be configured via the sidebar menu, with the following tabs:
#General
The general settings cover top level configuration of Cockpit, to set up who is using it and how it should connect to a vehicle:

- Create and switch the active User
- Manage the application settings directly, including saving, loading, and resetting configurations

⚠️ Invalid settings changes can break Cockpit, and stop it from loading correctly.
- Specify the primary network address to connect to the vehicle
- Optionally override the autopilot / MAVLink router telemetry connection address
- Optionally override the WebRTC media connection address, for video streaming
- Optionally customise the WebRTC connection configuration values
#Interface
The interface settings cover high-level configuration options about Cockpit's appearance and data displays:

It is also possible to rearrange and modify the components and widgets displayed during operation, which there's a dedicated interface for managing in Edit Mode.
#Joysticks
Cockpit is intended to work with arbitrary joystick types, and allows mapping joystick buttons and axes to various protocol functions, which can send inputs and commands to the vehicle, or trigger interface events.
#Function Mapping
Cockpit provides three independent sets of function mappings, which are automatically pre-selected based on the connected vehicle type:

Non-active mappings can be previewed by clicking on them, and switched to by clicking the switch button that appears while previewing:

Changes to a mapping are synchronised to/from the User, including changes to which vehicle type(s) a mapping gets selected for. It is also possible to manually export the function mappings as a file, and import them into another User or a different Cockpit instance/device.
#Buttons and Axes
Known joystick types have an interactive diagram for mapping button and axis functions visually:
Joysticks can be individually enabled/disabled from the toggle-switch under their name, or the entire joystick pipeline can be disabled via the Joystick Connection Indicator.
Button presses and axis movements should be mirrored on the diagram, and clicking on a button element in the diagram allows remapping its mapped function.
💡 Axes currently must have unique functions, so mapping an axis to an Action that is already in use will result in that Action being unmapped from whichever axis was using it previously.
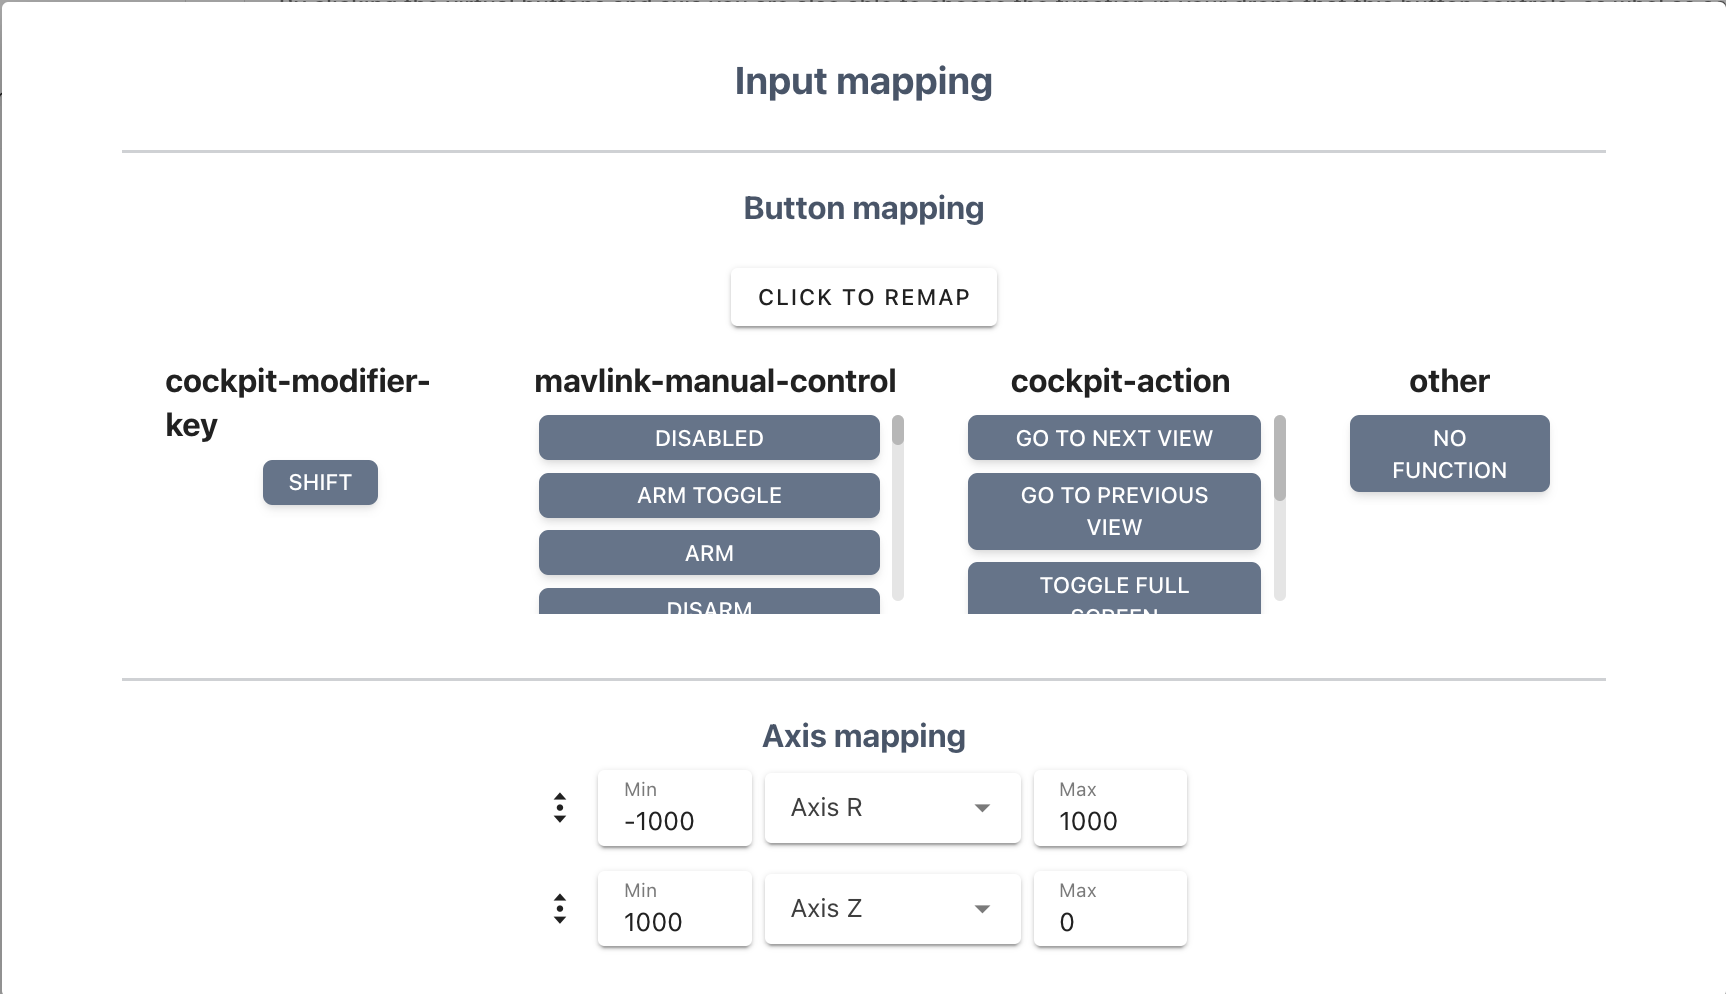
There is also a table view, which is available for both known and new joystick types:

Buttons can be remapped to different Actions using the edit pencil at the far right of the corresponding row.
💡 Support is built in for simultaneous input from multiple sources, including multiple joysticks, and by default each joystick can provide up to 32 axis ranges and 32 buttons.
#Axis Calibration
Axis calibration options are provided to improve control and compensate for joystick degradation:

- Exponential scaling reduces the output change near the center of an axis, and increases it towards the edges
- Higher values can improve fine control at low thrust levels (e.g. slow speeds), at the expense of less control fidelity at higher thrusts/speeds
- Dead-bands zero-out inputs at the center
- This helps to avoid undesired input values when there is slop in the axis spring (i.e. "stick drift")
- The auto-calibration option allows wiggling the axis sticks in the region where the spring is not engaging, to detect the zone the axes will return to when released
- Large dead-zones make fine control difficult, so if your joystick is suffering from signficant stick drift it is a good idea to repair or replace it
#Joystick Protocols
When mapping the functionality of a joystick button or axis, there are multiple protocols to choose from, which can be mixed and matched across different buttons and axes:


#MAVLink MANUAL_CONTROL Messages
MANUAL_CONTROL MAVLink messages are
automatically transmitted at 25Hz, which is not currently configurable.
💡 While it is generally expected for there to be a vehicle connected, Cockpit is capable of sending MAVLink Messages to a MAVLink system more generally, even without a vehicle included.
⚠️ If the browser tab is changed away from Cockpit, or the Cockpit application window is minimised, Cockpit loses access to the joystick inputs, and normally stops sending
MANUAL_CONTROLmessages to reflect the loss of input. This can trigger an autopilot failsafe, which may not be desirable, so an option is provided in the top right of the joystick page to tell Cockpit to repeatedly send the last joystick input it received before losing access to the joystick.It is important to always be conscious of where your vehicle is, and what kind of hazards it is operating near.
Button functions are determined by the autopilot firmware.
As a few caveats:
- ArduSub <= 4.1.x only supports 16 independent buttons and 4 axis ranges in its
MANUAL_CONTROLhandling- More recent versions support the extended protocol, with 32 buttons and 6 motion axis inputs
- ArduRover does not support buttons via the
MANUAL_CONTROLprotocol - When mapping the Z (vertical) motion axis range, note that ArduSub uses 0 to +1000 for full reverse to full forwards, whereas other vehicle types use -1000 to +1000
The function mapping decision process is designed to minimise intrusiveness to existing setups. When mapping a
MANUAL_CONTROL button function to a joystick button, Cockpit
- First tries to use already mapped functions
- e.g. if there is already a
BTNn_FUNCTIONconfigured to enable Stabilize mode, a Cockpit button being set to enable Stabilize mode will map to that existing function bit
- e.g. if there is already a
- Then overwrites available Disabled
BTNn_FUNCTIONs - Then tries to overwrite any mapped function bits that Cockpit currently isn't using
- If you try to change a Cockpit function to a
MANUAL_CONTROLfunction when there are no buttons left it will display an error message about insufficient buttons
- If you try to change a Cockpit function to a
It is permitted to map the joystick button functions without a vehicle connected, in which case any relevant
autopilot parameters will be automatically remapped once the vehicle connects. If more MANUAL_CONTROL button
functions have been assigned than are supported by the vehicle then the extra ones are removed, and a warning
is raised to notify that the configured mapping is not fully as designed.
#Cockpit Actions
Joystick buttons can also be configured to run more general functionalities, like modifying the interface or sending a single MAVLink message. These options can be provided (or defined) using Cockpit's Action system.
#Data Lake Variables
When it is useful for the button state to represent a value within some other functionality, the button can be configured to control a numeric or boolean variable within Cockpit's data-lake system. Relevant variables can be created as part of Input Widget configuration, or by adding a new persistent variable in the data lake.
Variables which are sourced externally (e.g. MAVLink message fields, and Cockpit usage statistics), as well as compound variables, which depend on other variables, cannot be overwritten by the joystick, so are filtered out of the available options.
#Modifier Keys
Modifiers allow sacrificing one button in order to add an extra functionality slot for every non-modifier button. Pressing a button while a modifier is held runs the modified function instead of the regular button function.
Currently only a single modifier is available (Shift). As a special case, when a shift functionality slot is
configured as a MAVLink MANUAL_CONTROL protocol function, it will activate BTNn_SFUNCTIONs rather than the
regular BTNn_FUNCTIONs, which allows additional MANUAL_CONTROL button functions to be configured. Functions
from other joystick protocols are unaffected, and can be arbitrarily assigned to regular or modifier-based
functionality slots.
#Other
Currently only used for the "No Function" option, which is used when a button or axis input is unmapped.
#Custom Joysticks
Adding support for a new joystick type requires providing an SVG file with particular element IDs (for function mapping, and so the elements can be dynamically filled when the corresponding button is pressed):
path_b*is used for different button numbers, numbers can currently be from 0-31- the buttons can be remapped during Cockpit configuration by clicking on the displayed button in the SVG display and clicking the "Remap" button followed by pressing the actual joystick button that matches the displayed location
path_b10/b11are currently used to denote the joystick axes- 10 indicates the left side joystick, 11 indicates the right side one
- in future there will be support for arbitrary axes and sliders
- New SVGs currently need to be added to the code, but in future will be possible to add/import dynamically
Once Cockpit has a suitably registered SVG file for the desired joystick type, it is possible to perform the relevant "Joystick mapping", from the button IDs presented by the physical joystick to labels that match the corresponding buttons in the SVG file. This mapping can then be exported to the computer and/or the vehicle, and imported to new Cockpit instances/devices later.
#Video Streams Configuration
Available video streams and connection settings can be viewed and configured:

- Set a custom name for each recognised video stream
- Edit by double clicking the existing name, or clicking the pencil icon
- Limit which IP address(es) are allowed to be used for video streaming
- This is particularly recommended if there are multiple available connection routes (e.g. if there is a wired route through a tether, as well as a wireless connection, you should select the tether IP and remove the wireless one to avoid video stuttering from transmission over wifi).
- By default wired connection pathways (e.g. an ethernet tether or USB cable) are assigned as the preferred pathway, if they are detected
- Limit which network protocol(s) are allowed for video streaming
- UDP can be lower latency but may drop frames, while TCP enforces frame ordering at the cost of some increased latency and jitter
- Customise the stream pipeline's jitter buffer duration
- Higher values increase stream latency, but can compensate for network jitter and display the stream with a smoother / more consistent duration between frames
- Configure Video Library behaviours
- Recorded video chunks can be combined automatically at the end of the recording session (which may take a while on low end hardware), or can be left for the user to trigger manually when they want to download a specific video
- Videos and subtitle files can be zipped together to download them as a single compressed archive, but the zipping process can take a while if the files are large, which may be inconvenient
- Access the Video Library from here, or from any video recorder mini-widget
#Telemetry
Telemetry values received by Cockpit can be displayed live, but also recorded into video subtitle files.
Available variables can be dragged and dropped into the relevant screen region to specify where they show up in the generated subtitle file, or removed from recording by pressing the X beside the variable name in the grid. It is also possible to style the subtitle file using the Overlay Options expandable section, and specify the subtitle update rate in the Settings section.

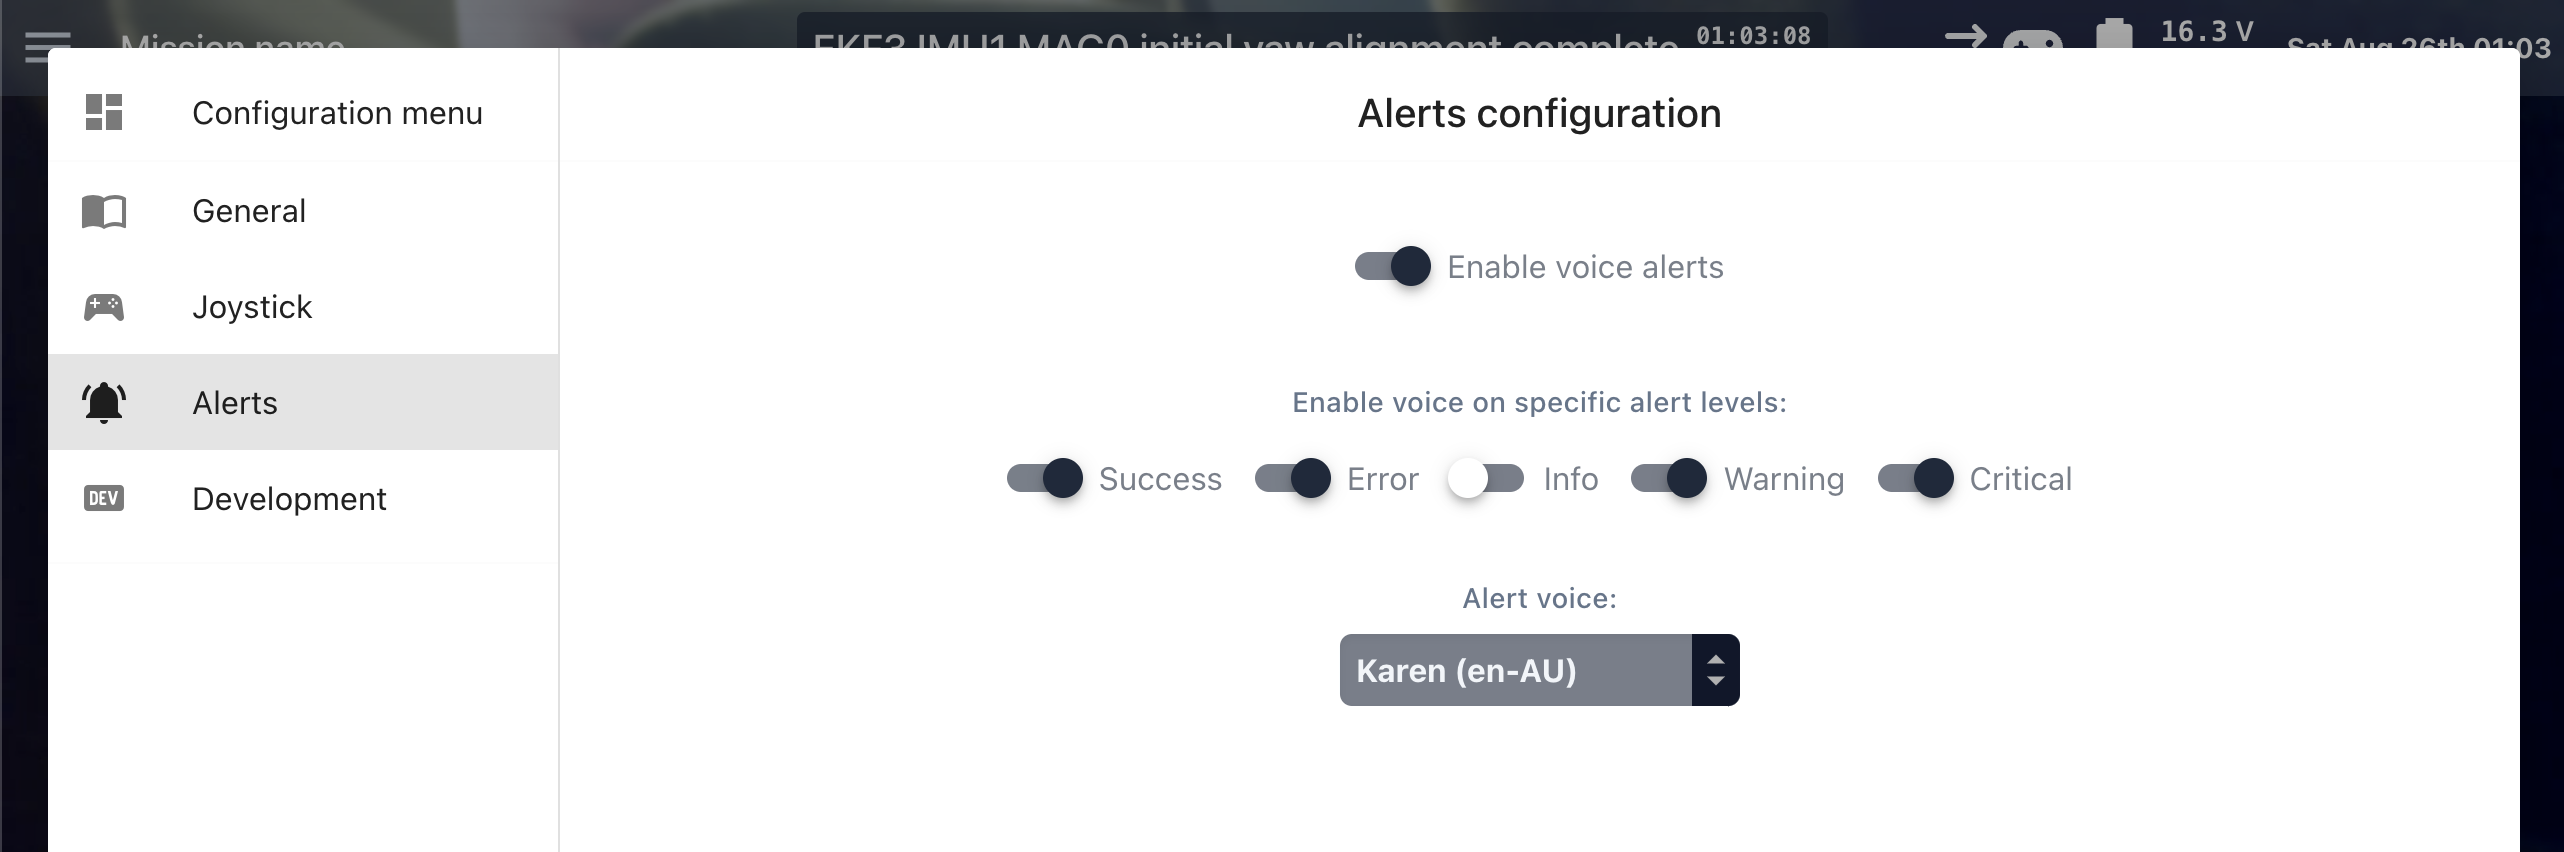
#Alerts
Cockpit includes a variety of alerts during operation, and provides settings for which ones (if any) should be read using text to speech technology:
#Development / Troubleshooting
These features help with error tracking and troubleshooting, so in normal use can generally be left alone:

- Development mode turns on a debugging overlay that displays relevant information about the visible widgets
- Dev info blur level determines how much the underlying interface is blurred when in dev mode
- BlueOS settings sync allows synchronising Cockpit's settings to the connected vehicle (if it is running BlueOS)
- This helps with keeping the same settings and profiles if that vehicle is then later controlled using a different device running Cockpit
- Usage statistics telemetry can be automatically sent to the Cockpit development team to help identify and
track common errors and performance issues across global Cockpit usage
- See the Data Privacy page for more details
- System logging creates application logs that can be checked or shared with
developers to help debug issues
- If system logs are disabled then messages are sent to the browser/application console instead, which may reduce performance
#Missions and Safety
While autopilots often include built in failsafes and pre-arming checks, it can also be useful for the operator's interface to require explict confirmation before a safety-related or mission critical action is even sent to the vehicle.
Depending on the interface configuration, some interfaces may make it easy to accidentally press a button or slider on the screen that has an undesirable outcome, so it is possible to require these actions to be have an extra confirmation step:

A confirmation slider is shown, which can either be dragged to completion in the interface, or confirmation can
be provided by pressing and holding a joystick button that is configured to the hold_to_confirm Action:

💡 Actions that are triggered by joystick button presses (instead of interface elements) do not require extra confirmation - it is assumed that the press of a dedicated button is enough confirmation.
If you want a similar feature for joystick button functions, consider assigning them to a modifier-based slot, to require a modifier key to be held down before the function can be triggered.
#Default Map Position
For convenience, it is possible to persistently set the default map position and zoom level:

This can be useful before a specific mission, or just to get the map to start near typical operating regions.
#Cockpit Actions
Cockpit's Action system provides a set of functionalities that can be triggered from any of Cockpit's supported input sources (e.g. joystick buttons, interface elements, other Actions, etc).
#Default Actions
There are some predefined Actions built into Cockpit for convenience, including:
go_to_next_viewgo_to_previous_viewtoggle_bottom_bartoggle_top_bartoggle_full_screenhold_to_confirmstart_recording_all_streamsstop_recording_all_streamstoggle_recording_all_streamsmavlink_armmavlink_disarm
#Custom Actions
It is also possible to define (and export or import) your own custom Actions, with a few different approaches:

💡 The "Name" and "Type" headings in the table can be clicked on to choose the sort order.
💡 Action definitinos can make use of dynamic Data Lake variable values by referring to their IDs in double braces (e.g.
{{ data-lake-variable-id }}). These can be modified during operation, most easily using Input Widgets or joystick buttons.
- MAVLink Message Actions are the most confined, and allow sending arbitrary MAVLink messages and commands to the vehicle and any other components in your MAVLink system

- HTTP Request Actions can send arbitrary HTTP requests, including custom URL parameters, headers,
and a JSON body
- These are best for basic communication with arbitrary APIs

- JavaScript Actions are a blank canvas, with all the possibilities (but also the complexities) of programming your own functionalities

Existing custom Actions can be edited, run manually (to test them), exported, or deleted. They can also be linked to changing variables and/or time periods to trigger automatically:

💡 More detailed breakdowns and examples will be coming in future.
#Status and Recordings
#Video Library
- Allows processing and previewing video recordings, and downloading them with corresponding subtitle files
- It is possible to select and act on multiple recordings at once, including downloading or deleting as a batch
- Selecting multiple files requires either switching to the relevant mode, or doing a long press on the
first file in the batch, or selecting a set of individual files using
CTRL+ClickorCMD+Click(for macOS).
- Selecting multiple files requires either switching to the relevant mode, or doing a long press on the
first file in the batch, or selecting a set of individual files using

#Snapshot Library
- Allows downloading and deleting snapshots

#Telemetry Logs / Subtitle Files
Cockpit can optionally record some of its received telemetry values, which can then be turned into subtitle files when recording videos.
💡 For lower level and more detailed communication/telemetry logs, consider checking the logs and debugging interfaces of your MAVLink router. Relevant information can be found in the MAVLink Endpoints documentation for BlueOS users.
Available variables for logging are determined using the mini-widgets included in a View in the active Profile, including Very Generic Indicator widgets, which can display almost anything Cockpit receives from the vehicle. It is also possible to add custom text values, to include extra metadata like a company name or vehicle operator.
💡 Using a hidden View allows configuring mini-widgets for any variables you want to record but do not want to display during operation.
It is possible to configure the logging frequency, as well as which variables are logged and where they appear in the generated subtitle files using the telemetry settings.
When a video recording completes, a corresponding subtitle file is generated by slicing the raw log from the start to end timestamps of the video.
💡 Recorded video and subtitles are in separate files, so the browser will typically ask for permission to "download multiple files", which must be accepted to get access to the subtitles corresponding to a video recording.
#System/Application Logs
For debugging purposes, Cockpit keeps track of its internal state changes and errors in JSON-based log files, which can be downloaded or deleted from the dev page:

The top right button allows deleting all the old log files as a group.
Downloaded logs can be opened in a standard text editor, and include a sequence of events recorded with a UNIX-style epoch timestamp, together with the event severity level (e.g. debug, log, error, etc), and some kind of related message.
#Alerts
Alerts received from the autopilot (STATUSTEXT), as
well as application notifications (like loss of connection to the vehicle) are displayed in the
alerter mini-widget.
Some alerts can be read aloud on arrival using text to speech technology, which can be configured.
#Mission Planning
For vehicles with a position estimate, Mission Planning mode (in the sidebar) can be used to create basic
autonomous missions, and load a mission from a file.
#Mission Creation
Planning can involve placing individual waypoints and generating basic surveys, including multiple survey regions with manually placed waypoints between them:

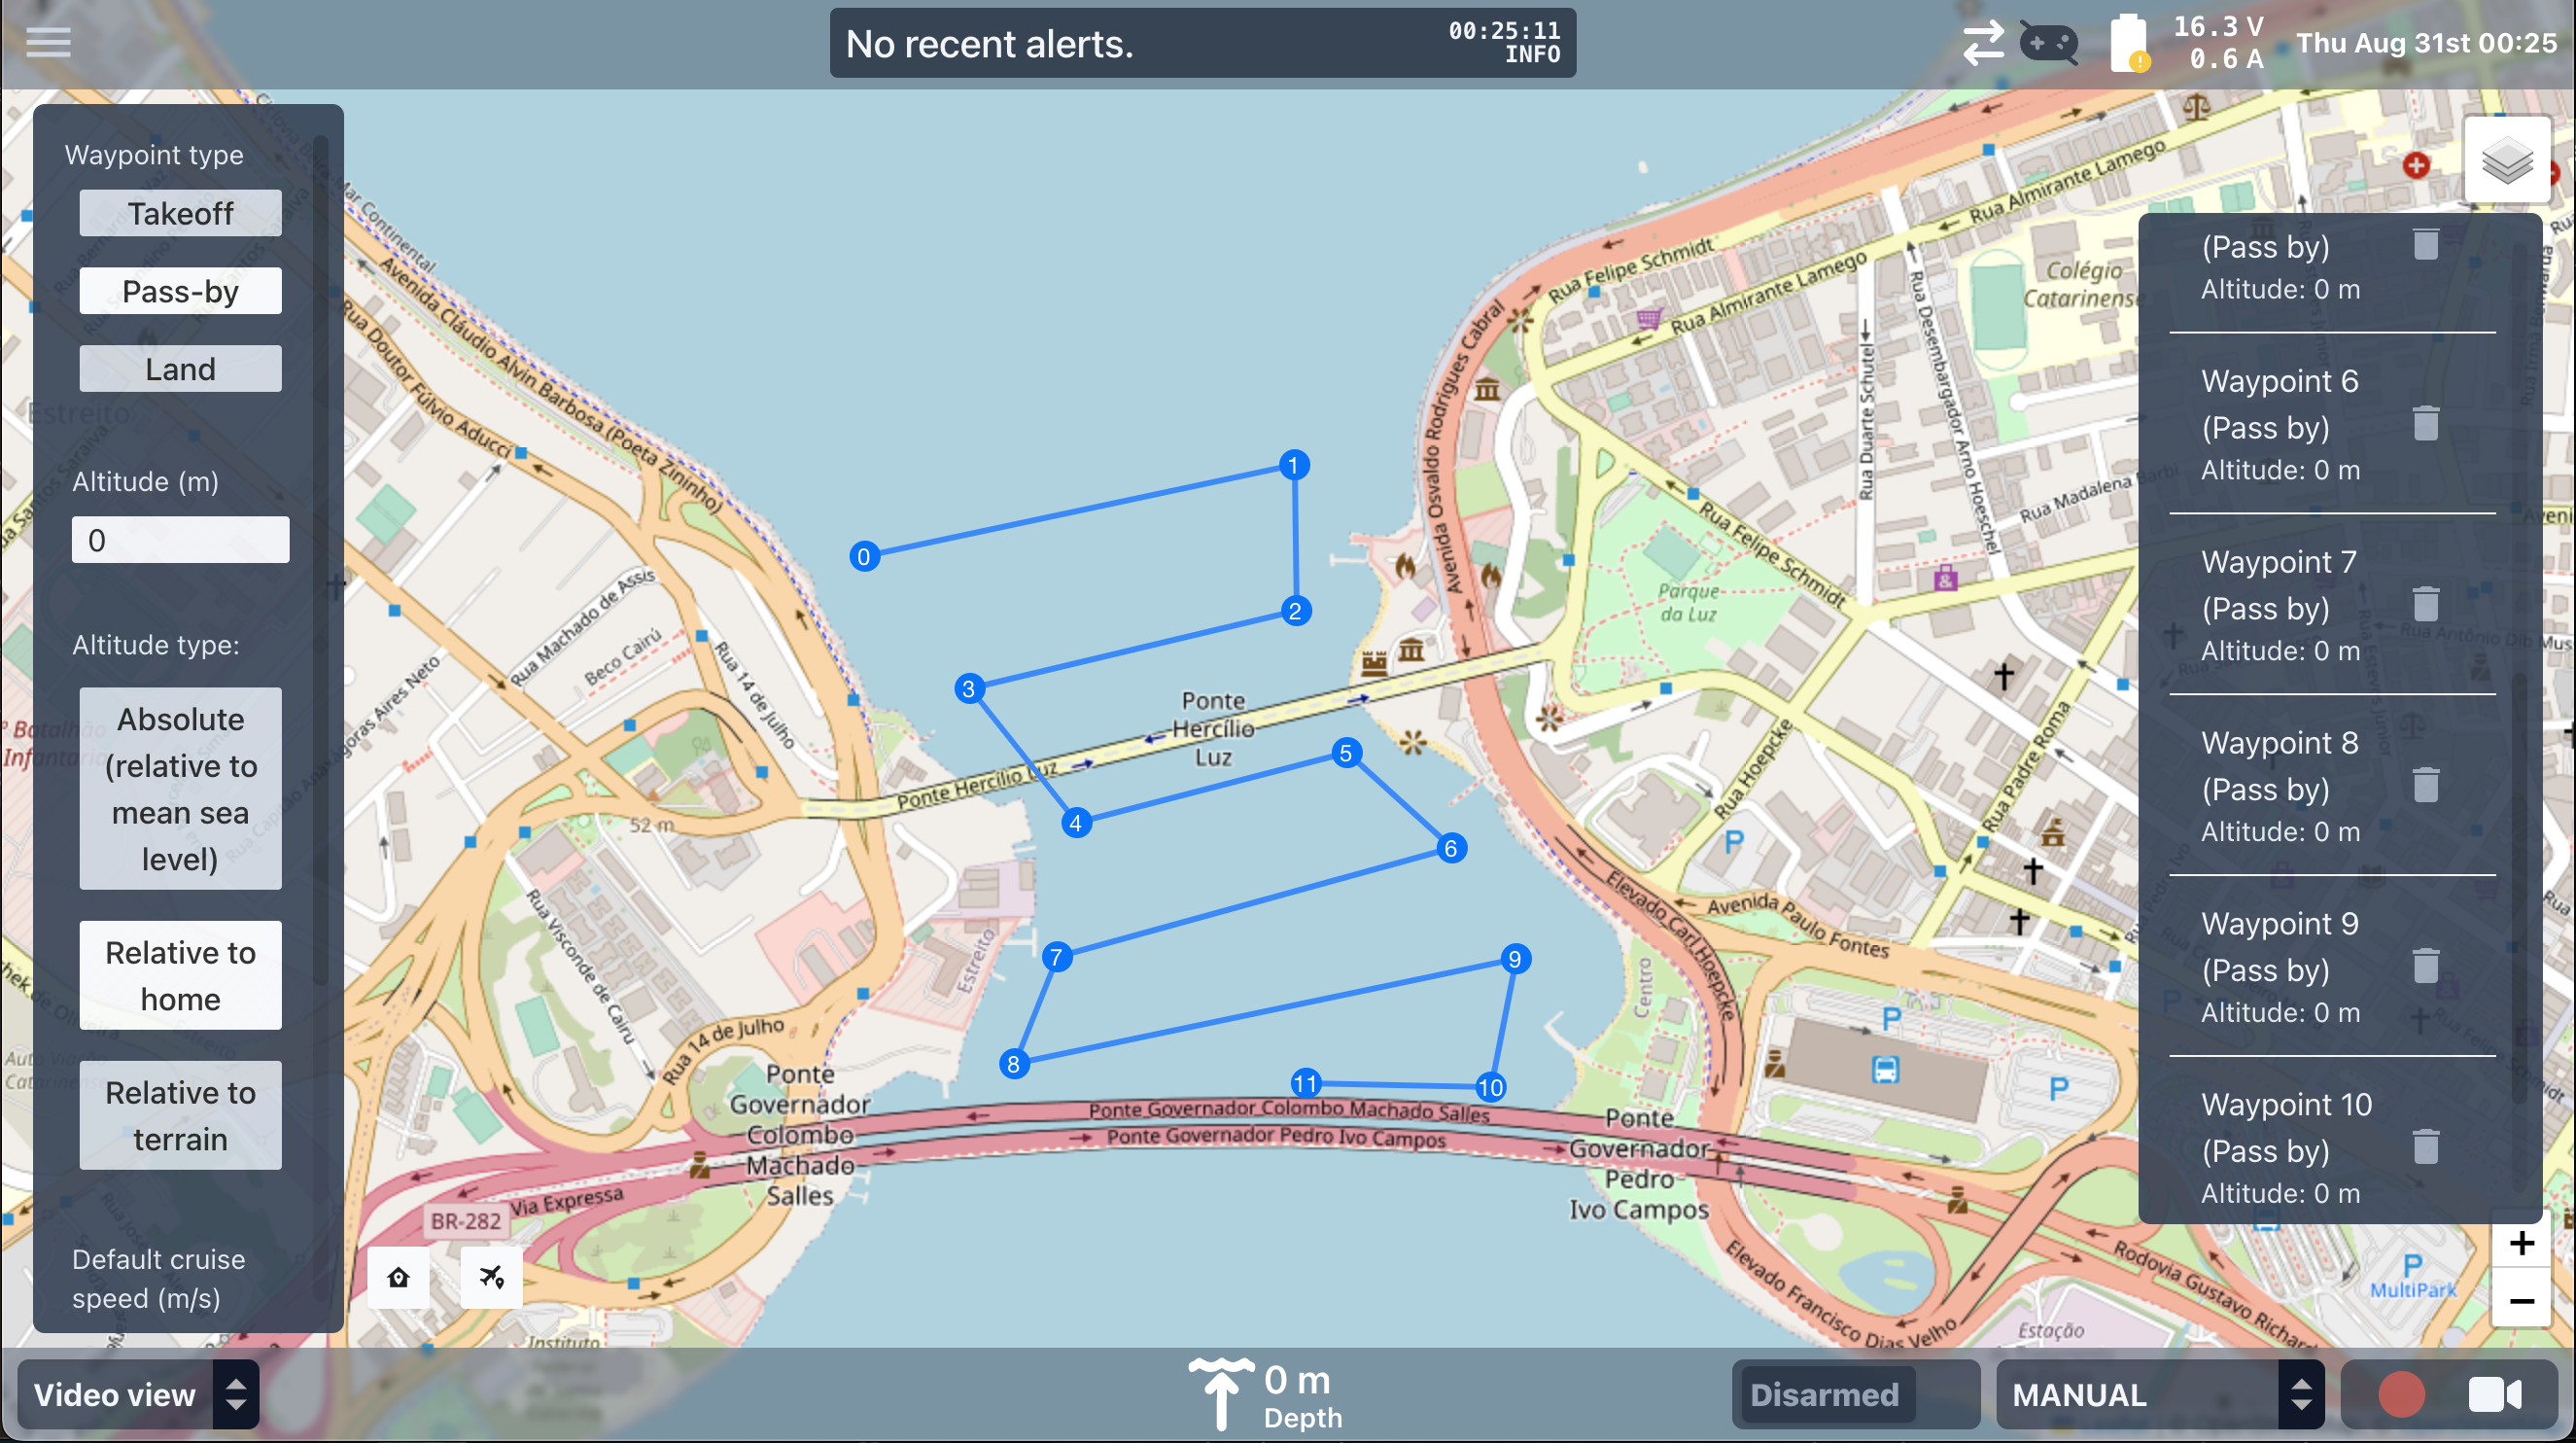
Clicking on a waypoint allows fine adjustments of its position, and configuration of its reference frame:

💡 Waypoints are currently limited to basic motion targets, but will soon be able to trigger custom MAVLink commands and other actions.
Survey generation can be configured with different spacings and scan angles, along with how the waypoints should be generated. For generated paths, right-clicking on a survey polygon allows modifying its scan direction.
#Mission Loading and Control
Once the mission is ready it can be uploaded to the vehicle, or saved to a file for later, before exiting
mission planning via the Flight button in the sidebar:

The mission can be started immediately by entering AUTO mode, or using the play button in the bottom right
corner of a Map widget. If necessary, missions can be manually cleared from an autopilot using the
bin icon at the bottom of the mission creation page.
Powered by Zola and Bluetheme Documentation under CC BY-NC-SA 4.0